Previous Next

Thermostat

REMOVAL AND INSTALLATION

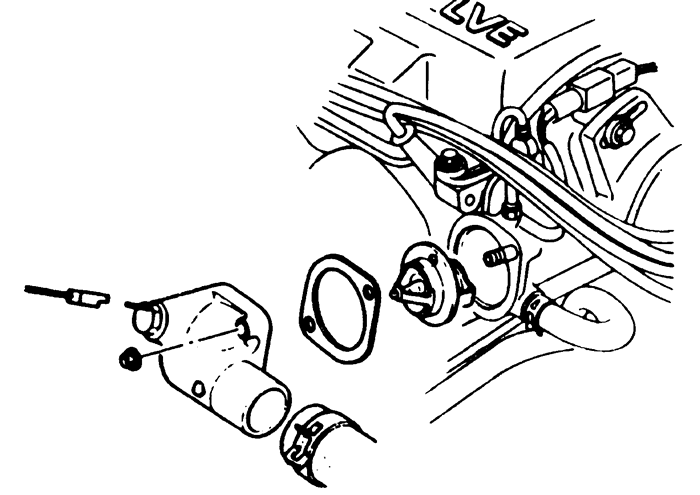
1993-94 323 1.6L (B6E), MX3 1.6L (B6-ZE), Miata 1.6L (B6-ZE), 1.8L (BPD) and Protege 1.8L (BPE, BPD) Engines
  1. Disconnect the negative battery cable. Drain the radiator to below the level of the thermostat.
  2. Disconnect the coolant temperature switch at the thermostat housing.
  3. Remove the upper radiator hose.
  4. Remove the mounting nuts, thermostat housing, thermostat and gasket.

    NOTE: Do not pry the housing off.

    To install:

  5. Clean the thermostat housing and the cylinder head mating surfaces.
  6. Insert the thermostat into the rear cylinder head housing with the jiggle pin at the top. The spring side of the thermostat should face the housing.
  7. Position a new gasket onto the studs with the seal print side facing the rear cylinder housing.
  8. Install the thermostat housing and 2 nuts. Tighten the nuts to 14-22 ft. lbs. (19-30 Nm).
  9. Connect the coolant temperature switch and install the upper radiator hose.
  10. Fill the cooling system. Connect the negative battery cable, start the engine and check for leaks. Check the coolant level and add coolant, as necessary.
    Fig. 1:Thermostat -- 1993-94 323 1.6L (B6E), MX3 1.6L (B6-ZE), Miata 1.6L (B6-ZE), 1.8L (BPD) and Protege 1.8L (BPE, BPD) engines

1993-97 626, MX6 2.0L (FS), 1995 MX3 1.6L (B6-ZE) and 1995-97 Miata 1.8L (BPD), Protege 1.5L (Z5D) and 1.8L (BPD) Engines
  1. Disconnect the negative battery cable. Drain the radiator to below the level of the thermostat.
  2. Remove the air cleaner.
  3. Remove the upper radiator hose.
  4. Remove the housing nut, thermostat housing, thermostat and gasket.

    NOTE: Do not pry the housing off.

    To install:

  5. Clean the thermostat housing and the cylinder head mating surfaces.
  6. Make sure that the thermostat jiggle pin is aligned with the gasket projection.
  7. Install the thermostat to the housing. Align the gasket projection with the opening in the housing. The spring side of the thermostat should face into the housing.
  8. Install the thermostat housing cover. Tighten the mounting bolt to 14-18 ft. lbs. (19-25 Nm).
  9. Install the upper radiator hose.
  10. Install the air cleaner.
  11. Fill, and bleed the cooling system.
  12. Connect the negative battery cable, start the engine and check for leaks. Check the coolant level and add coolant, as necessary.
1993-95 MX3 1.8L (K8) and 1993-97 2.5L 626 and MX6 (KL) Engines
  1. Disconnect the negative battery cable. Drain the radiator to below the level of the thermostat.
  2. Remove the water inlet pipe mounting bolt and remove the pipe.
  3. Remove the engine harness bracket bolt and position the harness aside.
  4. Remove the housing bolt, thermostat housing, thermostat and gasket.

    NOTE: Do not pry the housing off.

    To install:

  5. Clean the thermostat housing and the cylinder head mating surfaces.
  6. Insert the thermostat into the housing with the jiggle pin at the top.
  7. Position a new gasket with the projection facing the same direction as the thermostat jiggle pin.
  8. Install the thermostat housing cover and loosely install the lower bolt. Install the engine harness bracket and loosely install the bolt. Tighten both bolts to 14-18 ft. lbs. (19-25 Nm).
  9. Fill the cooling system. Connect the negative battery cable, start the engine and check for leaks. Check the coolant level and add coolant, as necessary.
1993-95 929 3.0L (JE-ZE) Engines
  1. Disconnect the negative battery cable. Raise and safely support the vehicle and remove the engine undercover.
  2. Drain the cooling system.
  3. Remove the fresh air duct and the air cleaner assembly. Remove the upper radiator hose.
  4. Remove the cooling fan and shroud. Remove the alternator belt and the water pump pulley.
  5. Remove the water bypass hose and the lower radiator hose.
  6. Remove the thermostat housing from the engine. Remove the housing cover and thermostat.

    To install:

  7. Make sure the cover, housing and cylinder block contact surfaces are clean. If the integral thermostat gasket is damaged, replace the thermostat.
  8. Install the thermostat in the cover with the spring facing the thermostat housing. Install the cover on the housing and tighten the bolts to 19 ft. lbs. (25 Nm).
  9. Using a new gasket, install the thermostat housing on the engine. Tighten the bolts to 19 ft. lbs. (25 Nm).
  10. Install the lower radiator hose and water bypass hose to the thermostat housing.
  11. Install the water pump pulley and alternator belt. Adjust the belt tension.
  12. Install the cooling fan and shroud. Tighten the fan nuts to 95 inch lbs. (11 Nm).
  13. Install the air cleaner assembly and fresh air duct. Install the engine undercover and lower the vehicle.
  14. Fill the cooling system. Connect the negative battery cable, start the engine and bring to normal operating temperature. Check for leaks and coolant level.
1995-97 Millenia 2.3L (KJS) and 2.5L (KLD) Engines
  1. Disconnect the negative battery cable.
  2. Drain the radiator to below the level of the thermostat.
  3. Remove the air cleaner housing assembly.
  4. Remove the water inlet pipe mounting bolt and remove the pipe.
  5. Remove the engine harness bracket bolt and position the harness aside.
  6. Remove the housing bolt, thermostat housing, thermostat and gasket.

    NOTE: Do not pry the housing off.

    To install:

  7. Clean the thermostat housing and the cylinder head mating surfaces.
  8. Insert the thermostat into the housing with the jiggle pin at the top. The spring side of the thermostat should face the housing.
  9. Position a new gasket with the projection facing the same direction as the thermostat jiggle pin.
  10. Install the thermostat housing cover and loosely install the lower bolt. Install the engine harness bracket and loosely install the bolt. Tighten both bolts to 14-19 ft. lbs. (19-25 Nm).
  11. Install the air cleaner housing assembly.
  12. Fill the cooling system.
  13. Connect the negative battery cable, start the engine and check for leaks.
  14. Check the coolant level and add coolant, as necessary.
1993-95 RX7 1.3L (13B) Engines
  1. Disconnect the negative battery cable.
  2. Drain the cooling system.
  3. Remove the fresh air duct and the air cleaner assembly.
  4. Remove the coolant hose from the thermostat cover.
  5. Remove the drive belt and remove the air pump.
  6. Remove the upper radiator hose.
  7. Disconnect the coolant level sensor connector.
  8. Remove the thermostat cover and remove the thermostat.

    To install:

  9. Make sure the thermostat cover and engine contact surfaces are clean. Replace the thermostat if the gasket is damaged.
  10. Using a new gasket, install the thermostat in the engine with the spring toward the engine and the jiggle pin at the top.
  11. Install the thermostat cover and tighten the bolts to 95 inch lbs. (11 Nm).
  12. Connect the coolant level sensor connector and the upper radiator hose.
  13. Install the air pump and the drive belt. Adjust the belt tension.
  14. Connect the coolant hose to the thermostat cover.
  15. Install the air cleaner assembly and the fresh air duct.
  16. Fill the cooling system. Connect the negative battery cable, start the engine and bring to normal operating temperature. Check for leaks and coolant level.
 
Previous Next