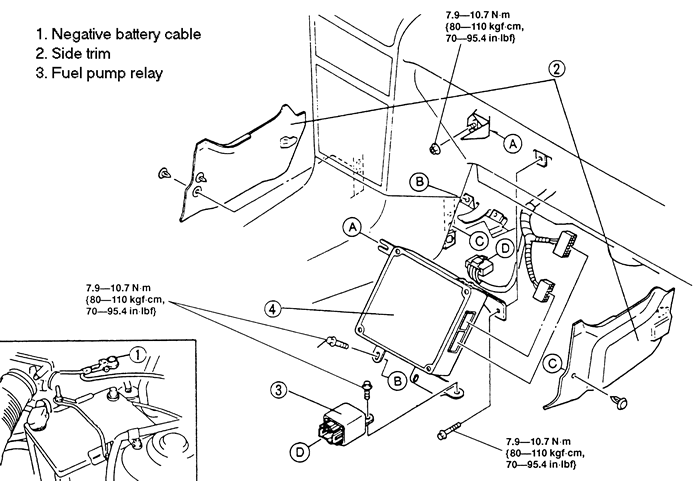
| Fig. 1: Powertrain control module mounting location --
1995 MX3 with 1.6L and 1.8L engines
|
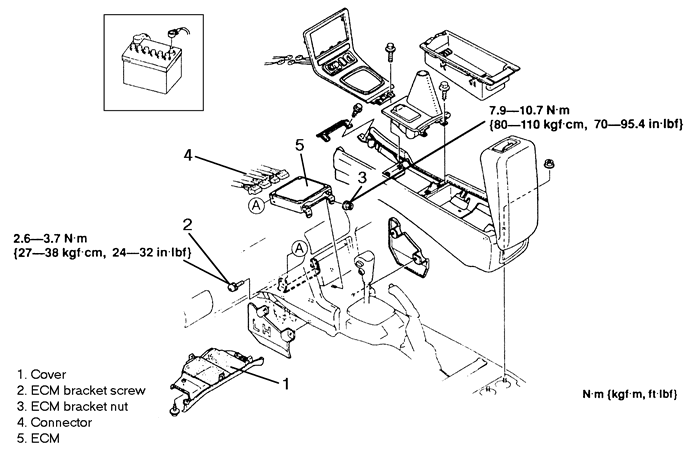
| Fig. 2: Powertrain control module mounting location --
Millenia with 2.3L and 2.5L engines
|
The control module is usually located under the front console.
- Disconnect the negative battery cable.
- Remove the rear console.
- Remove the ashtray.
- On manual transaxles only, remove the shift knob.
- Remove the front console to gain access to the module.
-
Remove the ECM mounting bolts/nuts, and disconnect the module electrical
connectors.
To install:
- Position the module, and install the mounting nuts
and bolts.
- Install the front console.
- If equipped, install the shift knob.
- Install the ashtray.
- Install the rear console.
- Connect the negative battery cable.
The control module is usually located behind the center console side
trim panels.
- Disconnect the negative battery cable.
- Remove both center console side trim panels to gain
access to the module.
- Remove the module mounting bolts/nuts, and disconnect
the module electrical connectors.
- Installation is the reverse of the removal procedure.
The control module is usually located behind the center console.
- Disconnect the negative battery cable.
- Remove the center console assembly, by pulling it
forward to disengage the six clips, to gain access to the module.
- Remove the module mounting bolts/nuts and disconnect
the module electrical connectors.
- Installation is the reverse of the removal procedure.
The control module is usually located behind the center console.
- Disconnect the negative battery cable.
- Remove the mounting nuts for the rear console box,
and remove the rear console box.
- Remove the center panel and the left and right undercovers.
- Remove the module cover.
- Remove the module bracket screw and nut.
- Remove the rear heater duct fasteners.
- Separate the rear heater duct to both sides.
-
Disconnect the module connector, and remove the module from the vehicle.
To install:
- Position the module, and engage the connector.
- Assemble the rear heater duct, and attach the fasteners.
- Install the module bracket nut and screw.
- Install the left and right undercovers.
- Install the center panel.
- Install the rear console box.
- Connect the negative battery cable.
The control module is usually located behind the passenger side scuff
plate.
- Disconnect the negative battery cable.
- Remove the passenger side scuff plate and front side
trim panels to gain access to the module.
- Remove the module mounting bolts/nuts, and disconnect
the module electrical connectors.
- Installation is the reverse of the removal procedure.
The control is usually located behind the center console driver and
passenger side panels.
- Disconnect the negative battery cable.
- Remove the passenger and driver side cover walls
from the center console unit.
- Remove the module mounting bolts/nuts and disconnect
the module electrical connectors.
- Installation is the reverse of the removal procedure.
The control module is usually located beneath the passenger seat or
floor mat.
- Disconnect the negative battery cable.
- On the 1993 models, move the passenger seat forward.
- On the 1994-97 models, lift the passenger side floor
mat.
- Remove the module protective cover.
- Remove the module mounting bolts/nuts and disconnect
the electrical connectors.
- Installation is the reverse of the removal procedure.