Previous Next

REAR SUSPENSION

Strut

REMOVAL AND INSTALLATION

1993-94 323, MX3 and Protege
  1. As required, remove the side trim panels from the inside of the trunk or the rear seat and trim.
  2. If equipped with Adjustable Shock Absorber (ASA) system, disconnect the wiring and remove the cap. Loosen and remove the top mounting nuts from the strut mounting block assembly.
  3. Raise and safely support the vehicle and remove the rear wheels. The suspension will drop when the weight lifts off the wheels.
  4. Unclip the brake line or wiring retainers as required and unbolt the bottom strut mount. Remove the strut.
  5. Installation is the reverse of removal. Torque the following:
    1. Lower strut mount bolts -- 86 ft. lbs (117 Nm).
    2. 323 trailing arm bolt -- 50 ft. lbs. (68 Nm).
    3. 323 upper strut mount nuts -- 22 ft. lbs. (29 Nm).
    4. MX-3 upper strut mount nuts -- 46 ft. lbs. (63 Nm).
1995-97 Protege
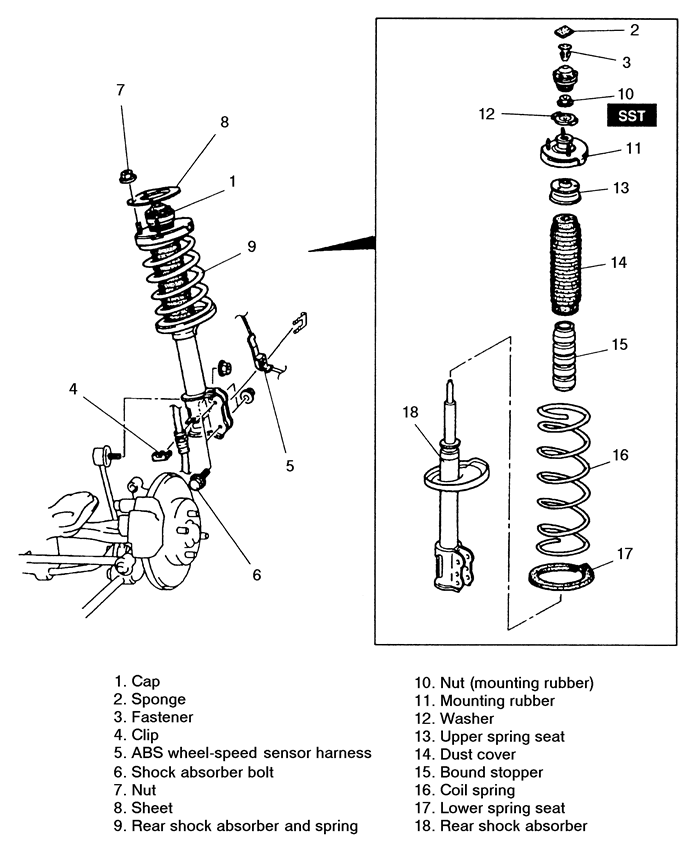
Fig. 1:Rear strut and related components (exploded view) -- 1995-97 Protege

  1. Remove the trunk side trim.
  2. Raise and safely support the vehicle and remove the rear wheels. The suspension will drop when the weight lifts off the wheels.
  3. Unclip the brake line and wiring retainers (if equipped with ABS), and unbolt the bottom strut mount.
  4. Remove the upper strut mount nuts, and remove the strut from the vehicle.
  5. Disassemble the strut to remove the coil spring as follows:
    1. Secure the mounting rubber in a vise.
    2. Remove the cap. Loosen the piston rod nut several turns, but do not remove it.
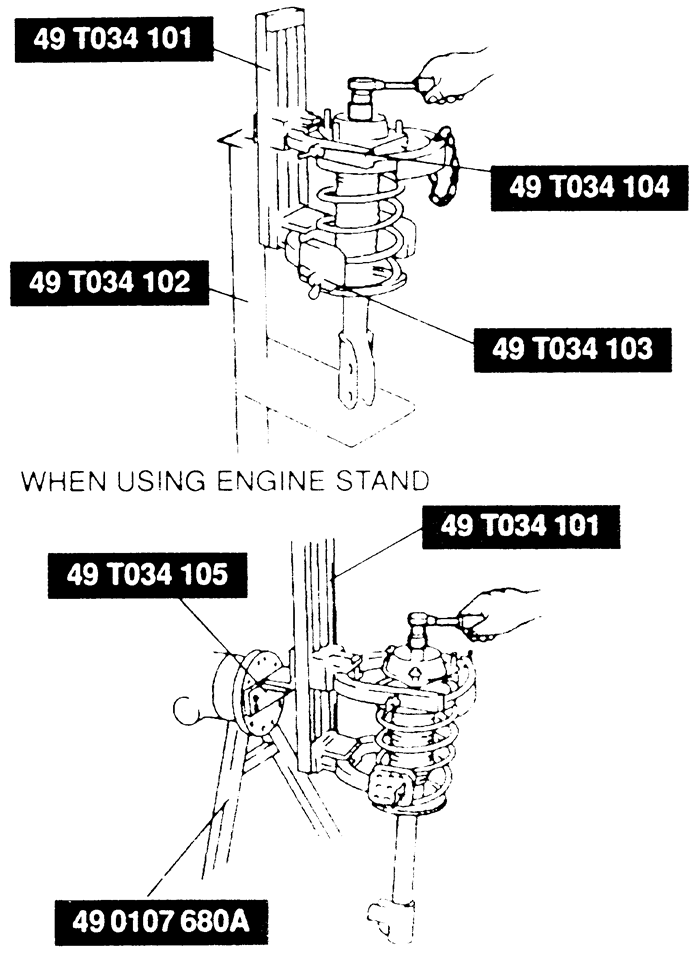
    3. Using a coil spring compressor, (Mazda special tool 49 T034 1A0 or equivalent) secure the strut assembly.
    4. Compress the coil spring and remove the nut.
    5. Remove the mounting rubber, upper spring seat, upper rubber spring seat, dust cover, bound stopper and the coil spring.
      Fig. 2:Compressing the strut -- 1995-97 Protege

      To install:

  6. If the coil spring was removed, assemble as follows:
    1. Temporarily assemble the upper rubber spring seat, upper spring seat and coil spring to the strut. Mark their locations on the strut for proper reassembly.
    2. Align the marks of the upper spring seat and coil spring. Protect them with a shop rag, and remove them from the strut.
    3. Using the same coil spring compressor tool that disassembled the strut, compress the spring.
    4. Install the bound stopper and dust cover to the strut.
    5. Install the strut into the coil spring, fitting the end of the coil into the step of the lower seat.
    6. Install the mounting rubber. Tighten the piston rod nut several turns.
    7. Remove the compressor tool, and verify that the coil spring is seated on the step of the lower seat.
    8. Secure the mounting rubber in a vise, and tighten the nut to 41-49 ft. lbs. (55-67 Nm). Install the cap.
  7. Position the strut in the strut tower and install the upper mounting nuts. Tighten the nuts to 34-46 ft. lbs. (47-62 Nm).
  8. Install the lower strut mount bolt, and tighten to 69-93.3 ft. lbs. (94-126 Nm).
  9. Replace the ABS harness (if equipped), and the brake line clip.
  10. Install the wheel assemblies, and lower the vehicle.
  11. Install the trunk side trim.
1995 MX3
  1. Remove the rear speaker cover and seat belt.
  2. Raise and safely support the vehicle and remove the rear wheels. The suspension will drop when the weight lifts off the wheels.
  3. Unclip the brake line and wiring retainers (if equipped with ABS), and unbolt the bottom strut mount.
  4. Remove the upper strut mount nuts, and remove the strut from the vehicle.
  5. Disassemble the strut to remove the coil spring as follows:
    1. Secure the mounting rubber in a vise.
    2. Remove the cap. Loosen the piston rod nut several turns, but do not remove it.
    3. Using a suitable coil spring compressor (Mazda special tools: 49 T034 001, 49 T034 002, 49 T034 003 and 49 T034 004 or equivalent) secure the strut assembly.
    4. Compress the coil spring and remove the nut.
    5. Remove the mounting rubber, upper spring seat, upper rubber spring seat, dust cover, bound stopper and the coil spring.

      To install:

  6. If the coil spring was removed, assemble as follows:
    1. Temporarily assemble the upper rubber spring seat, upper spring seat and coil spring to the strut. Mark their locations on the strut for proper reassembly.
    2. Align the marks of the upper spring seat and coil spring. Protect them with a shop rag, and remove them from the strut.
    3. Using the same coil spring compressor tool that disassembled the strut, compress the spring.
    4. Install the bound stopper and dust cover to the strut.
    5. Install the strut into the coil spring, fitting the end of the coil into the step of the lower seat.
    6. Install the mounting rubber. Tighten the piston rod nut several turns.
    7. Remove the compressor tool, and verify that the coil spring is seated on the step of the lower seat.
    8. Secure the mounting rubber in a vise, and tighten the nut to 41-49 ft. lbs. (55-67 Nm). Install the cap.
  7. Position the strut in the strut tower and install the upper mounting nuts. Tighten the nuts to 34-46 ft. lbs. (47-62 Nm).
  8. Install the lower strut mount bolt, and tighten to 76-93 ft. lbs. (103-126 Nm).
  9. Replace the ABS harness (if equipped), and the brake line clip.
  10. Install the wheel assemblies, and lower the vehicle.
  11. Install the rear seat belt and speaker cover.
1993-97 626 and MX6
  1. Remove the side trim panels from the inside of the trunk, or the rear seat and trim.
  2. Raise and safely support the vehicle and remove the rear wheels. The suspension will drop when the weight lifts off the wheels.
  3. Unclip the brake line and wiring retainers (if equipped with ABS), and unbolt the bottom strut mount.
  4. Remove the upper strut mount nuts, and remove the strut from the vehicle.
  5. Disassemble the strut to remove the coil spring as follows:
    1. Secure the mounting rubber in a vise.
    2. Remove the cap. Loosen the piston rod nut several turns, but do not remove it.
    3. Using a suitable coil spring compressor (Mazda special tools: 49 T034 001, 49 T034 002, 49 T034 003 and 49 T034 004 or equivalent) secure the strut assembly.
    4. Compress the coil spring and remove the nut.
    5. Remove the mounting rubber, upper spring seat, upper rubber spring seat, dust cover, bound stopper and the coil spring.

      To install:

  6. If the coil spring was removed, assemble as follows:
    1. Temporarily assemble the upper rubber spring seat, upper spring seat and coil spring to the strut. Mark their locations on the strut for proper reassembly.
    2. Align the marks of the upper spring seat and coil spring. Protect them with a shop rag, and remove them from the strut.
    3. Using the same coil spring compressor tool that disassembled the strut, compress the spring.
    4. Install the bound stopper and dust cover to the strut.
    5. Install the strut into the coil spring, fitting the end of the coil into the step of the lower seat.
    6. Install the mounting rubber. Tighten the piston rod nut several turns.
    7. Remove the compressor tool, and verify that the coil spring is seated on the step of the lower seat.
    8. Secure the mounting rubber in a vise, and tighten the nut to 66-86 ft. lbs. (90-116 Nm). Install the cap.
  7. Position the strut in the strut tower and install the upper mounting nuts. Tighten the nuts to 33-46 ft. lbs. (47-62 Nm).
  8. Install the lower strut mount bolt, and tighten to 69-96 ft. lbs. (94-116 Nm).
  9. Replace the ABS harness (if equipped), and the brake line clip.
  10. Install the wheel assemblies, and lower the vehicle.
  11. Replace any removed trim from the trunk and rear seat area.
1993-95 929
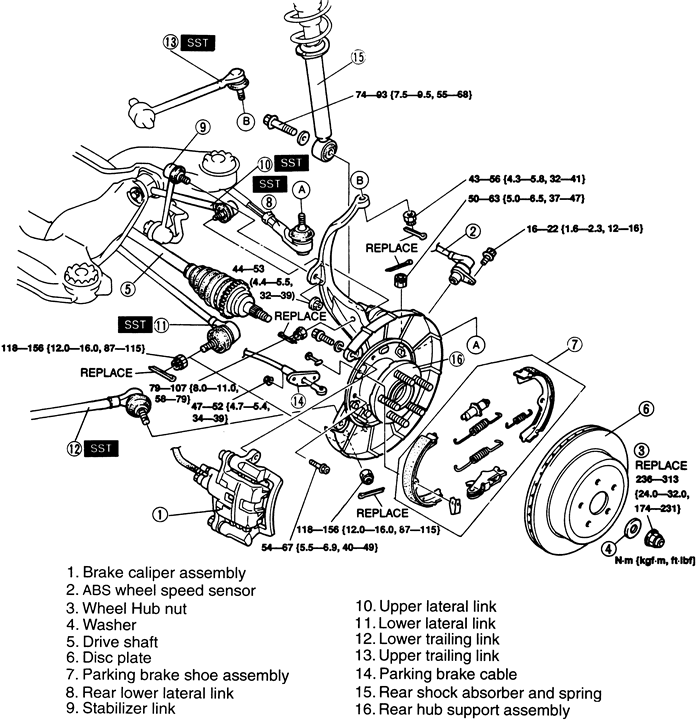
Fig. 3:Exploded view of rear suspension components -- 1993-95 929

  1. Remove the side trim panels from the inside of the trunk.
  2. Remove the rear seat belt cover.
  3. Loosen and remove the top mounting nuts from the strut mounting block assembly.
  4. Raise and safely support the vehicle and remove the rear wheels. The suspension will drop when the weight lifts off the wheels.
  5. Unbolt the bottom strut mount. Remove the strut.
  6. To remove the coil spring from the strut assembly:
    1. Safely secure the assembly in a vice. Loosen the piston rod upper nut several turns, but do not remove it.
    2. Assembly special tools 49 0223 640B and 40 G030 641. Compress the coil spring using the tools.
    3. Remove the upper nut, and remove the coil spring.

      To install:

  7. Install the coil spring on the strut assembly using the same special tools used to remove it. Tighten the upper nut in a vice with a final torque of 26-36 ft. lbs. (35-49 Nm).
  8. Install the strut assembly. Torque the upper mount nuts to 34-46 ft. lbs. (47-62 Nm) and the lower mount bolt to 55-68 ft. lbs. (74-93 Nm).
  9. Install the wheels, and lower the vehicle.
  10. Install the rear seat belt cover and the trunk trim panels.
  11. Adjust the rear wheel alignment.
1995-97 Millenia
  1. Raise and safely support the vehicle. Remove the wheel and tire assembly.
  2. Remove the mounting screws and the first aid box. Remove the speaker cover. Pull the speaker cover and rear package front trim upward to disengage the clips and remove the rear package front trim.
  3. Remove the bolt and disconnect the ABS sensor cable.
  4. Disconnect the lower lateral link ball joint.
  5. Matchmark the strut mounts and remove the mounting nuts, then remove the strut assembly.
  6. Remove the cap.

    CAUTION
    Removing the piston rod nut is dangerous. The shock absorber and spring could fly off under tremendous pressure and cause serious injury or death. Secure the shock absorber in a compression tool before removing the piston rod nut.

  7. Install the assembly into a strut compression tool and remove the top mount nut and mount.
  8. Remove the upper spring seat, bound stopper, coil spring and lower spring seat.

    To install:

  9. Assemble the strut assembly and install the damper fork and cap to the strut.
  10. Install the strut assembly.
  11. Install the strut in the strut tower, aligning the marks made during removal. Install the upper mounting nuts and torque to 34-46 ft. lbs. (47-62 Nm). Install the lower mounting nut and bolt and torque to 76-101 ft. lbs. (102-137 Nm).
  12. Connect the lower lateral link ball joint. Torque the nut to 86-115 ft.lbs. (116-156 Nm).
  13. Connect the ABS sensor cable mount, tighten the bolt to 14-18 ft. lbs. (19-25 Nm).
  14. Install the rear package front trim.
  15. Install the wheel and tire assembly and lower the vehicle. Check the front wheel alignment.
1993-97 Miata
  1. Raise and safely support the vehicle and remove the rear wheel(s).
  2. On the left side, remove the fuel filler pipe protector panel.
  3. Remove the bolt from the lower stabilizer bar connecting link.
  4. Loosen the upper arm and adjusting cam nuts.
  5. Remove the upper strut mount nuts and lower mount bolt.
  6. Lower the upper and lower arms to increase clearance. Lift the spring and strut out as an assembly.
  7. To remove the coil spring from the strut assembly:
    1. Safely secure the assembly in a vice. Loosen the piston rod upper nut several turns, but do not remove it.
    2. Assembly special tools 49 G034 101, 102 and 103. Compress the coil spring using the tools.
    3. Remove the upper nut, and remove the coil spring.

      To install:

  8. Install the coil spring on the strut assembly using the same special tools used to remove it. Tighten the upper nut in a vice with a final torque of 24-33 ft. lbs. (32-46 Nm).
  9. Install the strut assembly. Torque the upper mount nuts to 22-27 ft. lbs. (30-36 Nm) and the lower mount bolt to 54-69 ft. lbs. (73-93 Nm).
  10. Tighten the upper arm and adjusting cam nuts.
  11. Connect the control link to the stabilizer bar, and loosely install the mounting bolt.
  12. If removed, install the fuel filler pipe protector panel.
  13. Install the wheel(s), and lower the vehicle.
  14. Tighten the stabilizer link bolt to 27-40 ft. lbs. (37-54 Nm).
  15. Adjust the rear wheel alignment.
1993-95 RX7
  1. Raise and safely support the vehicle. Remove the rear wheel and tire assembly.
  2. Remove the nut and disconnect the stabilizer bar.
  3. Remove the strut upper mount nuts.
  4. Remove the rear upper strut bar.
  5. Remove the nut and stopper rubber at the top of the strut. Remove the strut and insulator.

    To install:

  6. Install the insulator on the strut so the notches face the studs.
  7. Install the strut so that the identification paint mark at the bottom of the strut faces rearward.
  8. Install the stopper rubber and nut. Tighten to 24-33 ft. lbs. (32-46 Nm).
  9. Install the upper strut bar, then install the strut upper mount nuts. Tighten to 34-46 ft. lbs. (47-62 Nm).
  10. Slide the stabilizer bar link through the control arm and the strut. Install the nut and tighten the 69-81 ft. lbs. (94-110 Nm).
 
Previous Next