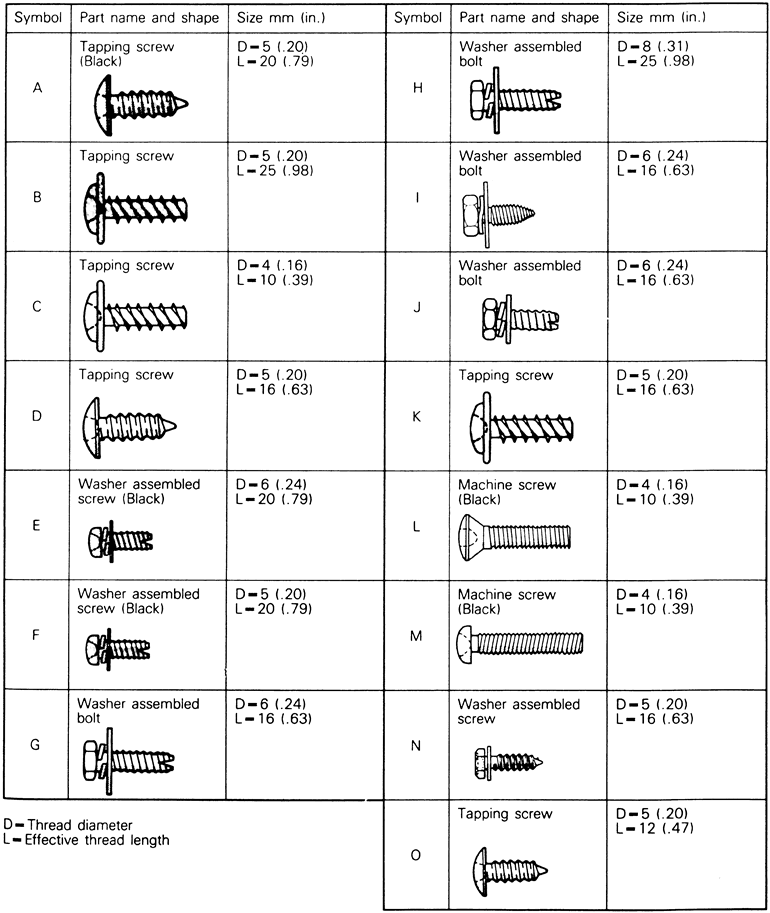
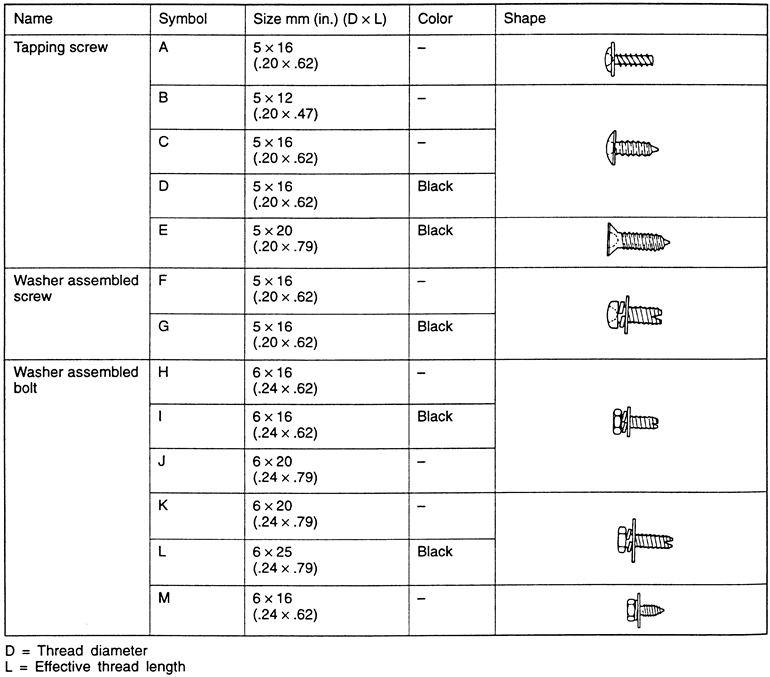
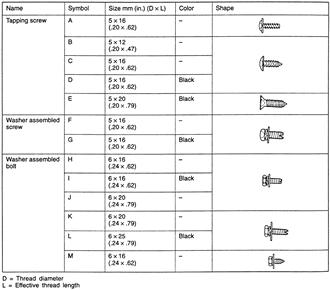
For installation of the instrument panel, different types of fasteners were
used. During installation, it is important that these fasteners are installed
in their original locations. To aid in this, the specific fasteners and their
positions are referenced by letters in the exploded views of the instrument
panel which follow.
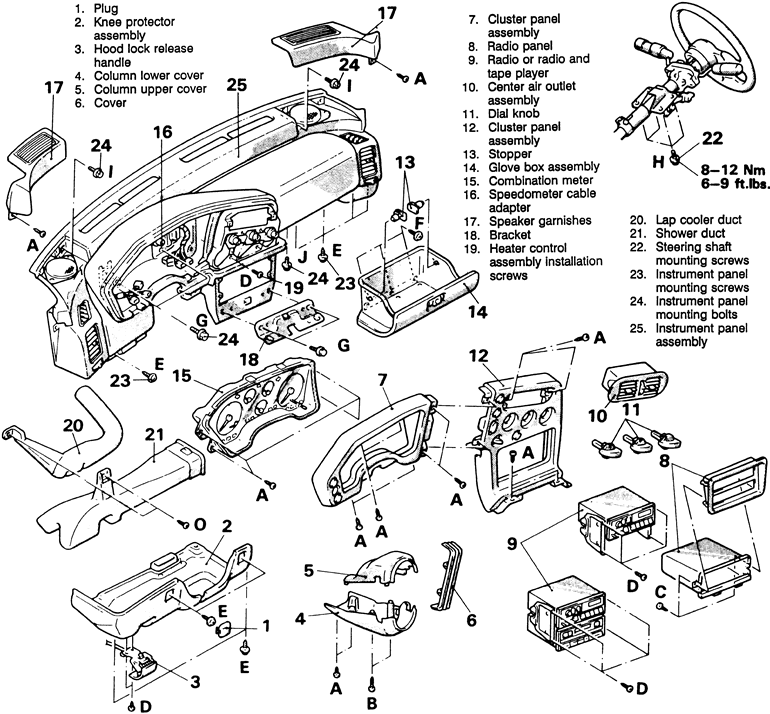
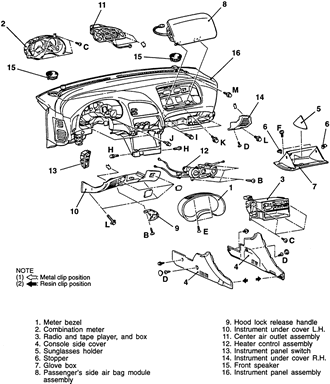
| Fig. 1: Exploded view of the instrument panel and related
components — 1990–94 vehicles
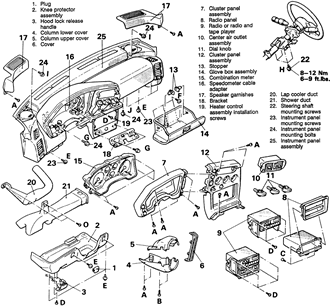
|
| Fig. 2: The instrument panel retainers should be installed
in the positions from which they were removed

|
- Disconnect the negative battery cable.
- Remove the floor console.
- The fasteners for the knee protectors are covered by plugs. Remove the plugs
and the screws from the knee protector assembly. Remove the assembly from
the vehicle.
- Remove the retainer and the hood lock release handle from the vehicle.
- Remove the steering column upper and lower covers.
- Remove the retainers from the cluster panel assembly and remove from the
vehicle.
- Remove the radio trim plate. Using a plastic trim tool, carefully pry the
lower part of the radio panel outward and remove it from the console.
- Remove the radio retainers and the radio from the console. Disconnect the
electrical harness and the antenna lead from the radio and remove it from
the vehicle.
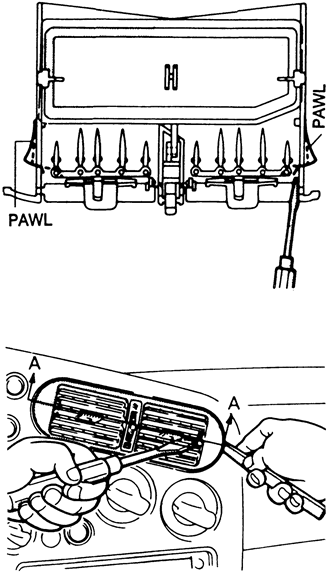
- Remove the center air outlet assembly. While depressing the locking pawls
of the center air outlet assembly with a small flat-bladed prytool, remove
the center air outlet assembly by prying outward with plastic trim tool.
| Fig. 3: Use a small prytool to press the locking
pawls, then pry the center air outlet off
|
- Remove the screw retainers from each dial knob on the center cluster. Gently
pull the dial knobs from the center cluster panel assembly.
- Remove the fasteners and the cluster panel assembly from the vehicle. Disconnect
the harness connectors as required.
- Remove the stoppers from inside the glove box assembly. Remove the retainers
and the glove box from the vehicle.
- Remove the retainers from the combination meter. Pull the meter out slightly.
Disconnect the electrical connections from the combination meter.
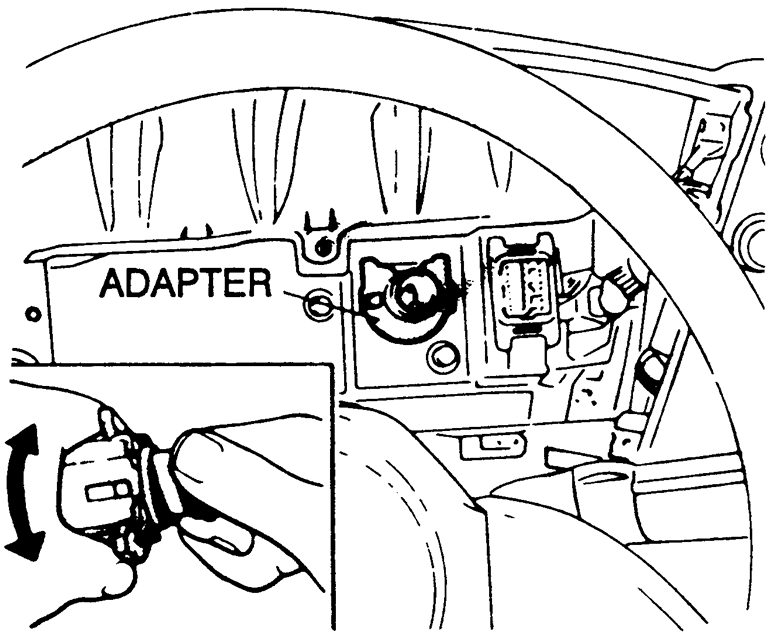
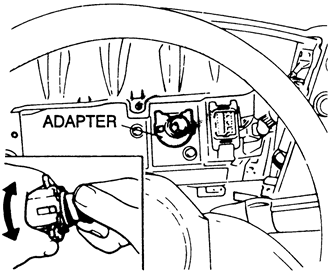
- Disconnect the speedometer cable from the combination meter as follows:
- Detach the speedometer cable from the transaxle assembly.
- Pull the speedometer cable slightly toward the vehicle interior.
- Release the cable lock by turning the adapter to the left or right,
and then remove the adapter.
| Fig. 4: Removing the speedometer cable adapter
|
- Remove the right and left speaker covers. Disconnect and remove the speakers
from the instrument panel assembly.
- Remove the heater control assembly retaining screws and disconnect the harness
connectors. Remove the heater control assembly from the vehicle.
- Remove the lap cooler duct and the shower duct taking note of their orientation.
- Remove the steering shaft mounting bolts and allow the steering wheel to
rest on the front seat cushion. Make sure no harness wires or connections
are being pulled or stretched.
- Remove the instrument panel retaining bolts, label and disconnect all electrical
harness connectors. Remove the instrument panel from the vehicle. Disassemble
components as required.
To install:
- Install the instrument panel into the vehicle, reconnect all harness connections
and install retaining bolts. Before installing bolts, make sure the electrical
harness wires were not pinched during instrument panel installation.
- Raise the steering shaft into position and install the mounting bolts. Tighten
the bolts to 9 ft. lbs. (12 Nm).
- Install the lap cooler duct and the shower duct in the same position as
removed. Install the mounting screw to hold in position.
- Install the heater control assembly, making sure to reconnect all connections
prior to installation.
- Reconnect both front speakers to the radio harness and install into instrument
panel. Install the speaker garnishes.
- Reconnect the speedometer cable to the combination meter. Make sure the
cable locks in position on the back of the meter assembly.
- Install the combination meter into the instrument panel and secure in place.
Reattach the speedometer cable to the transaxle assembly.
- Install the glove box assembly and door stops.
- Install the center panel assembly. Connect the radio equipment harness connections
and install into cluster panel. Secure components in position.
- Install the center air outlet assembly, radio trim panel and dial knobs.
- Install the upper and the lower steering column covers.
- Install the hood lock release handle and the knee protector. Install the
mounting screws and the plugs.
- Install the floor console.
- Connect the negative battery cable and check operation of all gauges and
meters.
- Disconnect the negative battery cable, then wrap the cable in insulated
tape. Wait at least 60 seconds before continuing to allow the SRS system time
to disable.
- Remove the floor console assembly.
- Remove the steering wheel and column cover(s), as outlined in Section 8.
- Unfasten the retaining screws, then remove the meter (instrument cluster)
bezel.
- Remove the mounting screws, then remove the combination meter (instrument
cluster).
- Remove the radio/tape player and/or CD player and the mounting box.
- Unplug the console side cover screw covers, then unfasten the retainers
and remove the side covers.
- Remove the sunglasses holder.
- Remove the glove compartment by pushing the stoppers toward the rear of
the vehicle to unlock them, then remove the glove compartment assembly.
- Remove the passenger side air bag module by unfastening the retaining screws,
accessible through the glove compartment opening, detach the connector and
remove the module.
- Remove the hood lock release handle. The handle is secured with a screw.
- Remove the retainers, then remove the left side instrument panel under cover.
- Remove the center air outlet assembly by carefully prying it out.
- Remove the heater control assembly as outlined in Section 6.
- Remove the instrument panel switch assembly.
- Unfasten the retainers, then remove the right side instrument panel under
cover.
- Remove the front speaker assemblies.
- Unfasten the remaining retainers, tag and detach the necessary connectors,
then remove the instrument panel assembly from the vehicle.
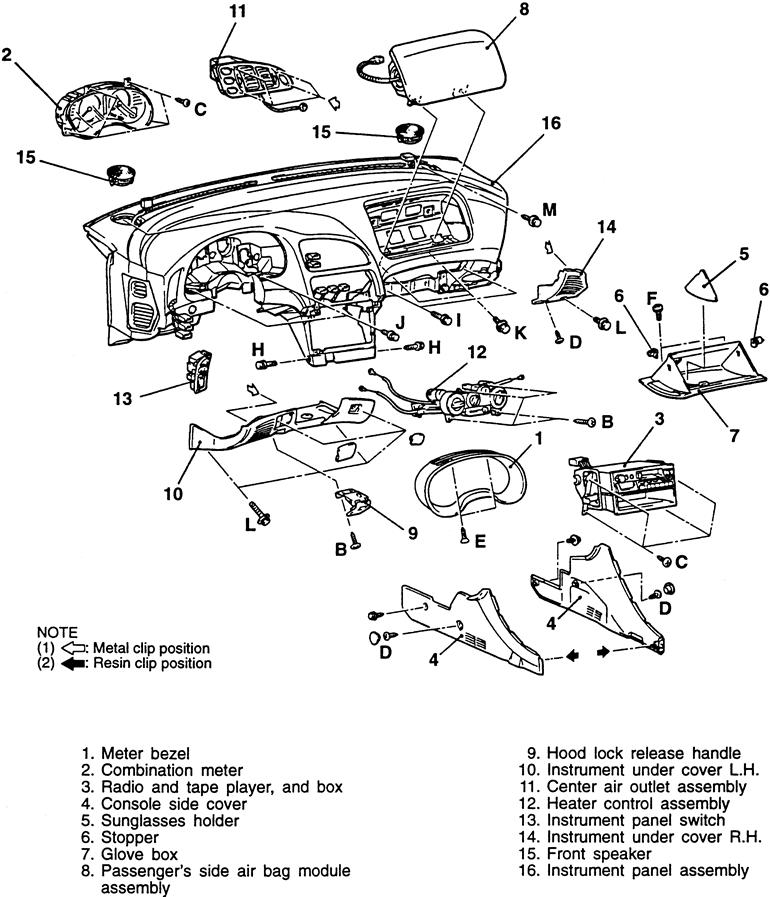
| Fig. 5: Exploded view of the instrument panel and
related components — 1995–98 vehicles
|
- Installation is the reverse of the removal procedure.
- Make sure to install all retainers in their original positions.
| Fig. 6: Use care to install the instrument panel
retainers in their original locations
|
- When installing the center air outlet assembly, perform the following:
- Turn the cool air bypass lever of the center air outlet fully downward.
- Pull the cool air bypass damper lever fully toward you to install the
cable to the lever pin.
- Push the outer cable to take up the slack, then secure with the retaining
clip.