| Fig. 1: Exploded view of the exhaust manifold — 1.5L
engine
|
| Fig. 2: Exhaust manifold exploded view — 1.8L
engine
|
- Disconnect battery negative cable.
- Raise the vehicle and support safely.
- Remove the exhaust pipe to exhaust manifold nuts and separate exhaust pipe.
Discard gasket.
- Lower vehicle.
- Remove electric cooling fan assembly, if necessary.
- If the oxygen sensor is located in the manifold, remove the sensor.
- Disconnect necessary EGR components.
- Remove outer exhaust manifold heat shield and engine hanger. Detach the
electrical connector and remove the oxygen sensor.
- Remove the exhaust manifold mounting bolts, the inner heat shield and the
exhaust manifold.
To install:
- Clean all gasket material from the mating surfaces and check the manifold
for damage.
- Using a new gasket, install the manifold. For 1.5L engines, tighten the
nuts in a crisscross pattern to 13 ft. lbs. (18 Nm). For 1.8L engines, tighten
the inner nuts in a crisscross pattern to 13 ft. lbs. (18 Nm) and tighten
the two outer (larger) nuts to 22 ft. lbs. (30 Nm).
- Install the heat shields.
- Connect EGR components.
- If removed, install the oxygen sensor.
- Install the electric cooling fan assembly as required.
- Install a new flange gasket and connect the exhaust pipe.
- Connect the negative battery cable and check for exhaust leaks.
| Fig. 3: Exhaust manifold exploded view — 2.0L
SOHC engine
|
| Fig. 4: Exhaust manifold exploded view — 1.6L
and 2.0L (non-turbo) DOHC engine

|
| Fig. 5: Exhaust manifold exploded view — 2.0L
(turbo) DOHC engine
|
- Disconnect the negative battery cable.
- Raise the vehicle and support safely.
- Remove the front exhaust pipe to exhaust manifold nuts and separate exhaust
pipe. Discard the gasket.
- Lower the vehicle.
- If equipped with air conditioning, remove condenser cooling fan assembly.
- Using special tool MD998703 or equivalent, disconnect and remove the oxygen
sensor.
- Remove outer exhaust manifold heat shield and the engine hanger.
- Remove the exhaust manifold mounting nuts, the inner heat shield and the
exhaust manifold from the engine.
To install:
- Clean all gasket material from the mating surfaces and check the manifold
for damage or cracking.
- Using a new gasket, install the exhaust manifold, to the engine. Tighten
the nuts to in a crisscross pattern to 11–14 ft. lbs. (15–20 Nm)
for 2.0L SOHC engine or to 18–22 ft. lbs. (25–30 Nm) for 1.6L
and 2.0L DOHC engine.
- Install the outer heat shield and tighten the mounting bolts to 10 ft. lbs.
(14 Nm).
- Install the electric cooling fan assembly, if removed.
- Using a new flange gasket, connect the exhaust pipe and tighten the mounting
nuts to 29–36 ft. lbs. (40–50 Nm).
- Connect the negative battery cable and check for exhaust leaks.
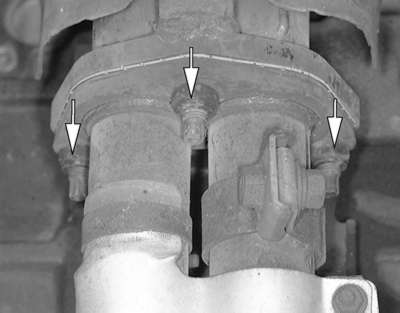
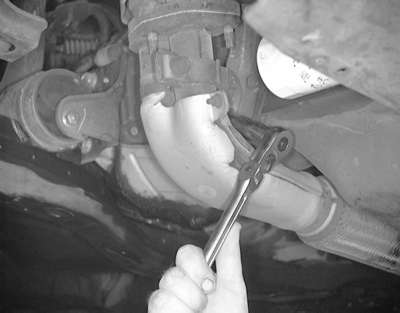
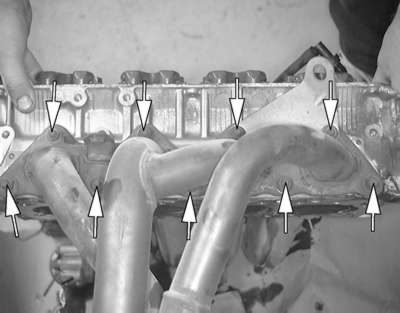
| Fig. 6: Remove the exhaust pipe-to-exhaust manifold nuts
|
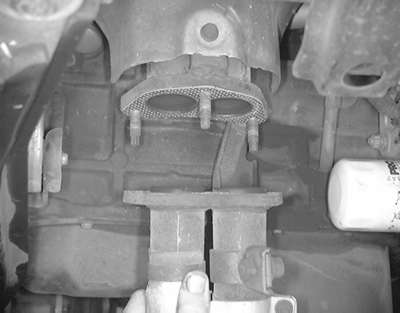
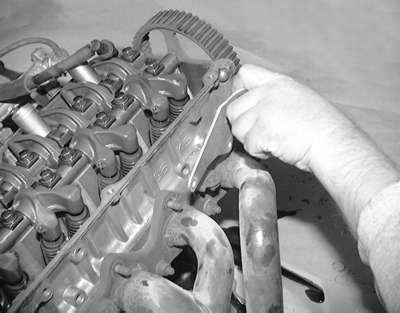
| Fig. 7: Remove the hanger retaining bolt . . .
|
| Fig. 8: . . . then separate the pipe from the manifold
|
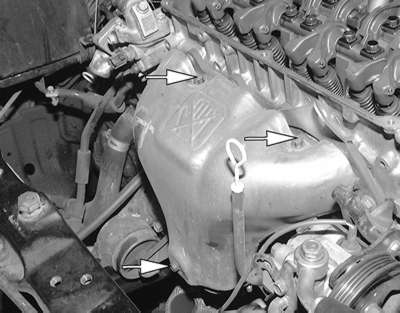
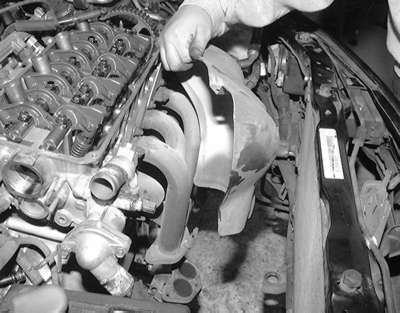
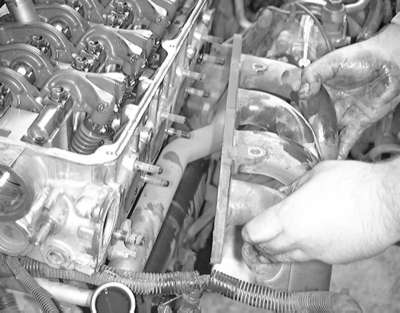
| Fig. 9: Remove the heat shield retaining bolts . . .
|
| Fig. 10: . . . then remove the heat shield from the exhaust
manifold
|
| Fig. 11: Remove the exhaust manifold retaining nuts
|
| Fig. 12: Remove the engine lifting eye from the manifold
. . .
|
| Fig. 13: . . . then remove the manifold from the cylinder
head
|
| Fig. 14: Remove the exhaust manifold gasket, thoroughly
clean the mounting surfaces, and replace the gasket

|
- Disconnect battery negative cable.
- Raise the vehicle and support safely.
- Remove the exhaust pipe-to-exhaust manifold nuts, the hanger retaining bolt,
then separate the exhaust pipe. Discard the gasket.
- Remove the outer exhaust manifold heat shield and engine hanger.
- Remove the exhaust manifold mounting nuts and the exhaust manifold from
the engine.
To install:
- Clean all gasket material from the mating surfaces and check the manifold
for damage or cracking.
- Install a new gasket and install the manifold. Tighten the nuts to in a
crisscross pattern to 18–21 ft. lbs. (25–29 Nm).
- Install the heat shields and tighten the mounting bolts 10 ft. lbs. (14
Nm).
- Install a new flange gasket and connect the exhaust pipe. Tighten the mounting
nuts to 32 ft. lbs. (44 Nm).
- Connect the negative battery cable and check for exhaust leaks.
| Fig. 15: Exploded view of the exhaust manifold and related
components — 3.0L SOHC engine
|
| Fig. 16: Exploded view of the exhaust manifold — 3.0L
DOHC engine
|
CAUTION
Do not attempt the work on the exhaust system until it has completely cooled.
- Disconnect battery negative cable.
- Raise the vehicle and support safely.
- Remove the exhaust pipe to exhaust manifold nuts and remove the front exhaust
pipe.
- Lower the vehicle.
- If removing the front manifold, remove condenser electric cooling fan assembly.
- For the DOHC engine, if removing the front manifold, remove the alternator
and mounting bracket from the vehicle.
- For the DOHC engine, separate the A/C compressor from the mounting bracket.
Leaving the hoses connected, position the compressor aside.
- If removing the front manifold, remove the oil dipstick and tube from the
engine.
- For the DOHC engine, if removing the front manifold, remove the heat protector.
- If removing the rear manifold, disconnect the EGR tube.
- For the SOHC engine, if removing the rear manifold, remove the intake plenum
stay and the roll stopper bracket.
- Unplug the electrical connector and remove the oxygen sensor.
- Remove the exhaust manifold mounting bolts the manifold.
To install:
- Clean all gasket material from the mating surfaces and check the manifold
for damage.
- Install a new gasket and install the manifold. Tighten the nuts in a crisscross
pattern to 21 ft. lbs. (30 Nm) for the SOHC engine or to 14 ft. lbs. (19 Nm)
for the DOHC engine.
- Install the heat shields.
- Connect the EGR tube and intake plenum stay and roll stopper bracket, if
removed.
- Install the oxygen sensor.
- Install the electric cooling fan assembly, A/C compressor, dipstick tube
and alternator, as required.
- Install a new flange gasket and connect the exhaust pipe or converter assembly.
- Install the drive belt(s) and adjust for proper tension.
- Connect the negative battery cable and check for exhaust leaks.
| Fig. 17: Exhaust manifold exploded view — 3.5L
engine

|
CAUTION
Do not attempt the work on the exhaust system until it has completely cooled.
- Disconnect battery negative cable.
- Raise the vehicle and support safely.
- Remove the exhaust pipe to exhaust manifold nuts and remove the front exhaust
pipe.
- Lower the vehicle.
- If removing the front manifold, remove the radiator and cooling fan assembly.
- If removing the front manifold, remove the alternator.
- Remove the heat protector(s).
- If removing the rear manifold, disconnect the EGR tube.
- Remove the exhaust manifold mounting bolts the manifold.
To install:
- Clean all gasket material from the mating surfaces and check the manifold
for damage.
- Install a new gasket and install the manifold. Tighten the nuts in a crisscross
pattern to 21 ft. lbs. (30 Nm).
- Install the heat protector(s).
- If installing the rear manifold, replace the gasket and connect the EGR
tube.
- If installing the front manifold, install the radiator and cooling fan assembly.
- If installing the front manifold, install the alternator.
- Install the drive belt(s) and adjust for proper tension.
- Raise and safely support the vehicle securely on jackstands.
- Install a new flange gasket and connect the exhaust pipe or converter assembly.
- Lower the vehicle.
- Connect the negative battery cable and check for exhaust leaks.