- Before servicing the vehicle, refer to the precautions in the beginning
of this section.
- Remove or disconnect the following:
- Battery negative cable
- Exhaust pipe from the exhaust manifold
- Electric cooling fan assembly, if necessary
- Dipstick tube, if removing the front manifold
- Alternator, if removing the front manifold from 3.0L DOHC engine
- EGR pipe
- Electrical connector and remove the HO2S sensor
- Exhaust manifold mounting bolts, the inner heat shield and the exhaust
manifold
To install:
- Clean all gasket material from the mating surfaces.
- Install or connect the following:
- New gasket and install the manifold. Tighten the nuts in a crisscross
pattern to 22 ft. lbs. (30 Nm).
- Heat shields
- EGR pipe
- HO2S sensor
- Electric cooling fan assembly, dipstick tube and alternator, as required
- New flange gasket and connect the exhaust pipe
- Negative battery cable and check for exhaust leaks
- Before servicing the vehicle, refer to the precautions in the beginning
of this section.
- Disconnect the negative battery cable.
- Drain the engine coolant.
- Remove or disconnect the following:
- Turbocharger assembly
- Heat shield
- Mounting nuts
- Exhaust manifold
NOTE: The cone disc springs are installed at all lower
mounting points.
To install:
- Clean all gasket material from the mating surfaces.
- Install new gaskets and install the manifold. Be sure all cone disc springs
are in their original locations with the grooved side facing the nut. Tighten
the manifold nuts using the following procedure:
- Tighten all but the outer 2 nuts to 22 ft. lbs. (30 Nm).
- Tighten the outer 2 nuts to 34–38 ft. lbs. (47–53 Nm).
- Loosen the outer 2 nuts, then tighten them to 22 ft. lbs. (30 Nm).
- Install or connect the following:
- Heat shield
- Turbocharger assembly
- Fill the cooling system.
- Connect the negative battery cable and check for exhaust leaks.
- Before servicing the vehicle, refer to the precautions in the beginning
of this section.
- Remove or disconnect the following:
- Battery negative cable
- Exhaust pipe from the exhaust manifold
- Condenser electric cooling fan assembly
- For the DOHC engine, remove the following:
- Alternator and mounting bracket
- Separate the air conditioning compressor from the mounting bracket.
Leaving the hoses connected, position the compressor aside.
- Heat protector
- If removing the front manifold, remove the oil dipstick and tube from the
engine.
- If removing the rear manifold, disconnect the EGR tube.
- For the SOHC engine, if removing the rear manifold, remove the intake plenum
stay and the roll stopper bracket.
- Remove or disconnect the following:
- Electrical connector and remove the HO2S sensor
- Exhaust manifold mounting bolts the manifold
To install:
- Clean all gasket material from the mating surfaces.
- Install or connect the following:
- New gasket and install the manifold. Tighten the nuts in a crisscross
pattern to 21 ft. lbs. (30 Nm) for the J- engine or to 14 ft. lbs. (19
Nm) for the H- engine.
- Heat shields
- EGR tube and intake plenum stay and roll stopper bracket, if removed
- HO2S sensor
- Electric cooling fan assembly, air conditioning compressor, dipstick
tube and alternator, as required
- New flange gasket and connect the exhaust pipe or converter assembly
- Negative battery cable and check for exhaust leaks
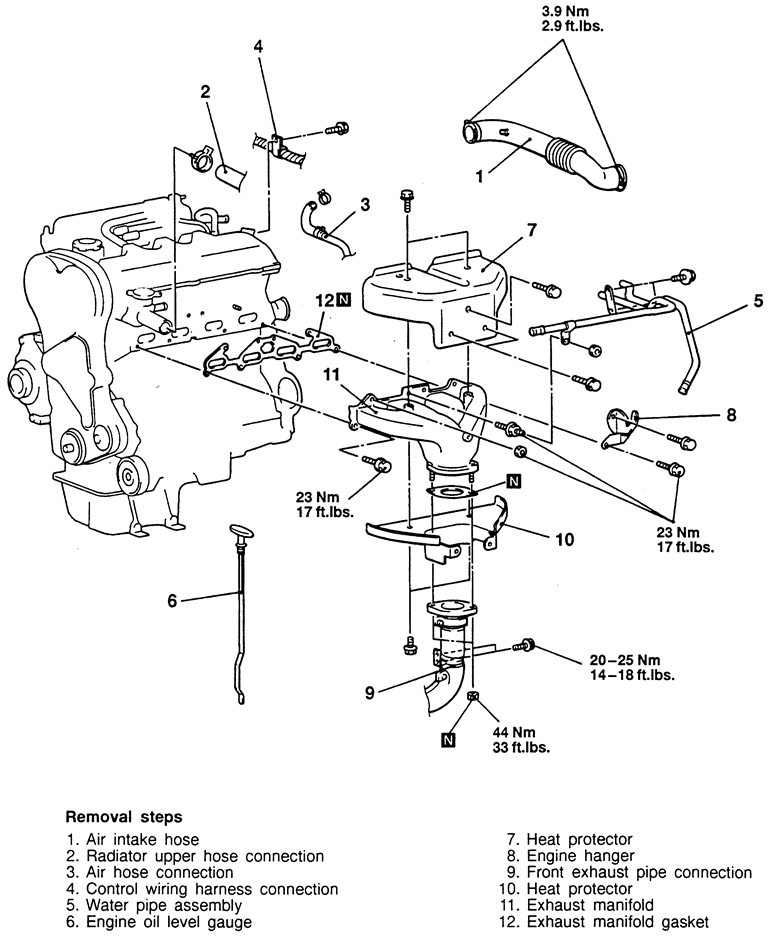
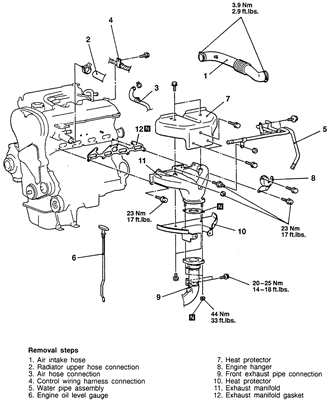
| Fig. 1: Exhaust manifold and related parts — Eclipse
2.0L (4G63) engine
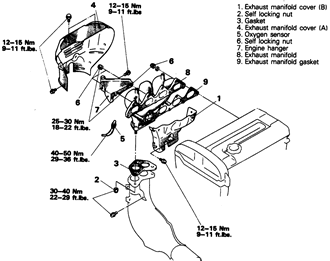
|
CAUTION
The air bag system must be disarmed before removing the exhaust manifold or
turbocharger.
- Before servicing the vehicle, refer to the precautions in the beginning
of this section.
- Disconnect the negative battery cable.
- Drain the engine coolant.
- Remove or disconnect the following:
- Condenser fan motor assembly, if equipped with air conditioning
- HO2S sensor
- Dipstick and tube assembly
- Air cleaner and air intake hose assembly
- Air intake hose from the turbocharger
- Engine coolant hoses from the turbocharger
- Oil supply pipe connection.
- Heat shields
- Engine hanger
- Front exhaust pipe from the turbocharger
- Oil return pipe and gaskets
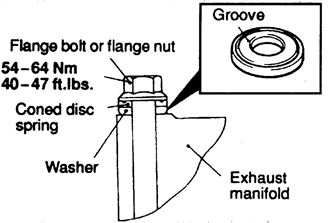
- Flange bolts and nuts that attach the turbo to the exhaust manifold.
Take note of the positions of the coned disc springs and the washers.
- Turbocharger, gasket and ring
- Exhaust manifold and gasket
To install:
- Use a new gasket and install the exhaust manifold.
- Use a new gasket and install the turbo to the exhaust manifold. Be sure
the coned disc spring and the washers are installed in their original positions.
Torque the bolts and nuts to specification, loosen them and tighten them again.
| Fig. 2: Install the groove of the cone-shaped disc
spring toward the flange bolt or nut — Eclipse 2.0L
(4G63) engine
|
- Use a new gasket and connect the exhaust pipe to the turbo.
- Using new gaskets, install the oil return pipe.
- Install or connect the following:
- Engine hanger
- Heat shields
- Oil supply pipe
- Engine coolant hoses to the turbo
- Air hose
- Air cleaner and duct assembly
- Dipstick tube, using a new O-ring
- HO2S sensor
- Condenser fan assembly if removed
- Negative battery cable and refill the engine with coolant
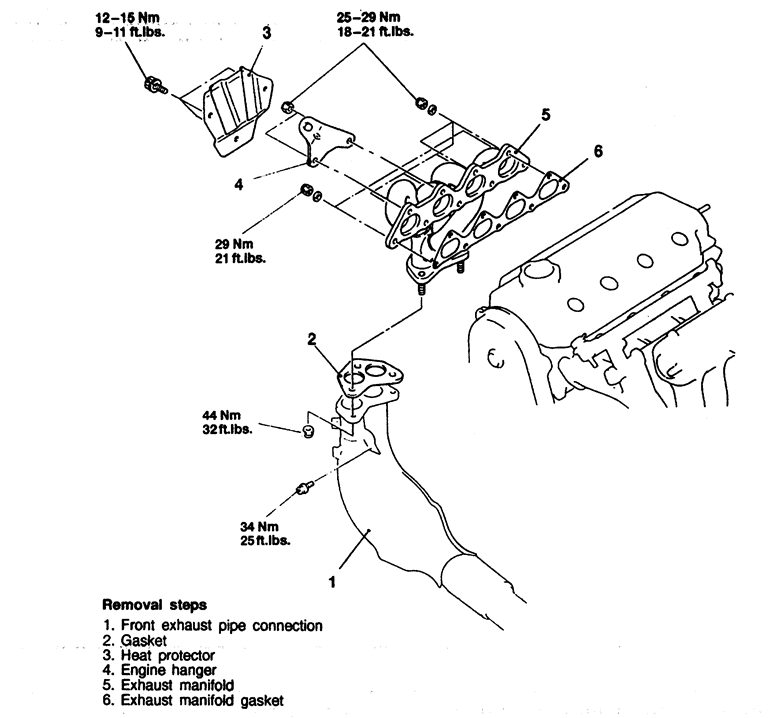
| Fig. 3: Exploded view of the exhaust manifold and related
components — 2.0L (420A) engine
|
CAUTION
The air bag system must be disarmed before removing the exhaust manifold.
- Before servicing the vehicle, refer to the precautions in the beginning
of this section.
- Disconnect the negative battery cable.
- Drain the engine coolant.
- Remove or disconnect the following:
- Air intake hose
- Upper radiator hose from the water outlet
- Air hose connection
- Engine control wiring harness from the rear of the engine
- Water pipe assembly
- Oil dipstick
- Upper heat shield
- Engine hanger
- Pulsed secondary air injection (check valve) valve from the exhaust
pipe (manual transaxle only)
- Front exhaust pipe from the manifold
- Lower heat shield
- Exhaust manifold and gasket
To install:
- Use a new gasket and install the exhaust manifold. Torque the nuts and bolts
to 17 ft. lbs. (23 Nm).
- Install the lower heat shield.
- Use a new gasket and connect the front exhaust pipe to the manifold.
- On vehicles with manual transaxles, connect the pulsed secondary air injection
valve to the exhaust pipe.
- Install or connect the following:
- Engine hanger
- Upper heat shield
- Dipstick and the water pipe
- Attach the engine wiring harness to the rear of the engine.
- Install or connect the following:
- Air hose and the upper radiator hose
- Air intake hose
- Negative battery cable
- Refill the engine with coolant, start the engine and check for leaks.
CAUTION
The air bag system must be disarmed before removing the exhaust manifold or
turbocharger.
- Before servicing the vehicle, refer to the precautions in the beginning
of this section.
- Remove or disconnect the following:
- Negative battery cable
- Front exhaust pipe from the exhaust manifold
- Heat shield
- Mounting nuts, the exhaust manifold, and the exhaust manifold gasket
To install:
- Install a new exhaust manifold gasket to the cylinder head and install the
exhaust manifold. Torque the mounting nuts to 21 ft. lbs. (29 Nm).
- Replace the heat shield and tighten the bolts to 10 ft. lbs. (13 Nm).
- Install a new gasket between the exhaust manifold and the front exhaust
pipe and reconnect the pipe. Torque the nuts to 32 ft. lbs. (34 Nm).
- Reconnect the negative battery cable, start the engine and check for any
exhaust leaks.
| Fig. 4: Exploded view of the exhaust manifold mounting — Eclipse
2.4L (4G64) engine shown, Galant similar
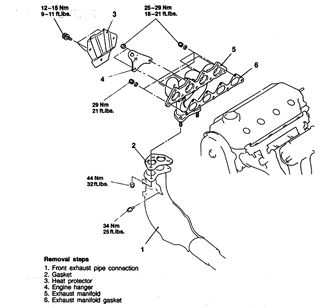
|
- Before servicing the vehicle, refer to the precautions in the beginning
of this section.
- Remove or disconnect the following:
- Battery negative cable
- Exhaust pipe from the exhaust manifold
- Outer exhaust manifold heat shield and engine hanger
- Exhaust manifold mounting nuts and the exhaust manifold from the engine
To install:
- Clean all gasket material from the mating surfaces.
- Install a new gasket and install the manifold. Tighten the nuts to in a
crisscross pattern to 18–21 ft. lbs. (25–29 Nm).
- Install the heat shields and tighten the mounting bolts to 10 ft. lbs. (14
Nm).
- Install a new flange gasket and connect the exhaust pipe. Tighten the mounting
nuts to 32 ft. lbs. (44 Nm).
- Connect the negative battery cable and check for exhaust leaks.
- Before servicing the vehicle, refer to the precautions in the beginning
of this section.
- Remove or disconnect the following:
- Battery negative cable
- Exhaust pipe from the exhaust manifold
- Electric cooling fan assembly
- HO2S sensor
- EGR pipe
- Outer exhaust manifold heat shield and engine hanger
- Exhaust manifold mounting bolts, the inner heat shield and the exhaust
manifold
To install:
- Clean all gasket material from the mating surfaces.
- Using a new gasket and install the manifold. For 1.5L engines, tighten the
nuts on a crisscross patter to 13 ft. lbs. (18 Nm). For 1.8L engines, tighten
the inner nuts to in a crisscross pattern to 13 ft. lbs. (18 Nm) and tighten
the 2 outer (larger) nuts to 22 ft. lbs. (30 Nm).
- Install or connect the following:
- Heat shields
- EGR pipe
- HO2S sensor
- Electric cooling fan assembly
- New flange gasket and connect the exhaust pipe
- Negative battery cable and check for exhaust leaks