Previous Next

ROD BEARING REPLACEMENT

  1. Crankshaft crankpins (the part of the crank on which the bearing rides) should be inspected for clogged oil holes and scoring. If scoring is evident, the crankpins should be machined undersize and the proper undersize (thicker) bearings installed in all the rods.
  2. If the crankpins and rod bearing shells appear to show minimal wear and normal wear patterns, they still must be checked for proper fit with Plastigage® . Clean all the surfaces of oil and then cut plastic measuring media (Plastigage® or similar) inserts to a length that will fit the width of the bearing. Apply the insert to an area of the crankpin away from an oil hole and install the rod cap. Tighten the bolts to specification. Make sure you don't turn the crankshaft.

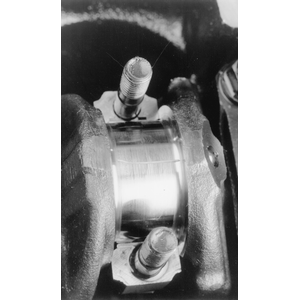
    Fig. 1: Apply a strip of gauging material to the bearing journal, then install and tighten the cap

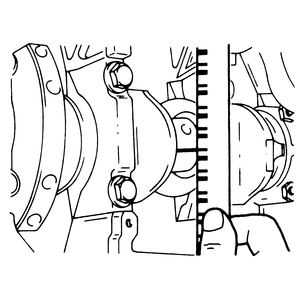
    Fig. 2: Reading the width of the mark left by Plastigage®

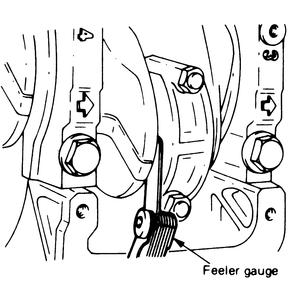
    Fig. 3: Checking connecting rod side clearance

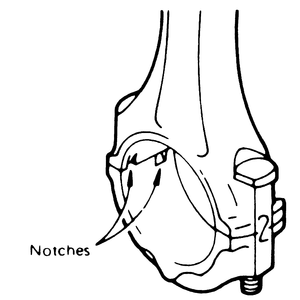
    Fig. 4: Notches in the connecting rod and connecting rod cap should be on the same side

  3. Remove the connecting rod bolts and then remove the caps. Read the width of the Plastigage® at its widest part by comparing it with the scale on the package to get actual bearing clearance. If the bearing clearance is within specification, the bearings may be reused.
  4. You must also measure side clearance between the connecting rod side surface and the crank with the rod assembled and tightened to the specified torque. Excessive wear here indicates the rod and cap must be replaced to restore clearance.
  5. When the bearing shells are replaced, make sure bearing backs and inner surfaces of the rod and cap are dry and that bearings and crankpins are well lubricated with clean engine oil. It is important to insure that all bearings are installed with the notches (in the bearings, rod and cap) aligned; this will keep the bearing from spinning out of position.Notches in the rod and cap should be on the same side. This is a way to make sure rod and cap are properly assembled.
  6. tighten the rod bolts to specification, going back and forth in several steps.

Previous Next