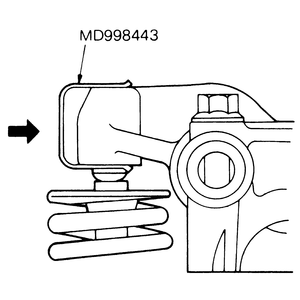
NOTE: The Mitsubishi special tool No. MD 998443 (to retain
the hydraulic lash adjusters) should be used before removing the rocker arm/shaft
assembly.
- Disconnect the negative battery cable. Remove the rocker cover and the upper
timing belt cover. Loosen the camshaft sprocket bolt until you can turn it
with your fingers.
| Fig. 1: The special tool is used to retain hydraulic
lash adjusters
|
| Fig. 2: Exploded view valve train assembly — 2.0L
engine
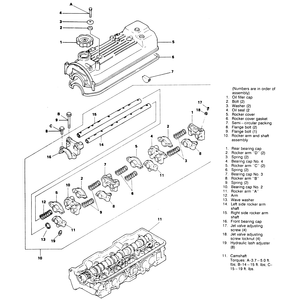
|
- Turn the engine over until the camshaft sprocket timing mark lines up with
the timing mark on the cylinder head. The Top Dead Center mark on the front
crankshaft pulley must line up with the timing scale on the front cover.
- Remove the camshaft sprocket bolt, and without allowing tension on the belt
to be lost, place the sprocket in the sprocket holder of the front cover or
lower timing belt cover. Make sure you don't lose tension on the belt as this
will require a lot of additional labor. Make sure, also, that you do not turn
the crankshaft throughout the work. Put the special clips on the eight hydraulic
adjusters at the outer ends of all eight rocker arms. Note that these clips
go over the lash adjusters that actuate the large intake valves, not on the
small adjusting screw for the smaller jet valves.
- Loosen but do not remove the camshaft bearing cap bolts (not the outer or
cylinder head bolts), rotating them outward in steps, a little at a time,
moving from bolt to bolt. Remove the bolts and then, holding the ends so the
assembly stays together, remove the rocker shaft assembly from the cylinder
head.
To install:
- Place the assembly on a clean work bench. Remove the bolts (which retain
the bearing caps in position on the shafts) two at a time along with the associated
cap, washers, springs and rockers. Continue until all parts are disassembled.
Keep all parts in original order. All parts that will be re-used must be in
original positions.
- Inspection of parts should include verifying that the pads that follow the
cam lobes are not worn excessively and that the oil holes are clear. Replace
the rockers and/or shafts if rockers are loose on the shafts. If any of the
hydraulic lash adjusters have been diagnosed as defective (valves tapping
or not closing fully) they can be replaced by removing clips, allowing the
adjuster to fall out of the rocker, and replacing the adjuster with another.
Install the clip to keep the new adjuster from dropping out of the arm.
- Assemble the parts of the rocker assembly as follows:
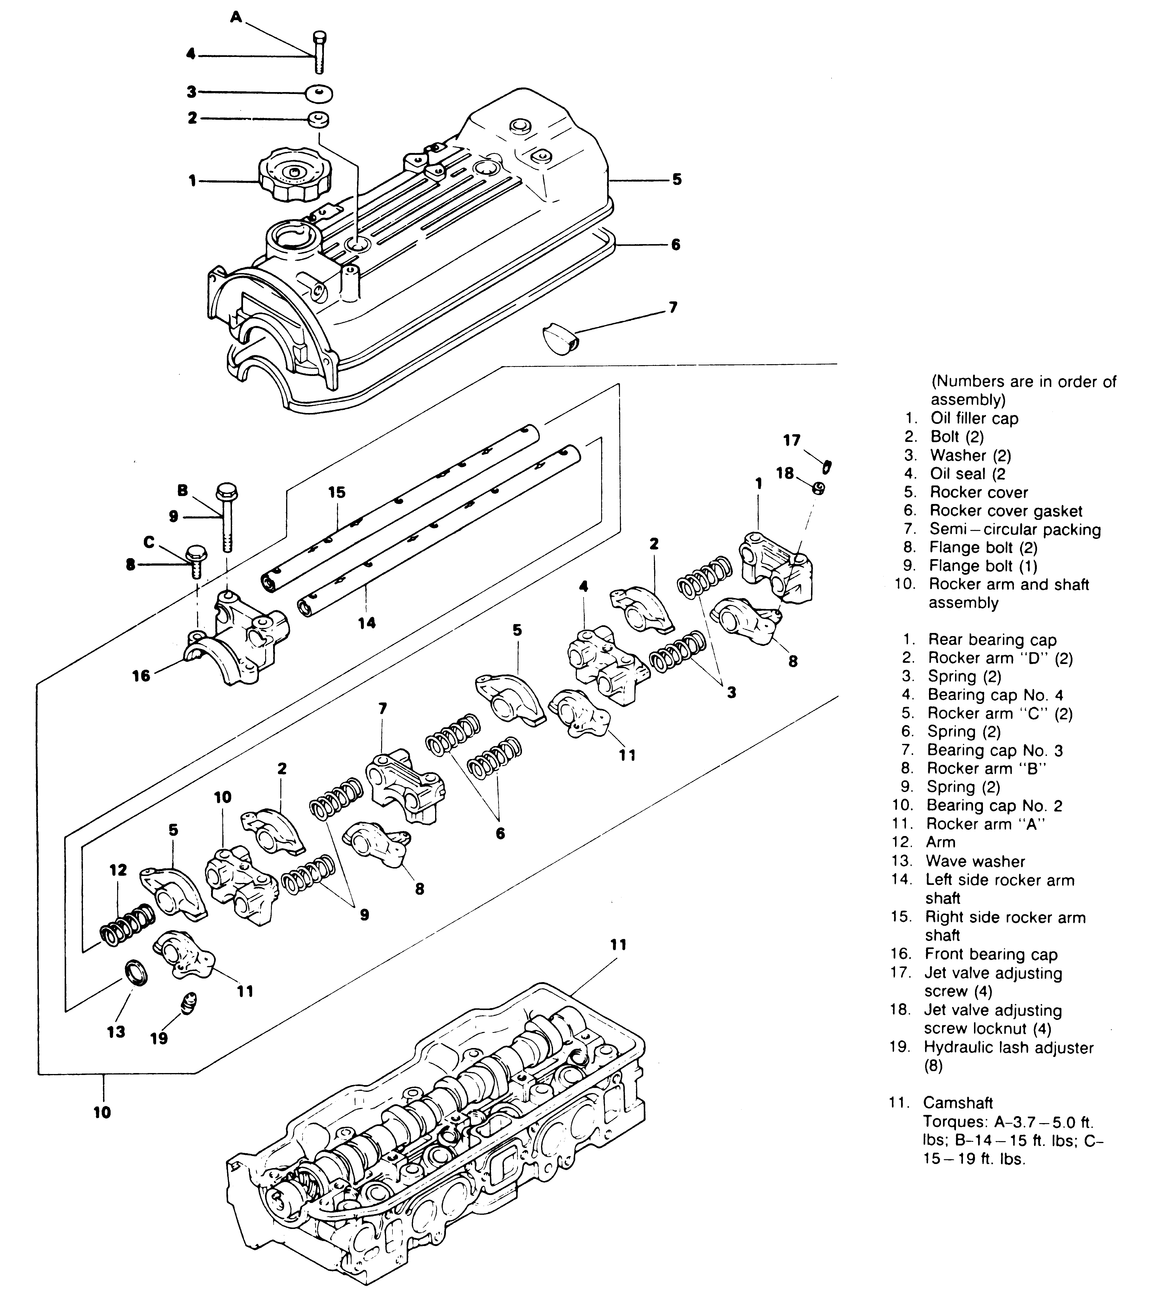
- Install the left and right side rocker shafts into the front bearing
cap. Notches in the ends of the shaft must be upward.
- Install the bolts for the front cap to retain the shafts in place. Note
that the left rocker shaft is longer than the right rocker shaft.
- Install the wave washer onto the left rocker shaft with the bulge forward.
- Coat the inner surfaces of the rockers and the upper bearing surfaces of
the bearing caps with clean engine oil and assemble rockers, springs, and
the remaining bearing caps in order. The intake rockers are the only ones
with the jet valve actuators. Note that the rockers are labeled for cylinders
1–3 and 2–4 because the direction the jet valve actuator faces
changes. Use mounting bolts to hold the caps in place after each is assembled.
When the assembly is complete, install it onto the head and start all mounting
bolts into the head and tighten finger-tight.
- Tighten the attaching bolts for the rocker assembly to 14–15 ft. lbs.
(19–20 Nm), working from the center outward.
- Without removing tension from the timing chain or belt, lift the sprocket
out of the holder and position it against the front of the camshaft. Make
sure the locating tang on the sprocket goes into the hole in the front of
the camshaft. Install the bolt. Tighten it to 65 ft. lbs. (88 Nm).
- Adjust the jet valves, if necessary. Refer to Section 2.
- Apply sealant to the top surface of the semi-circular seals in the head
and install the valve cover. Install the upper timing belt cover.
NOTE: The Mitsubishi special tool No. MD 998443 (to retain
the hydraulic lash adjusters) should be used before removing the rocker arm/shaft
assembly.
- Follow the previously described procedures for removal of the valve cover.
- Loosen the large center bolt holding the camshaft sprocket to the camshaft;
don't remove it, just loosen it.
- Turn the crankshaft pulley clockwise until the timing marks align on both
the cylinder head and the crank pulley. This sets the engine at TDC No.1 cylinder.
Once this position is established, the engine MUST NOT be rotated during repairs.
- Remove the center bolt from the sprocket and remove the small distributor
drive gear.
- Pull the camshaft sprocket with the chain attached out from the camshaft
and place it on top of the camshaft sprocket holder. Do not allow the chain
to come off the sprocket.
- Install the retaining clips (tool MD 998443) over the auto lash adjusters.
- Loosen but do not remove the camshaft bearing cap bolts (not the outer or
cylinder head bolts). Start at an inner or center bolt and work outward in
a circular pattern, loosening each a little at a time, moving from bolt to
bolt.
- Remove the bolts after all are loosened. Hold the ends so the assembly stays
together and remove the rocker shaft assembly from the cylinder head.
To install:
- Place the assembly on a clean work bench. Remove the bolts (which retain
the bearing caps in position on the shafts) two at a time along with the associated
cap, washers, springs and rockers. Continue until all parts are disassembled.
Keep all parts in original order. All parts that will be re-used must be in
original positions.
- Inspection of parts should include verifying that the pads that follow the
cam lobes are not worn excessively and that the oil holes are clear. Replace
the rockers and/or shafts if rockers are loose on the shafts. If any of the
hydraulic lash adjusters have been diagnosed as defective (valves tapping
or not closing fully) they can be replaced by removing clips, allowing the
adjuster to fall out of the rocker, and replacing the adjuster with another.
Install the clip to keep the new adjuster from dropping out of the arm.
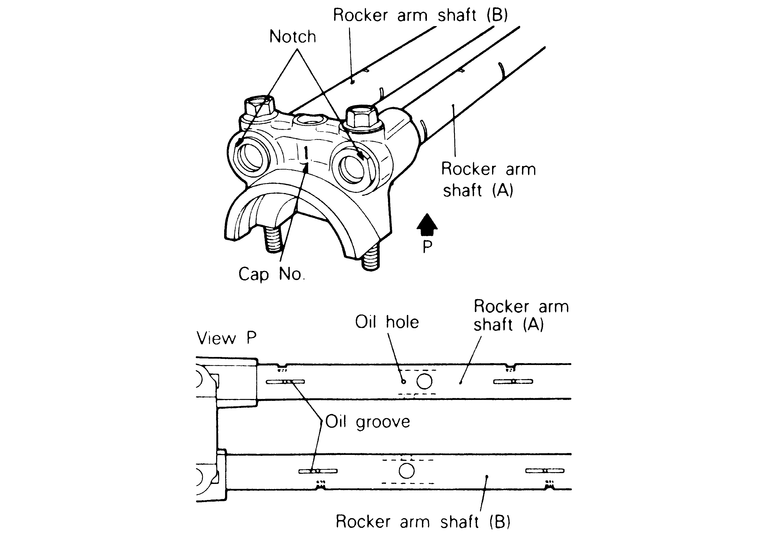
- Install the left and right side rocker shafts into the front bearing cap.
The rear end of the left (intake) rocker arm shaft has a notch. Align the
mating marks on the front of each rocker shaft to the mating marks on the
front bearing cap. Insert the bolts to hold the shafts in the cap.
- Install the wave washer so that the rounded side bulges toward the timing
chain.
- Coat the inner surfaces of the rockers and the upper bearing surfaces of
the bearing caps with clean engine oil and assemble rockers, springs, and
the remaining bearing caps in order. The intake rockers are the only ones
with the jet valve actuators. Note that the rockers are labeled for cylinders
2, 3 and 4. While similar in shape, they must be reinstalled in their original
position. Use mounting bolts to hold the caps in place after each is assembled.
When the assembly is complete, install it onto the head and start all mounting
bolts into the head and tighten finger-tight.
- Tighten the attaching bolts for the rocker assembly to 15 ft. lbs. (20 Nm),
working from the center outward. Remove the special clips from the rocker
arms.
- Without removing tension from the timing chain, lift the sprocket out of
the holder and position it against the front of the camshaft. Make sure the
locating tang on the sprocket goes into the hole in the front of the cam.
- Install the distributor drive gear, making certain it is properly seated.
Install the sprocket bolt and tighten it finger-tight.
- Tighten the center sprocket bolt to 40 ft. lbs. (54 Nm).
- Adjust the jet valve, if necessary. Refer to Section 1.
- Apply sealant to the flat face of the half-circle plug in the head. Install
the valve cover and gasket.
NOTE: The Mitsubishi special tool No. MD 998443 (to retain
the hydraulic lash adjusters) should be used before removing the rocker arm/shaft
assembly.
- Follow the previously described procedures for removal of the valve cover.
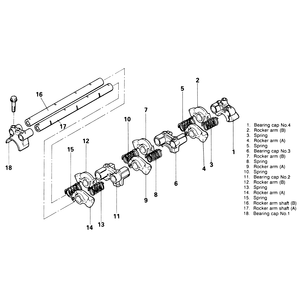
| Fig. 3: 3.0L engine rocker shaft assembly
|
| Fig. 4: Correct assembly of rocker shaft assembly — 3.0L
Engines
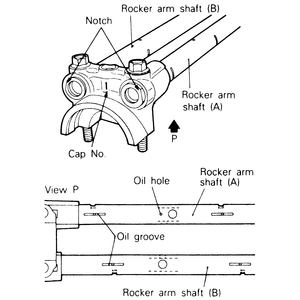
|
| Fig. 5: Directional arrows on the bearing caps must
agree with the arrows on the cylinder head assembly
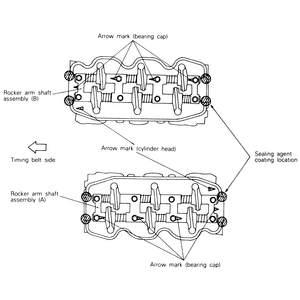
|
- Install the special clips (MB 998443–01) to hold the auto-adjusters
in place. Carefully loosen the retaining bolts at each bearing cap. Keep light
downward pressure on the rockers to hold the camshaft in place.
- When all the bolts are loose, remove them from the front (pulley end) to
the rear while keeping the same light pressure on the assembly. Have an assistant
hold the camshaft firmly in place as you remove the rocker assembly. The tension
of the timing belt will try to pop the camshaft out of its journals; this
must NOT be allowed to happen. If this should happen, you'll need to reinstall
the camshaft and timing belt. Instructions for each are found later in this
section.
- As soon as the rocker assembly is clear of the vehicle, remove the rearmost
bearing cap and install it in its original position on the cam. Tighten the
bolts just snug enough to hold it in place. If, during the inspection process,
this bearing cap must be removed for cleaning or replacement, install the
No. 3 bearing cap before removing the No. 4 cap.
NOTE: Take care during removal that no oil, grease or dirt
comes into contact with the timing belt.
To install:
- Disassemble the rocker assembly, checking each component for wear, scoring,
or plugged oil passages. Check the roller for correct and smooth rotation.
Inspect the inner diameter of each rocker for any scoring or enlargement.
If wear is found inside the rocker, replace it and inspect the shaft for damage.
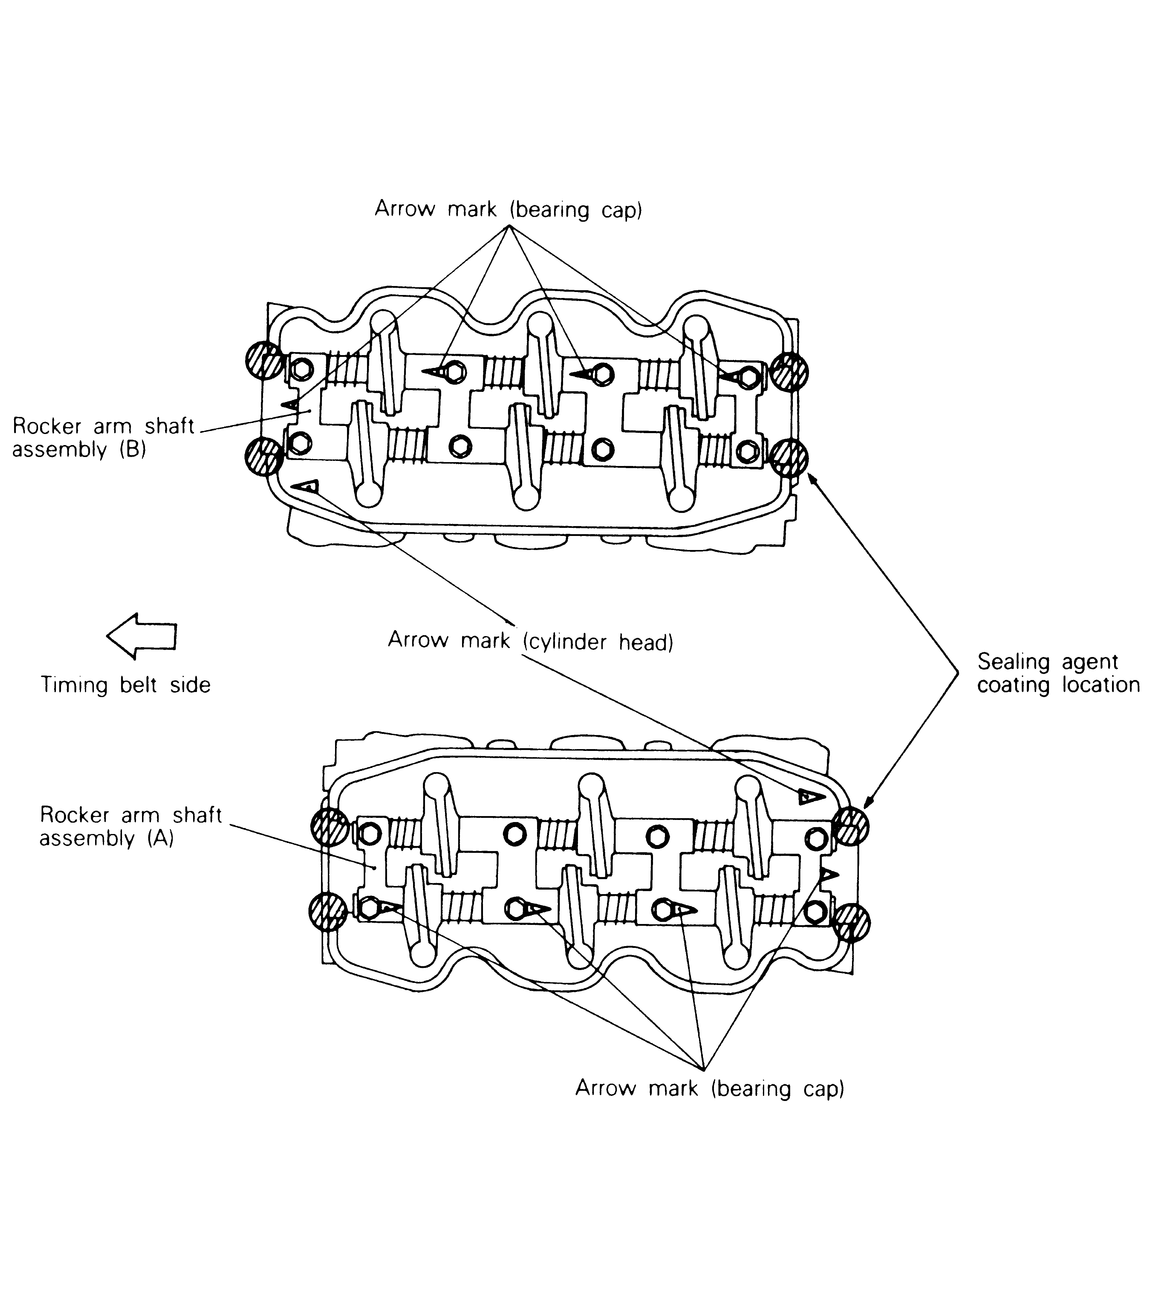
- Before reassembly, coat the contact faces liberally with clean motor oil.
Observe the numbers on the bearing caps so that they are replaced in the correct
location. Reassemble the rocker shafts into the front bearing cap so that
the notches face outward. As you continue to assemble the springs, rockers
and bearing caps, remember that the arrows on the bearing caps must point
in the same direction as the arrow on the head. This is particularly important
if the rockers have been removed from both heads.
- When the rocker arm assembly is complete (except for the rear bearing cap,
which is holding the camshaft down), have your assistant hold the camshaft
while the rear cap is removed. Assemble the last cap onto the rocker assembly
and carefully fit the assembly onto the head. Remember that the camshaft must
be held in place during this exchange.
- Install the retaining bolts finger-tight, making sure each rocker is correctly
aligned with the camshaft and valve stem. Once the rockers are securely in
place, the special retaining clips may be removed.
- Starting at the center bearing cap and working outward in two passes, tighten
the bearing cap bolts to 15 ft. lbs. (20 Nm).
- Apply sealer to the correct locations and reinstall the valve cover.
The 3.5L DOHC engines are not equipped with rocker arm shafts like the other
engines from Mitsubishi. To remove the rocker arms, the camshafts must first
be removed. Refer to the procedures for camshaft removal, located later in this
section.
- Follow the previously described procedures for removal of the valve cover.
- Remove the timing belt covers.
- Using a wrench, turn the crankshaft in a clockwise direction until all the
timing marks align. This positions No.1 piston at TDC/compression.
- Remove the 5 flange bolts and washers holding the rocker rail to the head.
- Lift the rocker assembly with the rockers attached away from the engine.
To install:
- If the assembly is to be disassembled, take note that the intake and exhaust
rockers are different. Each is labeled I or E;
they must be reassembled in the correct positions.
- Inspect the arms and shafts after a thorough cleaning. The face of the cam
follower must be smooth and free of grooves. The end of the adjuster screw
must be round (spherical), not mushroomed or flattened. The oil passages in
the shaft must be open.
- Reassemble the rockers onto the shaft, making certain each component is
in the correct location. Coat the entire shaft and rockers with a light coat
of clean engine oil. Pay particular attention to coating the face of each
cam follower.
- Install the assembly onto the head. Install the 5 retaining bolts and tighten
them alternately and evenly to 27 ft. lbs. (37 Nm).
- Adjust the valves. Refer to Section 1.
- Install the valve cover.
- Start the engine and check for oil leaks.