Under some circumstances, the solenoid or magnetic switch may fail. This can
be indicated by a failure of the starter to engage or produce adequate power.
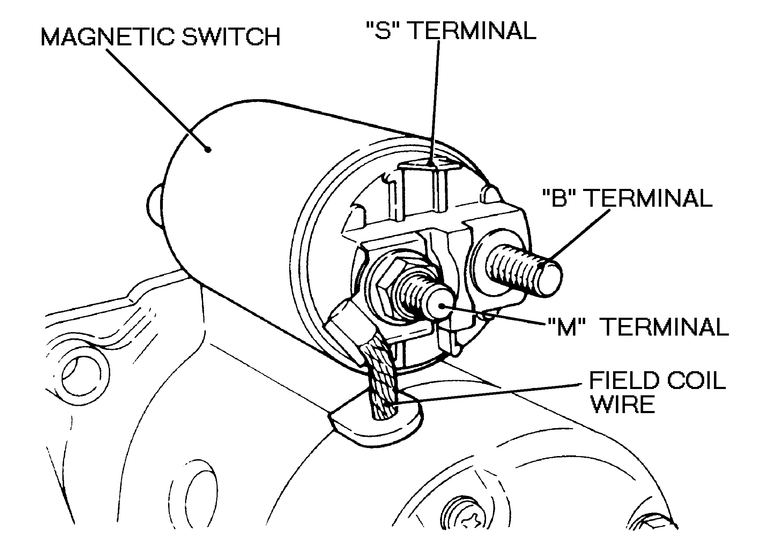
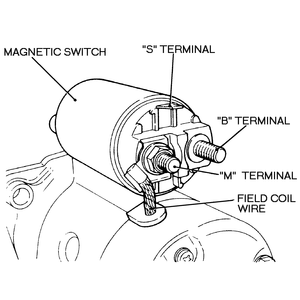
To test solenoid failure, disconnect the heavy starter motor wire at the M terminal
on the solenoid. Run a jumper wire from the battery (+) terminal to the S terminal
of the solenoid. If possible, use a remote starter control with a switch built
into it. If this is not available, touch the wire to the S terminal
briefly but do not leave the solenoid engaged for more than 10 seconds.
| Fig. 1: Solenoid terminals and wiring
|
| Fig. 2: Solenoid and shim
|
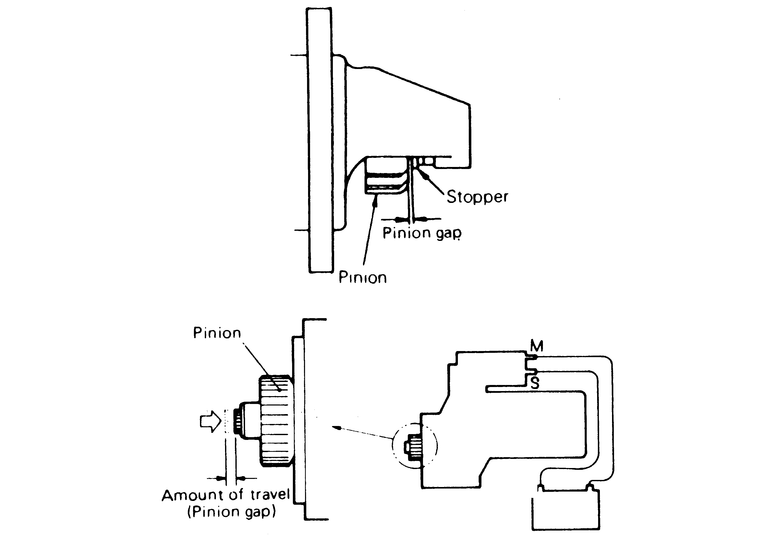
| Fig. 3: To measure pinion gap or pinion travel, the solenoid
must be momentarily energized

|
If the solenoid now engages in a positive manner, inspect the wiring and ignition
switch for defects. (You have proven that the solenoid works if it gets the
correct message.) If not, the solenoid should be replaced. You can test the
solenoid switch itself by pulling the coil wire out of the distributor cap,
having someone engage the starter, and then measuring the voltage at both the B and M terminals
of the solenoid ( M terminal wire connected). If voltage is
close to battery voltage at the B terminal, but drops significantly
at the M terminal with the starter turning, the solenoid switch
is bad and the solenoid unit will have to be replaced.
- Remove the starter from the vehicle as previously described.
- Disconnect the starter motor wire at the M terminal of
the solenoid.
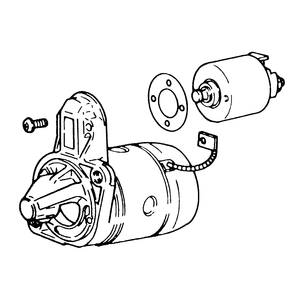
- Remove the screw(s) from the front end of the solenoid. Disengage the solenoid
plunger from the yoke inside the front of the starter and then remove the
solenoid and the shims located between the solenoid and the starter front
frame. Note the number and position of these shims — they
are important and will be needed during reassembly. If you're replacing the
solenoid, make sure you get extra shims.
To install:
- Install the solenoid and tighten all of the mounting screws, making sure
the plunger engages the drive yoke. Install the same number of shims.
- Energize the solenoid by running jumper wires — including
a switch if possible — from the (+) terminal of a 12 volt
battery to the S terminal of the solenoid and from the (−)
terminal of the battery to the M terminal. Make certain the
field coil wire is disconnected from the M terminal. Quickly
measure (in 10 seconds or less) the clearance between the front of the pinion
gear and the stop in front of it in the starter front frame. De-energize the
solenoid before it overheats. The pinion gear should be pushed back against
the drive mechanism when you do this.On reduction gear starters you'll have
to measure the distance the pinion gear assembly travels when you shift it
back and forth. Use a flat feeler gauge; correct clearance is 0.020–0.079
in. (0.50–2.00mm). Change the number of shims between the solenoid and
starter frame to correct the clearance if necessary. Adding shims decreases
the clearance, and vice-versa.
- Disconnect all test wiring hook-ups. Connect the field coil wire to the M terminal
and reinstall the starter. Make certain the matching faces of the starter
and engine are clean; any grit or grease can act as a shim and change the
position of the starter relative to the engine.