NOTE: Brush replacement requires a soldering gun or iron and
the ability to use it effectively and neatly.
- Remove the starter from the vehicle as previously described.
- Remove the M terminal nut, and disconnect the field coil
(large) wire at the solenoid.
- Remove the two through-bolts and two Phillips screws from the rear starter
bracket. Remove the rear bracket.
| Fig. 1: The rear bracket is secured by bolts and
screws
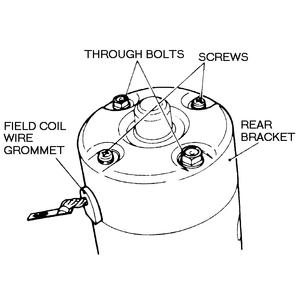
|
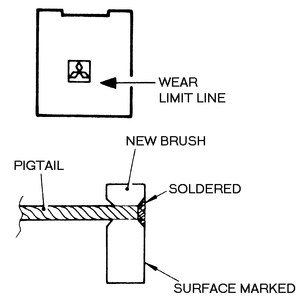
| Fig. 2: Note that the solder is flush with the outer
surface. Any overflow can cause binding when the brush is installed
|
- Pry the retaining springs back, slide the two brushes out of the brush holder
and pull the brush holder off of the rear of the starter.
- Inspect the brushes for excess wear. There is a manufacturer's symbol (usually
the Mitsubishi diamonds) stamped on the side of each. If the brush is worn
to the bottom of the emblem it should be replaced.
- To replace the brush, it must be crushed with a pair of pliers to crack
it where the wiring pigtail passes through the brush. Be careful not to damage
the wiring pigtail in doing this. Use sandpaper to sand the end of the pigtail
smooth. Also sand the outer surface of the last 0.25 in. (6mm) or so of the
pigtail wire until it is bright and free of corrosion.
To install:
- Insert the pigtail into the hole in the new brush until the flat end of
the pigtail just reaches the opposite end of the hole in the brush. Insert
the wire from the unmarked side of the brush. The brush and pigtail must be
brought to just the right temperature for the solder to run in between the
brush and pigtail. Make sure solder does not get onto the outer surface of
the brush, as this could cause it to bind in the brush holder later.
- Install the brushes into the holders.
- Assemble the rear case of the starter and install bolts and screws. Connect
the field coil wire to the M terminal of the solenoid.
- Reinstall the starter.
The starter drive may need to be replaced if the starter motor turns but does
not engage properly. If, in removing the drive, damage to the starter pinion
gear is noted, the flywheel ring gear should also be inspected. If there is
significant damage to the ring gear, the flywheel will have to be replaced,
too.
When diagnosing apparent starter problems, test the battery first. A low battery
or weak connections can prevent the required amount of current from getting
to the starter motor. Also check the solenoid before condemning the starter
drive itself; a solenoid that does not engage properly may cause the same symptoms.
- Remove the starter and remove the solenoid.
- Remove the 2 through-bolts and 2 screws from the rear bracket. Remove the
rear bracket.
- Pry back the retaining rings and slide the 2 brushes out of the brush holder.
Remove the brush holder and the yoke assembly.
- Remove the washer from the rear of the armature. Remove the field coil assembly
from the front frame. Remove the spring retainer, spring, and spring seat
from the starter front frame.
- Separate the armature from the front bracket by first pulling the armature
back out of the front bearing and then shifting the armature so the starter
drive is pulled out of the yoke. Make sure you don't lose the washer located
in the front frame.
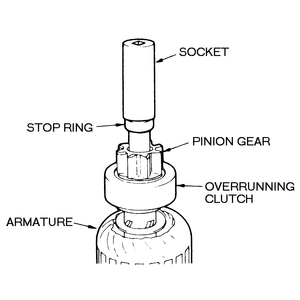
- Invert the armature so the starter drive is on top and rest the rear of
the armature on a solid surface. Use a deep well socket wrench that is just
slightly larger than the diameter of the armature shaft to press the snap-ring
collar back. Install the socket over the top of the shaft and then press it
downward or tap it very lightly to force the ring downward. Once the snap-ring
is exposed, use snap-ring pliers to open it until it will slide upward, out
of the groove and off the shaft. Pull the starter drive and snap-ring collar
upward and off the armature shaft.
- With the starter disassembled, do not immerse parts in cleaning solvent.
The yoke and field coil assembly will be damaged. Wipe the parts with a clean
cloth. The overrun clutch is packed with lubricant which will be washed out
by any solvent or fluid.
- Use a micrometer or caliper to measure the diameter of the commutator. If
below the limit, the commutator must be replaced.
To install:
- Lightly coat the front of the armature shaft with high temperature grease.
Install the starter drive, snap-ring collar, and snap-ring. Make sure the
snap-ring seats in its groove. Then use a puller to pull the snap-ring collar
up and over the snap-ring until the bottom of the collar touches the snap-ring.
- Place the washer in position in the front frame. Insert the armature through
the lever and yoke. Make certain the armature is correctly seated in the bearing.
- Install the spring seat, spring and spring retainer.
- Install the field coil assembly to the front frame. Place the washer on
the rear of the armature.
- Install the brush holder and yoke assemblies and install the brushes.
- Position the rear bracket and install the 2 screws and 2 through-bolts.
- Install the solenoid and connect the field coil wire.
- Remove the starter from the vehicle as described above. Remove the solenoid.
- Remove the two through-bolts and two Phillips screws from the rear starter
bracket. Remove the rear bracket.
- Pry the retaining springs back and slide the two brushes out of the brush
holder. Pull the brush holder off the rear of the starter. Remove the field
coil (yoke) assembly from the front frame. Remove the armature.
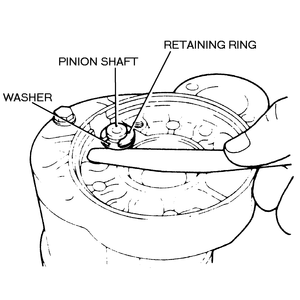
- Remove the pinion shaft end cover from the center frame. Measure the clearance
between the spacer and center cover and record it. If the pinion shaft is
replaced, you'll have to insert or subtract spacer washers until the clearance
is the same as that recorded. Use a screwdriver to remove the retaining clip
and then remove the washers. Remove the retaining bolt and then separate the
center frame from the front frame.
- Remove the spring retainer and spring for the yoke from the front frame.
Then remove the washer, reduction gear, shift yoke lever, and two lever supports.
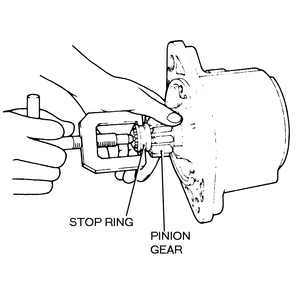
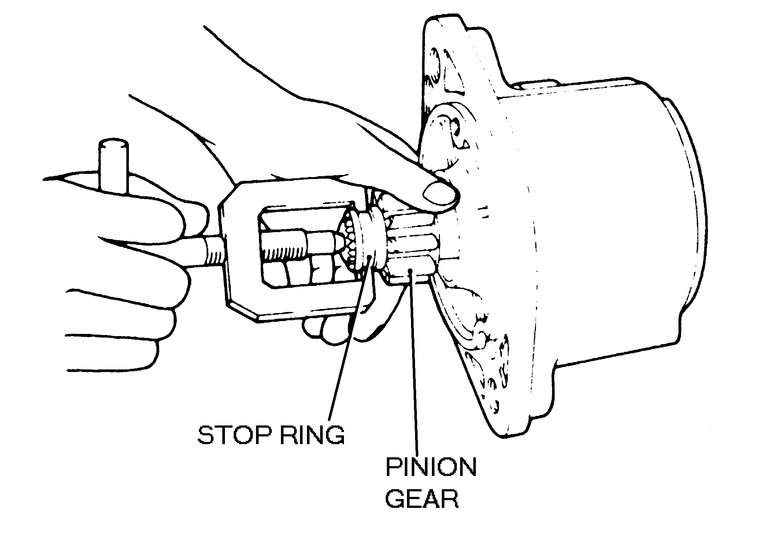
- Turn the front frame so the pinion gear is at the top and support it securely.
Use a socket that fits tightly over the pinion shaft to force the snap-ring
collar (stop ring) downward. Tap the socket lightly at the top or use a press
to do this. Use a small prytool to work the snap-ring out of its groove and
remove it from the shaft (a pair of small snapring pliers will make this procedure
much easier). Remove the collar. Remove the pinion and the spring behind it
from the shaft.
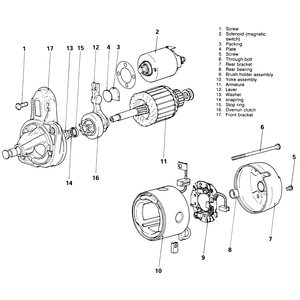
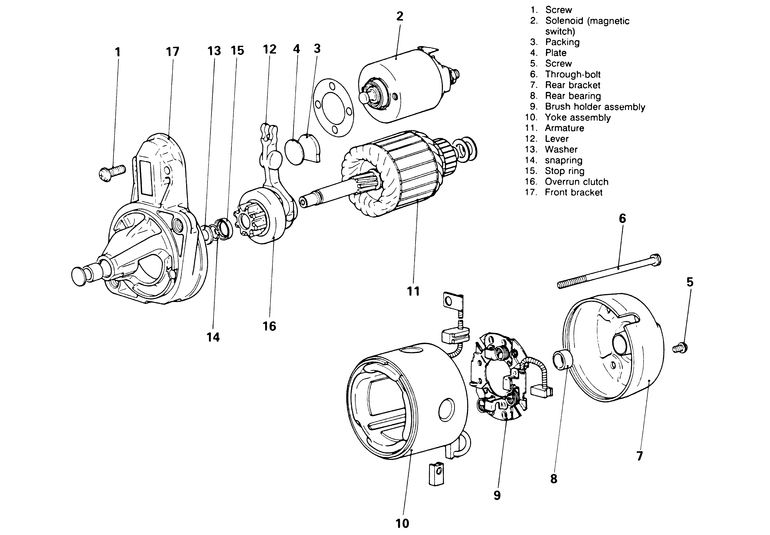
| Fig. 3: An exploded view of a direct drive starter
|
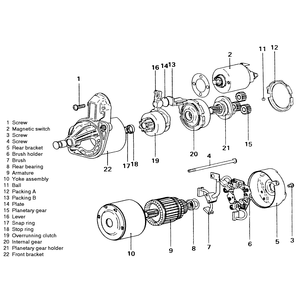
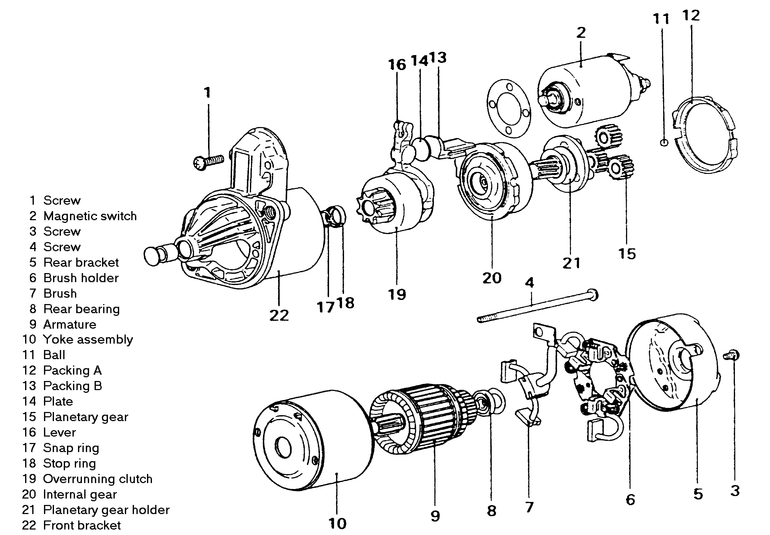
| Fig. 4: An exploded view of a reduction drive starter
|
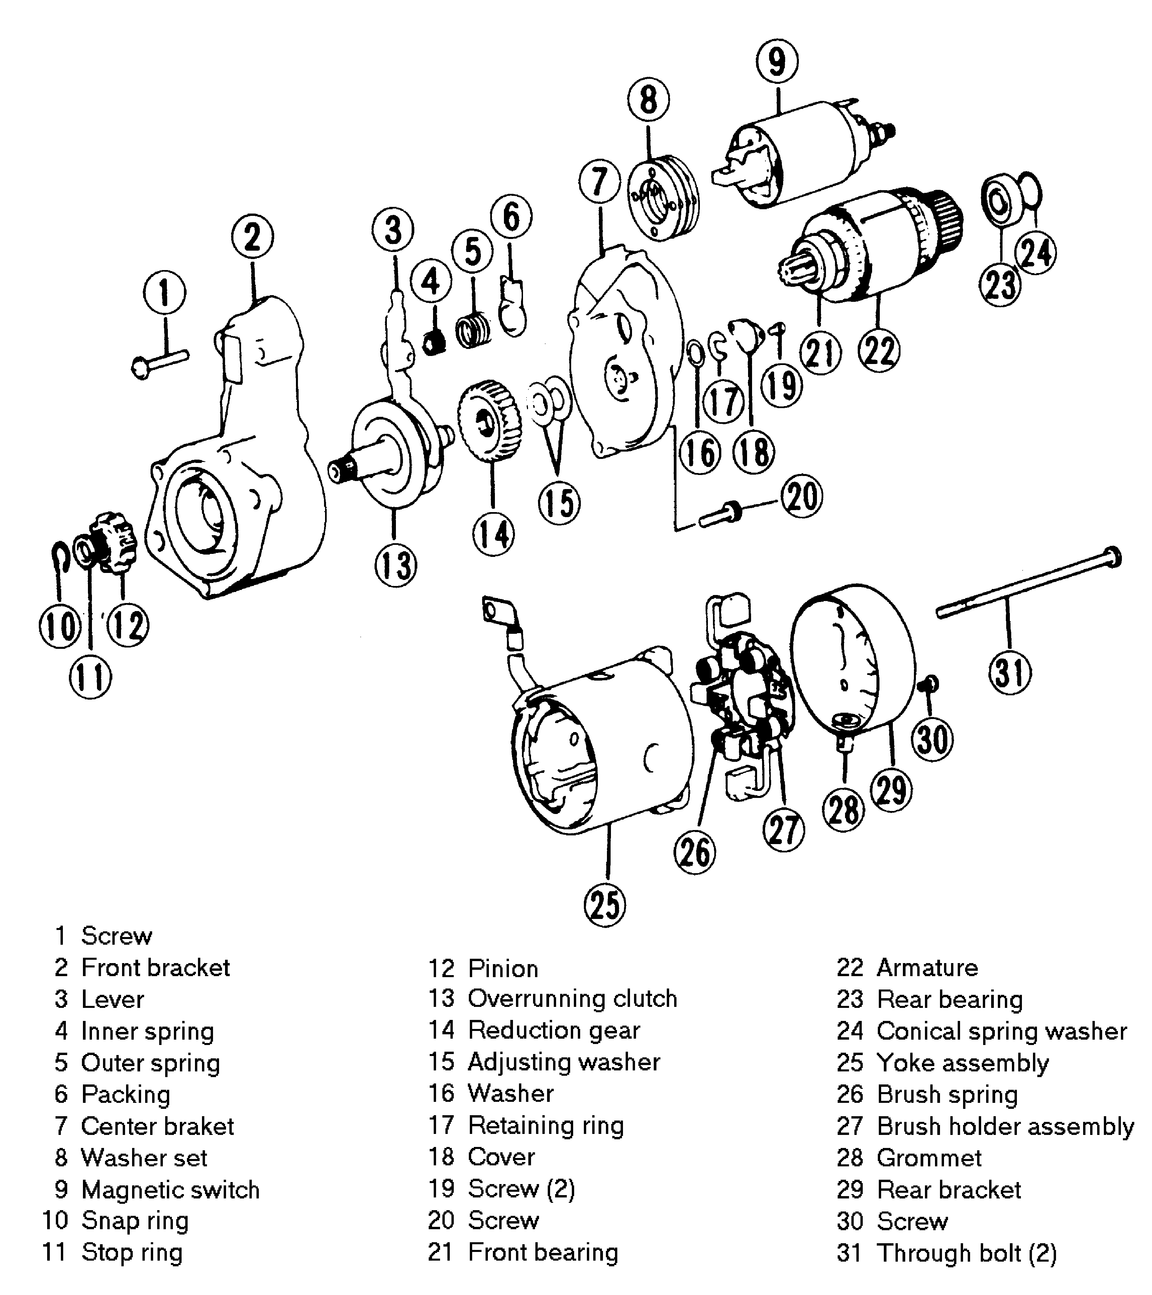
| Fig. 5: Diesel engine starter is similar, but has
more power
|
- Pull the lever and pinion shaft assembly out of the rear of the front frame.
Replace the pinion if its teeth are damaged (check the flywheel ring gear
as well). Replace the overrunning clutch if the pinion gear is damaged or
if the one-way action of the clutch is not precise.
- Do not immerse parts in cleaning solvent. The yoke and field coil assembly
will be damaged. Wipe the parts with a clean cloth. The overrun clutch is
packed with lubricant which will be washed out by any solvent or fluid.
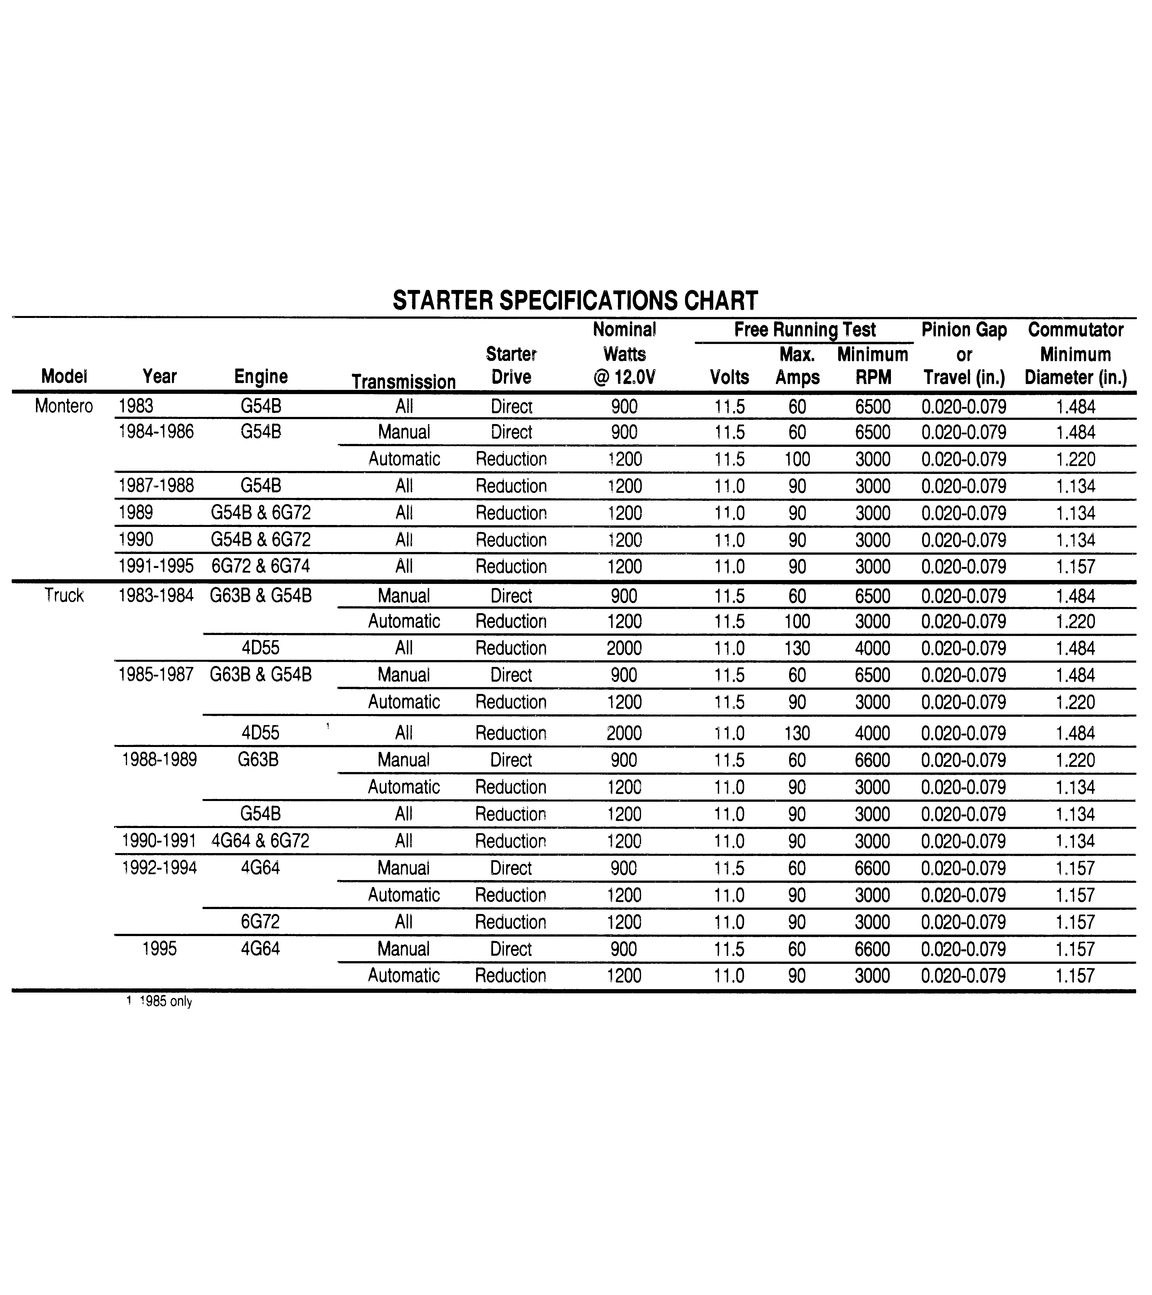
- Use a micrometer or caliper to measure the diameter of the commutator and
compare to the specifications chart. If below the limit, the commutator must
be replaced.
To install:
- Lightly coat the front of the armature shaft with high temperature grease.
Install the pinion shaft, spring, gear and stop ring. Install the snapring
and use a puller to seat the stop ring over the snapring.
- Place the washer in position in the front frame. Insert the armature through
the lever and yoke. Make certain the armature is correctly seated in the bearing.
- Install the lever and pinion shaft assembly with the reduction gear into
the rear of the front frame. Make certain all the springs, spacers and washers
are present and in the correct order. When the clearance is correct, install
the cover and its small screw.
- Fit the center frame onto the shaft and install the washer and retaining
clip. Note that the clearance must be corrected by changing the thickness
or number of washers if the overrunning clutch and pinion shaft assembly have
been replaced. Double check the clearance and install or remove shims as necessary.
- Install the armature into the yoke (field coil). Install the brush holder
and install the brushes, making sure they are properly seated and do not bind
in the holders.
- Install the rear bracket and the small screws. Assemble the motor to the
drive and install the through-bolts.
- Install the solenoid and connect the field coil wire to the M terminal.
- Reinstall the starter.
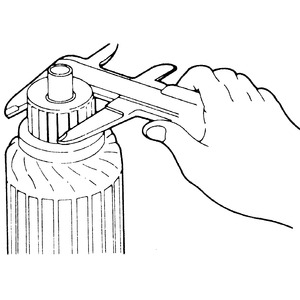
| Fig. 6: Pressing back the snapring collar
|
| Fig. 7: Measuring commutator diameter — take
measurements at 2 or 3 points and use smallest diameter as reference
|
| Fig. 8: Record the clearance at the rear of the pinion
shaft before disassembly
|
| Fig. 9: Use a small puller to bring the stop ring
over the snapring
|

