Rebuilding the master cylinder is a tedious, time consuming job. You can save
yourself time and trouble by buying a rebuilt master cylinder from your dealer
or a parts supply house. The small difference in cost between a rebuilding kit
and a rebuilt part usually makes it more economical, in terms of time and work,
to buy the rebuilt part.
- Remove the master cylinder from the vehicle and mount it securely on a bench.
- Remove the boot from the cylinder body.
- Remove the connecting tube nipple.
- Remove the brake pipe joint and drain any fluid remaining in the master
cylinder.
- Remove the stop ring and stop washer, and pull out the piston assembly.
- Pull out the primary cup, return spring, check valve and valve seat.
- Inspect the master cylinder as follows:
- Make sure that the bore of the master cylinder is smooth and perfectly
round. If the bore is worn or scarred, replace the master cylinder.
WARNING
It is not advisable to correct the bore by honing with emery cloth or
a cylinder hone. Use only genuine rubber parts. The sliding parts used
in the cylinder should be washed in clean brake fluid before assembling.
Do not allow dust or other foreign matter to enter the cylinder.
- Check the following tolerances: the inside diameter of the master cylinder
should be 0.741–0.742 in. (19.02–19.05mm), the outside diameter
of the piston should be 0.740–0.742 in. (18.99–19.03mm), the
cylinder-to-piston clearance should be 0.0007–0.0058 in. (0.02–0.15mm).
- Check the master cylinder rubber cup for scars, splits, wear and other
damage. Even if the damage is only slight in the case of the rubber cup,
the cup must be replaced.
- Replace the return spring if it is excessively worn. The free length
of the primary spring should be 2.31 in. (59mm). The free length of the
secondary spring should be 2 in. (51mm).
- Check the brake fluid reservoir for cracks and replace if any cracks
are found.
- Install the Valve seat, check valve, return spring and the primary cup.
- Install the piston assembly, stop washer and the stop ring.
- Install the brake pipe joint and the connecting tube nipple.
- Install the boot in the cylinder body.
- Bench bleed the master cylinder and install it on the vehicle.
- Refill the master cylinder with fresh fluid and bleed the system.
- Remove the master cylinder from the car.
- Remove the reservoir caps, filters and drain the brake fluid.
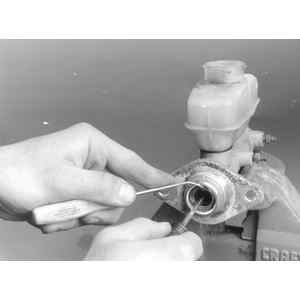
- Pry the piston stopper snapring from the open end of the master cylinder
with a screwdriver.
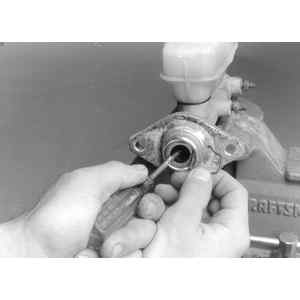
- Remove the stopper screw and washer from the side or bottom of the master
cylinder while applying rearward pressure on the piston.
- Remove the primary and secondary piston assemblies from the master cylinder
bore.
- Remove the caps on the underside of the master cylinder to gain access to
the check valves for cleaning.
| Fig. 1: Exploded view of a master cylinder found
on 1970–79 models
|
WARNING
Do not disassemble the brake fluid level gauge, if equipped.
- Discard all used rubber parts and gaskets. These parts should be replaced
with the new components included in the rebuilding kit.
WARNING
Do not remove the master cylinder reservoir tank(s) unless leaking. If removed
for any reason, replacement is necessary.
- Clean all the parts in clean brake fluid. Do not use mineral oil or alcohol
for cleaning.
- Check the cylinder bore and piston for wear, scoring, corrosion, or any
other damage.
- The bore can be dressed with crocus cloth or a cylinder hone soaked in brake
fluid.
- Wash both the cylinder bore and the piston with clean brake fluid.
- Soak all of the components in clean brake fluid before assembling them.
- Assemble the master cylinder in the reverse order of disassembly.
- Bench bleed the master cylinder.
- Install the master cylinder and fill it with fresh clean brake fluid.
- Bleed the system.
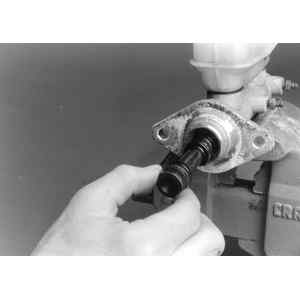
| Fig. 2: When overhauling the master cylinder, it is better
to mount it in a vise for stability
|
| Fig. 3: Remove the snapring and washer
|
| Fig. 4: Remove the primary piston assembly
|
| Fig. 5: Remove the secondary piston assembly

|
| Fig. 6: Exploded view of a common master cylinder found
on 1980–84 models
|
- Remove the level indicator assemblies from the reservoir(s) by turning them
counterclockwise to unlock.
- Drain out and properly discard the fluid.
- Remove the stopper screw while simultaneously holding the pistons fully
back in the cylinder.
- Keeping the pistons fully pushed in, remove the stopper washer with a screwdriver.
- Remove the stopper washer, both piston assemblies, and the return spring.
- Inspect all parts for wear or cracks. If rubber cups are worn, you must
replace the piston assembly it is a part of. Leave pistons assembled.
- The check valve can be disassembled by removing the check valve cap and
then removing the valve, spring, and seat.
- Wash all parts in clean, approved brake fluid. Check the cylinder and other
parts for scoring, damage or corrosion, and check springs for deformation
or fatigue.
To install:
- Assembly is the reverse of disassembly.
- Coat all wear surfaces with clean, approved fluid.
- Make sure the primary piston is pushed all the way into the cylinder before
installing the stopper screw.
- Tighten the check valve cap to 18–25 ft. lbs. (24–33 Nm) and
the stopper screw to 13–26 inch lbs. (1.4–2.9 Nm). Do not remove
the reservoir unless it is leaking. It must be replaced if disassembled.