NOTE: The OHC engines DO NOT use a rocker arm shaft. The valve
rocker simply floats between the valve stem and the hydraulic lifter, and the
center of the valve rocker rides against the camshaft.
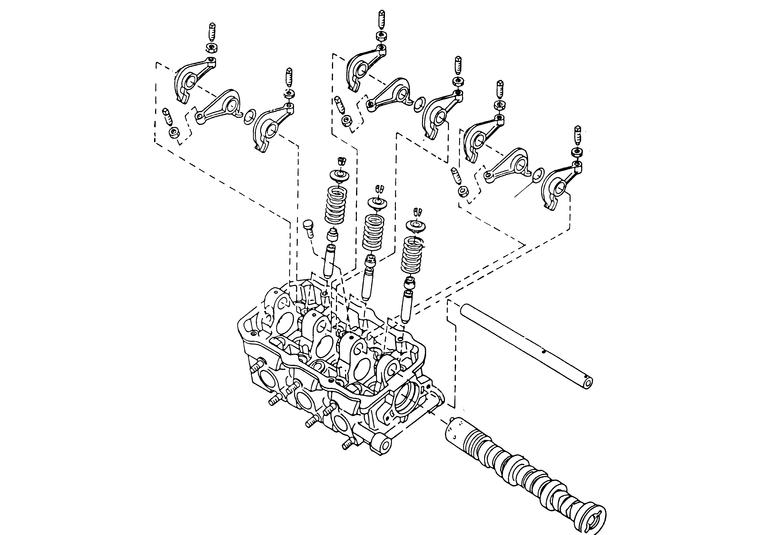
| Fig. 1: Cylinder head and rocker assembly — 1.2L
engine
|
- Disconnect the negative battery cable.
- Disconnect the PCV hose from the rocker arm cover.
- Remove the rocker arm cover mounting bolts and lift off the rocker arm cover.
- Remove the rocker shaft mounting bolt.
- Before removing the shaft, note the positions of the rocker arms and spring
washers.
- Remove the rocker arm shaft slowly. Remove each component as it clears the
shaft. Line the parts up in order as they are removed.
To install:
NOTE: Coat each component with clean engine oil as it is
installed.
- Install the individual components one at a time while slowly sliding the
rocker arm shaft into the shaft carrier. Make sure the hole in the rocker
shaft is lined up with the bolt hole in the center of the carrier.
- Install the rocker shaft bolt. Tighten the bolt to 8–11 ft. lbs. (10–14
Nm).
- Adjust the valve lash. Refer to the procedure in Section 1. Attach all remaining
components then start the engine and listen for any rocker noise or leaking.
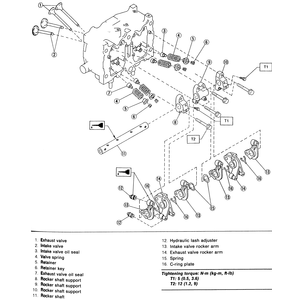
These engines are not equipped with rocker shaft assemblies. Instead, the rocker
arm is driven directly by the camshaft.
Refer to the Camshaft removal and installation procedure in this section for
details.
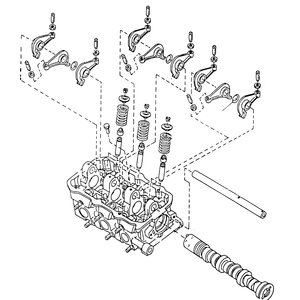
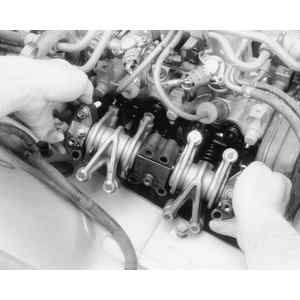
| Fig. 2: Cylinder head and rocker assembly — 2.2L
engine
|
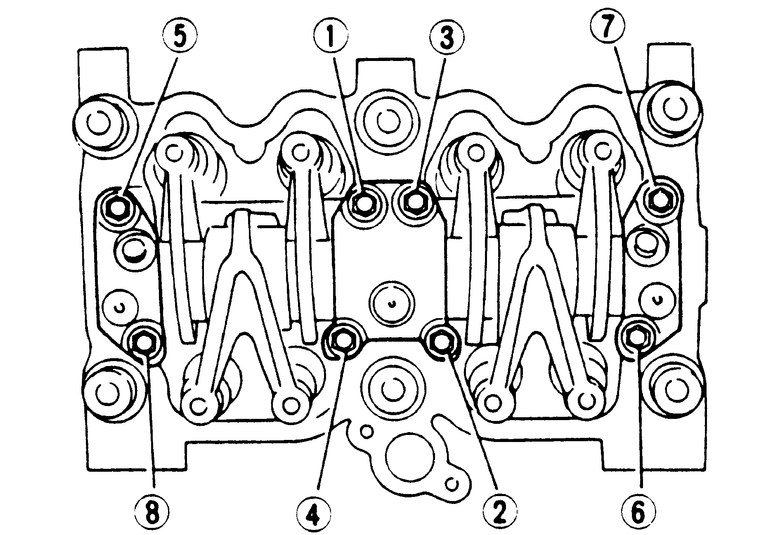
| Fig. 3: Valve rocker bolt loosening/tightening sequence — 2.2L
engine
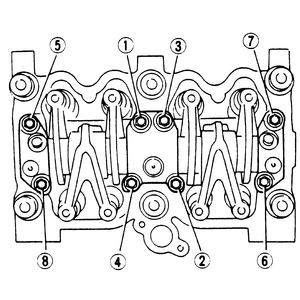
|
| Fig. 4: Loosen and remove the bolts in numerical order
|
| Fig. 5: Remove the rocker shaft and components from the
engine as an assembly
|
- Disconnect the PCV hose and remove the rocker cover.
- Remove the valve rocker assembly by removing bolts 2 through 4 in numerical
sequence.
- Loosen bolt 1, but leave it engaged to retain the valve rocker assembly.
- Remove bolts 5 through 8, taking care not to gouge the dowel pin.
- Remove the valve rocker assembly.
- Place the valve rocker assembly with the air vent on the rocker arm facing
upward into clean engine oil until ready to install. This is done to prevent
damaging the hydraulic lash adjuster.
To install:
- Install the valve rocker assembly on the cylinder head.
- Temporarily tighten bolts 1 through 4 equally.
NOTE: Do not allow the valve rocker assembly to gouge the
dowel pins.
- Tighten bolts 5 through 8 to 9 ft. lbs. (12 Nm).
- Tighten bolts 1 through 4 to 9 ft. lbs. (12 Nm).
- Install the rocker cover and connect the PCV hose.
These engines are not equipped with either rocker shafts or rocker arms. Instead,
the camshaft drives the opening and closing of the individual valves.