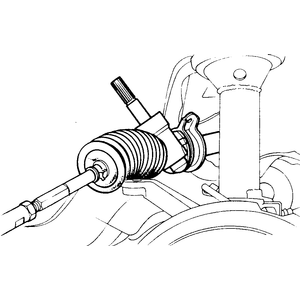
Fig. 2: Slide the rack assembly through the wheelwell
opening
Disconnect the negative battery cable.
Raise and safely support the vehicle.
Remove the tire and wheel assembly.
Remove the cotter pins and castle nuts from the outer tie rod ends and separate
the tie rod ball studs from the steering knuckles.
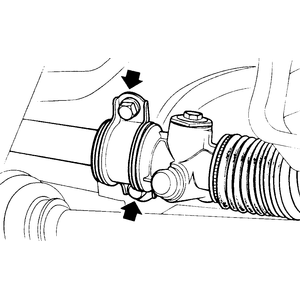
From inside the vehicle, remove the two pinch bolts at the upper and lower
ends of the steering shaft universal joints.
Slide the universal joint up off the rack and pinion unit.
From under the vehicle remove the rack and pinion mounting bracket bolts
and brackets.
Pull the rack down slightly to clear the pinion shaft past the dust boot.
Once the rack is clear, pull the assembly out through the drivers side tie
rod hole.
To install:
Install the rack and pinion assembly through the driver's side tie rod hole
and position on the firewall.
Make sure the pinion shaft passes through the dust boot. With the rack situated
on the firewall install the rack mounting brackets and bolts. Tighten the
mounting bolts to 48 ft. lbs. (67 Nm).
From inside the vehicle, slide the universal joint over the pinion shaft
and install the upper and lower pinch bolts. Tighten the pinch bolts to 17
ft. lbs. (23 Nm). Install and secure the remainder of the components in the
reverse order of removal.
Check the front end alignment and adjust as necessary.
Raise and safely support the vehicle on jackstands.
Remove the front wheels.
Remove the cotter pins from the outer tie rod ends and discard. Remove the
castle nuts and using a suitable tool separate the tie rod ends from the steering
knuckles.
Remove the pinch bolt from the tighten rod universal joint.
Loosen the exhaust manifold mounting nuts and lower the front exhaust pipe.
Remove the four rack and pinion mounting bolts.
Move the gear box toward the pinion side. When the pinion shaft comes off
the rod, rotate the gearbox rearward and remove from the vehicle.
Install the rack and pinion unit from the drivers side and move it into
position so the universal joint can be connected to the pinion shaft. Position
the rack and pinion unit on the crossmember and install the four mounting
bolts and brackets. Tighten the mounting bolts to 44 ft. lbs. (59 Nm).
Install and secure the remaining components in the reverse of removal. Check
and adjust the front end alignment.