Previous Next

Rear Wheel Bearings

REPLACEMENT

Justy

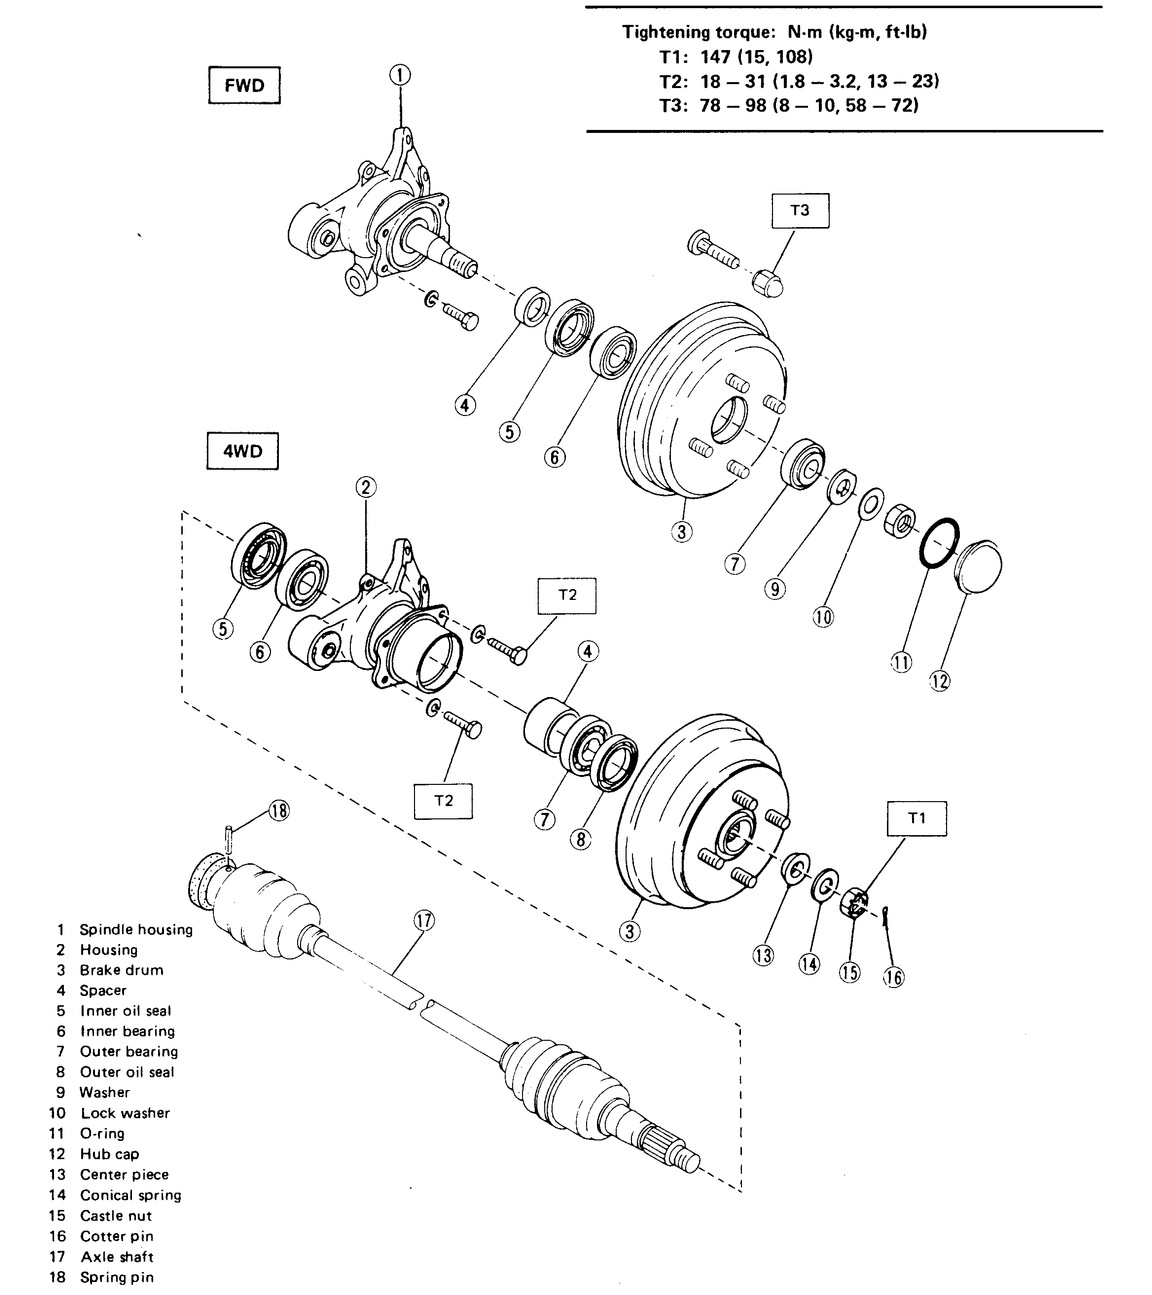
Fig. 1: Rear axle assembly — Justy

FRONT WHEEL DRIVE
  1. Disconnect the negative battery cable.
  2. Raise and safely support the vehicle on jackstands.
  3. Remove the tire and wheel assembly.
  4. Remove the dust cap from the brake drum.
  5. Straighten the lock washer and remove the nut, lock washer and washer.
  6. Pull the drum off the spindle using care not to drop the outer bearing.

    To install:

  7. Install the drum on the spindle and install the outer bearing.
  8. Install the washer, lock washer and nut. Tighten the nut as follows:
    1. Tighten the nut to 29 ft. lbs. (39 Nm).
    2. Rotate the drum several times in each direction.
    3. Loosen the nut until it is completely loose.
    4. Tighten the nut to 1 ft. lbs. (1 Nm).
  9. Bend the lock washer to secure the nut. Install the dust cap with a new oil seal.
  10. Install the tire and wheel assembly, lower the vehicle and connect the negative battery cable.
ALL WHEEL DRIVE
  1. Raise and safely support the vehicle on jackstands.
  2. Remove the tire and wheel assembly.
  3. Remove the axle nut, washer and center piece. It may be necessary to tap on the hub to get the center piece out.
  4. Remove the brake drum from the axle.
  5. Using a suitable seal removal tool, Remove the seals from the front and back of the drum.
  6. Using a suitable press or clamp. drive out the drum bearing assembly.

    To install:

  7. Install the wheel bearing using a press or clamp assembly. Install new seals to the front and rear of the drum assembly.
  8. Carefully install the drum onto the splined shaft. Install the center piece, washer and axle nut. Tighten the axle nut to 108 ft. lbs. (147 Nm). Install a new cotter pin.
  9. Install the wheel, adjust the rear brakes and lower the vehicle.
Sedan, Coupe, Loyale, XT, Wagon And Brat
REAR DRUM — 4WD

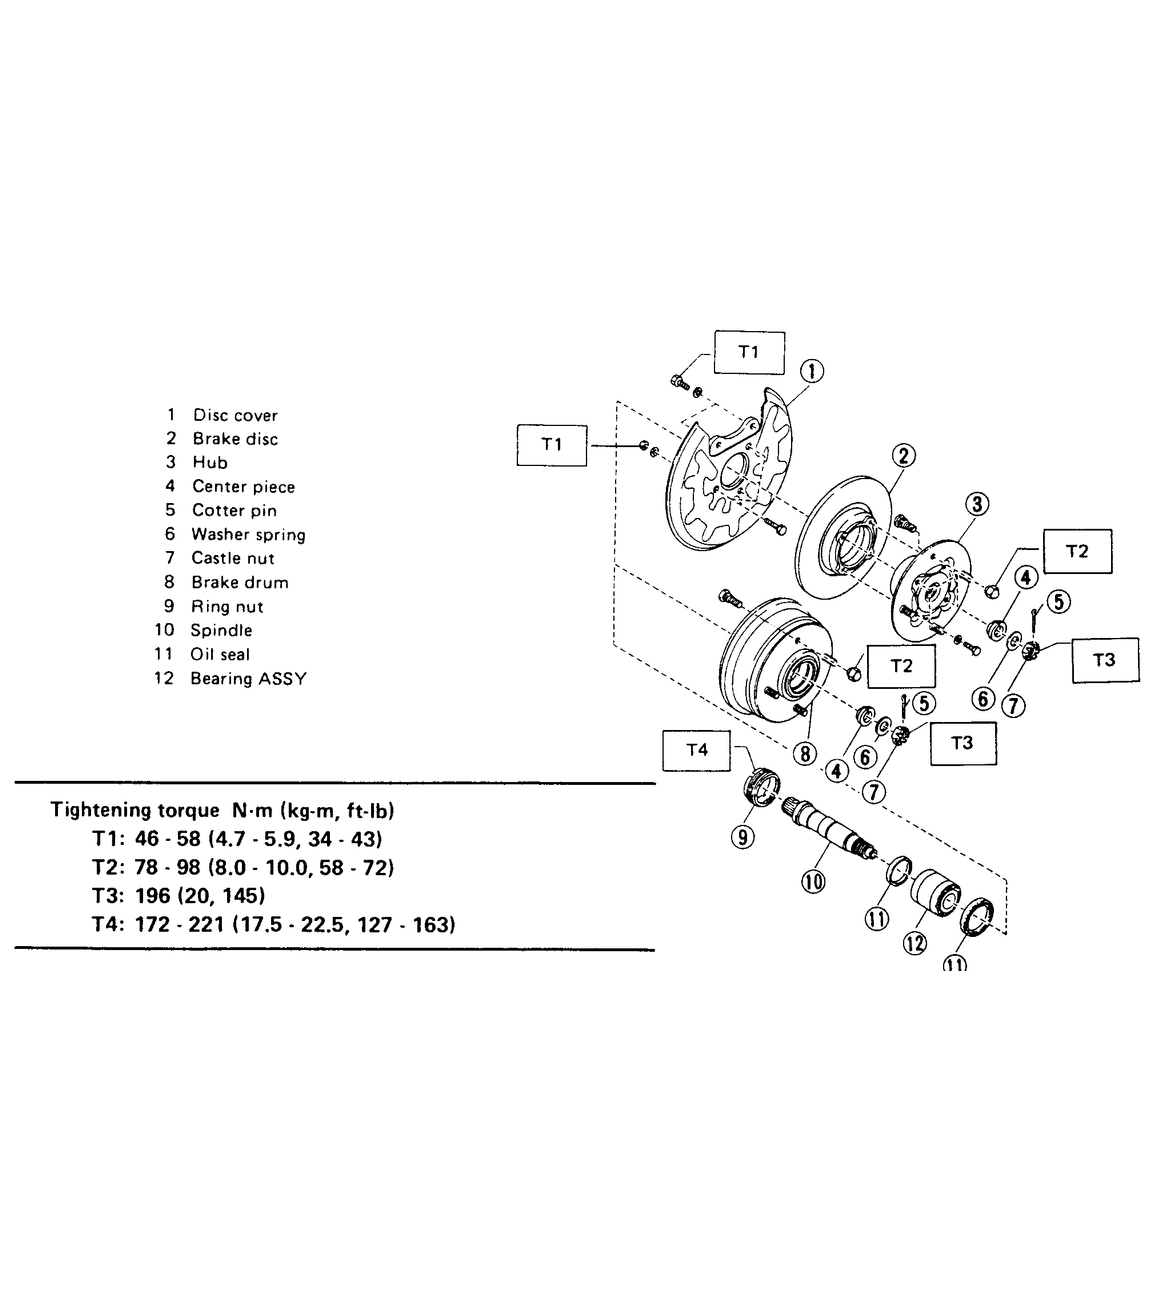
Fig. 2: 4WD rear brake assemblies — Sedan, Coupe, Loyale, XT, Wagon and Brat

  1. Raise and safely support the vehicle on jackstands.
  2. Remove the tire and wheel assembly.
  3. Remove the axle nut, flat washer and center piece. It may be necessary to tap on the hub to get the center piece out.
  4. Remove the brake drum from the axle.
  5. Using a suitable seal removal tool, Remove the seals from the front and back of the drum.
  6. Using a suitable press or clamp. drive out the drum bearing assembly.
  7. Installation is the reverse of removal. Install the wheel bearing using a press or clamp assembly.
  8. Install new seals to the front and rear of the drum assembly.
  9. Adjust the rear brakes.
REAR DRUM — FRONT WHEEL DRIVE

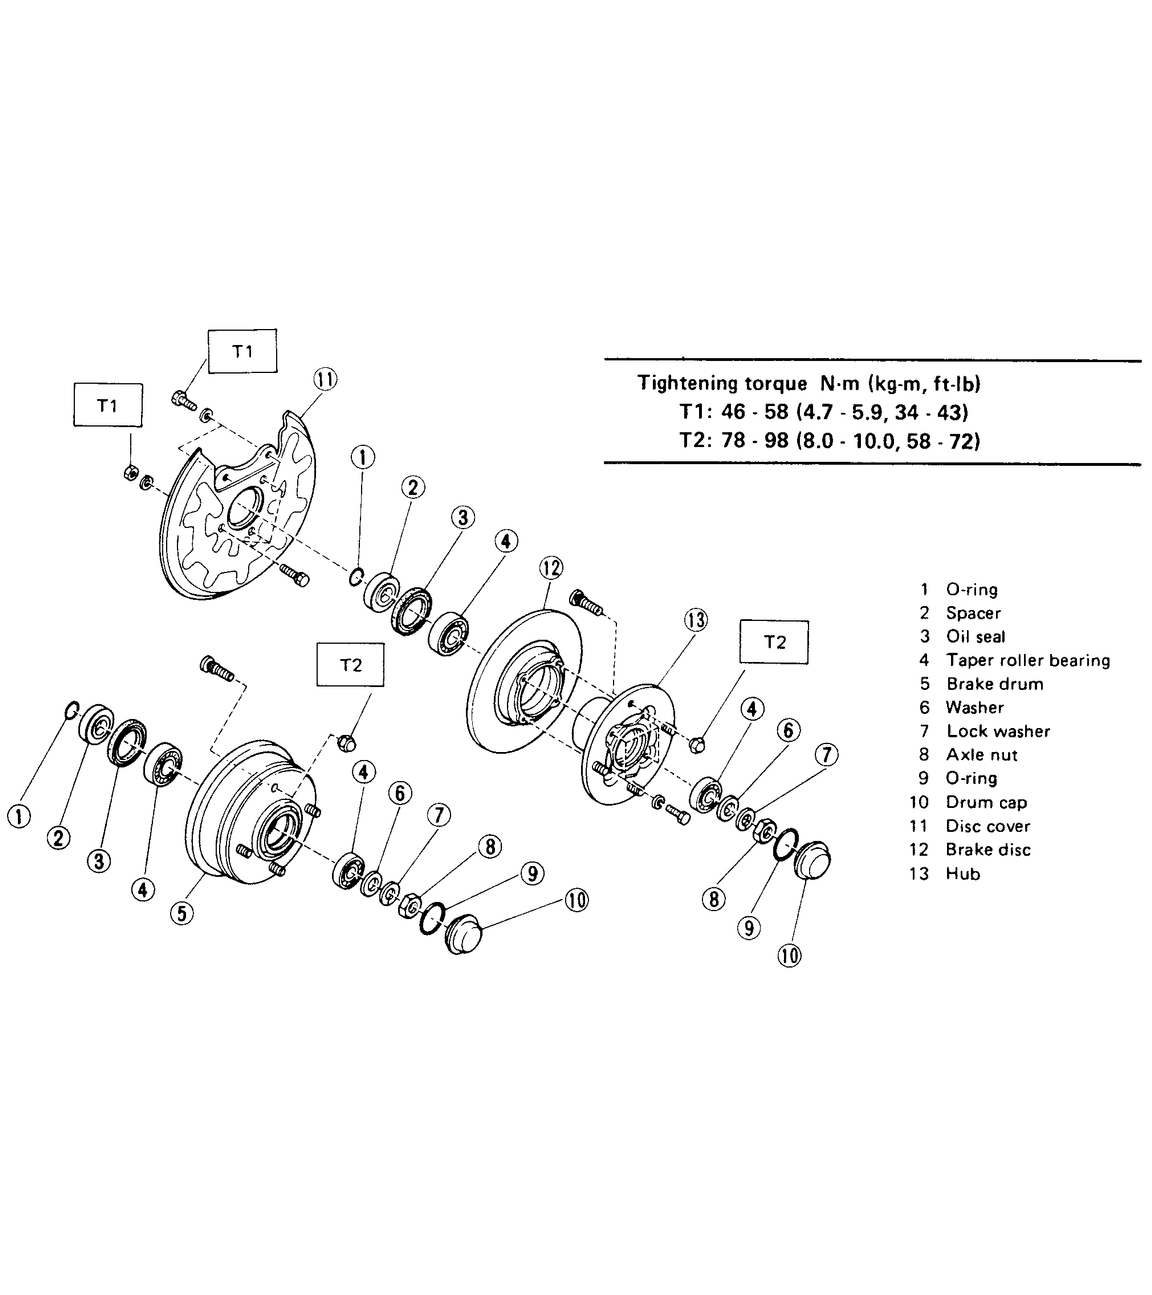
Fig. 3: FWD rear brake assemblies — Sedan, Coupe, Loyale, XT, Wagon and Brat

  1. Raise and safely support the vehicle on jackstands.
  2. Remove the rear wheel assembly.
  3. Remove the dust cap.
  4. Remove the axle nut and remove the washer and outer wheel bearing.
  5. Remove the drum from the rear spindle.
  6. Using a suitable seal removal tool, remove the seals from the front and rear of the drum.
  7. Remove the wheel bearings by using a suitable press or clamp.
  8. Installation is the reverse of removal. Install the wheel bearings into the drum using a press or clamp assembly.
FRONT AND REAR ROTORS — 4WD
  1. Raise and safely support the vehicle on jackstands.
  2. Remove the tire and wheel assembly.
  3. Remove the lower caliper mounting bolt and remove the caliper from the mounting bracket. Suspend the caliper from the strut with a wire. DO NOT allow the caliper to hang from the brake hose.
  4. Remove the two caliper mounting bracket bolts and remove the caliper mounting bracket with the brake pads in place.
  5. Remove the cotter pin from the axle nut.
  6. Remove the axle nut, flat washer and center piece. It may be necessary to tap on the hub to get the center piece out.
  7. Remove the brake rotor assembly from the axle.
  8. Separate the rotor from the hub assembly, by removing the retainer bolts.
  9. Using a suitable seal removal tool, remove the seals from the front and rear of the drum.
  10. Remove the bearings from the assembly using a press to drive out the bearing.
  11. Installation is the reverse of removal. Install the bearings to the assembly using a suitable press.
  12. Install new seals to the front and rear of the hub assembly.
  13. Pump the brake pedal several times to seat the pads against the rotor.
REAR ROTOR — FWD
  1. Raise and safely support the vehicle on jackstands.
  2. Remove the rear wheel assembly.
  3. Remove the lower caliper mounting bolt and remove the caliper from the mounting bracket. Suspend the caliper from the strut with a wire. DO NOT allow the caliper to hang from the brake hose.
  4. Remove the two caliper mounting bracket bolts and remove the caliper mounting bracket with the brake pads in place.
  5. Remove the dust cap.
  6. Remove the axle nut and remove the washer and outer wheel bearing.
  7. Remove the rotor assembly from the rear spindle.
  8. Separate the rotor from the hub assembly, by removing the retainer bolts.
  9. Using a suitable seal removal tool, remove the seals from the front and rear of the drum.
  10. Remove the bearings from the assembly using a press to drive out the bearing.
  11. Installation is the reverse of removal. Install the bearings to the assembly using a suitable press.
  12. Install new seals to the front and rear of the hub assembly.
  13. Pump the brake pedal several times to seat the pads against the rotor.
Legacy and Impreza
ALL WHEEL DRIVE
  1. Disconnect the negative battery cable.
  2. Loosen the parking brake adjustment.
  3. Raise and support the vehicle safely on jackstands.
  4. Remove the wheel assembly.
  5. Unstake and remove the axle nut.
  6. If equipped, remove the caliper, leaving the line connected, and suspend it aside, then remove the rotor. If equipped with rear drum brakes, remove the drum brake assembly.
  7. Disconnect the parking brake cable.
  8. Remove the sway bar clamp.
  9. Remove the bolt securing the lateral link to the housing.
  10. Remove the bolts securing the trailing link to the housing.
  11. Remove the halfshaft.
  12. Remove the bolts securing the strut to the housing.
  13. If equipped with ABS, remove the speed sensor from the backing plate.
  14. Remove the housing assembly.
  15. Using hub stand 92708000 and puller 927420000 or equivalent, remove the hub from the rear housing.
  16. Remove the backing plate from the housing.
  17. Remove the outer, inner and sub oil seals.
  18. Remove the snapring.
  19. Remove the bearing by pressing the inner race.

    To install:

  20. Clean the housing thoroughly.

    NOTE: Do not remove the plastic lock from the inner race when installing the bearing.

  21. Install a new bearing into the housing by pressing the outer race.
  22. Pack the bearing with grease.
  23. Install the snapring and ensure it fits properly.
  24. Using installer 927460000 or equivalent, press in a new outer seal until it comes in contact with the snapring.
  25. Using installer 927450000 or equivalent, press in a new inner seal until it contacts the bottom.
  26. Install a new sub oil seal.
  27. Apply grease to the oil seal lip.
  28. Install the backing plate and tighten the bolts to 43 ft. lbs. (58 Nm).
  29. Using installer 927450000 or equivalent, press in the hub into the housing.
  30. Connect the housing to the strut and tighten the bolts to 119 ft. lbs. (162 Nm).
  31. Install and secure all remaining components in the reverse order of removal. Adjust the parking brake cable.
FRONT WHEEL DRIVE
  1. Disconnect t he negative battery cable.
  2. Loosen the parking brake adjustment.
  3. Raise and support the vehicle safely on jackstands.
  4. Remove the wheel assembly.
  5. Unstake and remove the axle nut.
  6. If equipped, remove the caliper, leaving the line connected and suspend it aside. Remove the rotor. Or if equipped with rear drum, remove the drum brake assembly.
  7. Disconnect the parking brake cable.
  8. Remove the bolt securing the lateral link to the spindle then the trailing link to the spindle.
  9. Remove the bolts securing the strut to the spindle and extract the spindle assembly.
  10. Remove the hub and bearing assembly from the spindle.

    To install:

  11. Pack the oil seal located and the rear of the hub with grease.
  12. Install the hub on the spindle and temporarily tighten a new nut and washer to hold the hub in place.
  13. Connect the spindle to the strut and tighten the bolts to 119 ft. lbs. (162 Nm).
  14. Connect the trailing link to the spindle and tighten the bolt and new nut to 94 ft. lbs. (127 Nm).
  15. Connect the lateral link to the spindle and tighten the bolt and new nut to 116 ft. lbs. (157 Nm).
  16. Install and secure the remainder of installation is the reverse of removal.
  17. Adjust the parking brake cable.
SVX
  1. Set the parking brake.
  2. Raise and safely support the vehicle on jackstands.
  3. Remove the rear wheel assembly.
  4. Remove the dust cap and remove the axle nut.
  5. Return the parking brake lever and remove the console box lid.
  6. Loosen the parking brake adjuster nut.
  7. Remove the stabilizer link.
  8. Remove the ABS sensor and clamp.
  9. Disconnect the parking brake cable clamp.
  10. Disconnect the brake hose from the strut.
  11. Loosen the caliper assembly securing bolts.
  12. Disconnect the trailing link from the knuckle. Remove the nut securing the lateral link to the knuckle.
  13. Remove the two nuts securing the strut to the knuckle.
  14. Remove the caliper assembly and fasten to the strut using wire.
  15. Remove the rotor.
  16. Remove the parking brake shoes and disconnect the cable from the shoe.
  17. Remove the parking brake cable clamp and remove the cable from the back plate.
  18. Separate the knuckle from the halfshaft.
  19. Remove the mounting bolts and remove the knuckle. Extract the bearings.
  20. Installation is the reverse of removal. Secure all components as follows.

Previous Next