 |
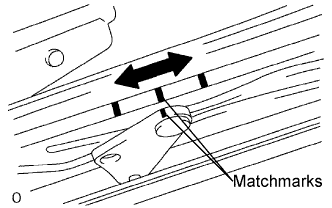
Using a screwdriver, slide the drive cable of the sliding roof to align the matchmarks.
- HINT:
- Tape the screwdriver tip before use.
SLIDING ROOF HOUSING > INSTALLATION |
| 1. INSTALL ROOF WIND DEFLECTOR PANEL ASSEMBLY |
| 2. INSTALL SLIDING ROOF DRIVE CABLE SUB-ASSEMBLY |
| 3. ADJUST FULLY CLOSED POSITION |
|
Using a screwdriver, slide the drive cable of the sliding roof to align the matchmarks.
| 4. INSTALL ROOF DRIP CHANNEL REAR |
| 5. INSTALL SUNSHADE TRIM KNOB |
Install the trim knob with the 2 screws.
| 6. INSTALL SUNSHADE TRIM SUB-ASSEMBLY |
| 7. INSTALL SLIDING ROOF SUNSHADE STOPPER |
| 8. INSTALL SLIDING ROOF HOUSING SUB-ASSEMBLY |
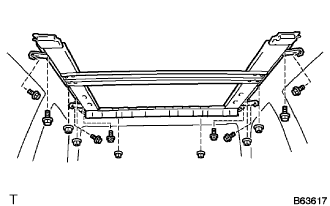 |
Install the housing sub-assembly with the 6 nuts.
Install the 4 brackets with the 8 bolts.
Connect the 4 drain hoses.
| 9. INSTALL SLIDING ROOF DRIVE GEAR SUB-ASSEMBLY |
Install the drive gear with the 2 bolts.
Connect the sliding roof motor switch connector.
| 10. ADJUST SLIDING ROOF GLASS SUB-ASSEMBLY |
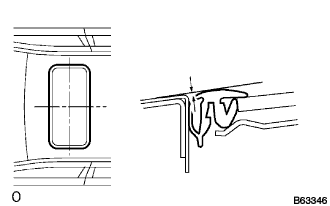 |
Check the difference in level between the sliding roof (weatherstrip) and roof panel.
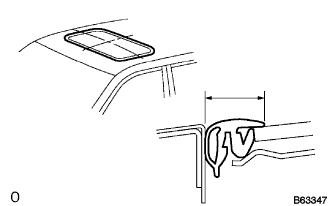 |
Check the difference in level between the sliding roof (glass) and roof panel front end and rear end.
| 11. INSTALL SLIDING ROOF GLASS SUB-ASSEMBLY |
Using a "torx" wrench T25, loosen a screw to adjust the sliding roof panel position. When the adjustment has been done, tighten the screw there.
Reset the sliding roof drive gear (Click here).
Check the sliding roof operation function (Click here).
| 12. CHECK FOR WATER LEAKS |
Adjusting the sliding roof, check that there is no water leak.
If a leak is found, readjust the sliding roof.
| 13. INSTALL ROOF HEADLINING ASSEMBLY |