1GR-FE INTAKE / EXHAUST INTAKE MANIFOLD INSTALLATION
PROCEDURE

 17111
1.INSTALL INTAKE MANIFOLD
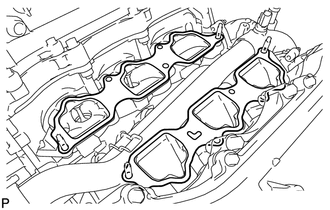
Set a new gasket on each cylinder head.
- NOTICE:
- ·
Align the port holes of the gasket and cylinder head.
·Be careful of the installation direction.
Set the intake manifold on the cylinder heads.
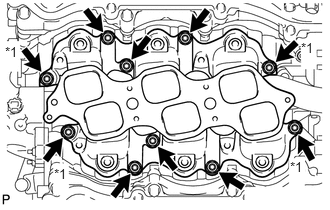
Install and uniformly tighten the 6 bolts and 4 nuts in several passes.
- Torque:
- 21 N*m (214 kgf*cm, 15 ft.*lbf)
| *1 | Nut |
- HINT:
-
Tighten the inner installation bolts of the intake manifold before tightening the outer bolts.
23807
2.INSTALL FUEL DELIVERY PIPE SUB-ASSEMBLY
17129
3.INSTALL INTAKE AIR SURGE TANK
Install a new gasket to the intake air surge tank.
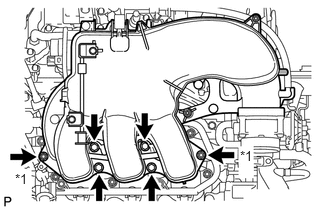
Install the intake air surge tank with the 4 bolts and 2 nuts in the order shown in the illustration.
- Torque:
- 28 N*m (286 kgf*cm, 21 ft.*lbf)
| *1 | Nut |
Install the No. 1 surge tank stay with the 2 bolts.
- Torque:
- 21 N*m (214 kgf*cm, 15 ft.*lbf)
Attach the wire harness clamp.
Install the No. 2 surge tank stay with the 2 bolts.
- Torque:
- 21 N*m (214 kgf*cm, 15 ft.*lbf)
Install the throttle body bracket with the 2 bolts.
- Torque:
- 21 N*m (214 kgf*cm, 15 ft.*lbf)
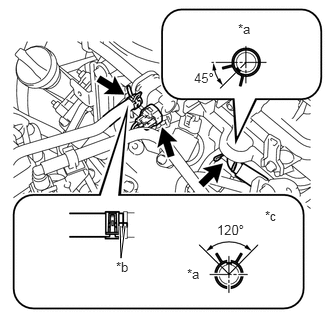
Connect the No. 1 ventilation hose.
| *a | Front |
| *b | Matchmark |
| *c | Top |
Connect the No. 1 vacuum switching valve connector.
Connect the No.1 fuel feed hose.
- HINT:
-
Connect the hose so that the direction of the hose clamp is as indicated in the illustration.
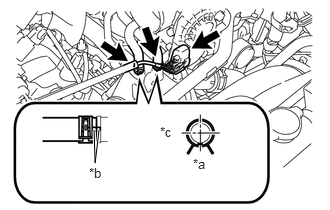
Connect the throttle body connector.
| *a | Front |
| *b | Matchmark |
| *c | RH |
Connect the No. 4 water by-pass hose.
Connect the No. 5 water by-pass hose.
- HINT:
-
Connect the hose so that the direction of the hose clamp is as indicated in the illustration.
Attach the 2 heater hose clamps.
17881
4.INSTALL NO. 1 AIR CLEANER HOSE
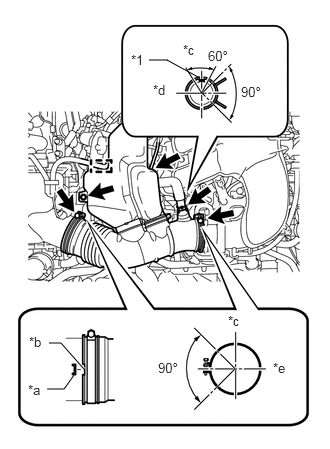
Install the air cleaner hose with the 2 clamps.
- Torque:
- 5.0 N*m (51 kgf*cm, 44 in.*lbf)
| *1 | Paint Mark |
| *a | Protrusion |
| *b | Groove |
| *c | Top |
| *d | RH |
| *e | Front |
Install the bolt.
- Torque:
- 5.0 N*m (51 kgf*cm, 44 in.*lbf)
Connect the vacuum hose and ventilation hose.
- HINT:
-
The direction of the hose clamp is indicated in the illustration.
Attach the wire harness clamp.
5.CONNECT CABLE TO NEGATIVE BATTERY TERMINAL
- NOTICE:
-
When disconnecting the cable, some systems need to be initialized after the cable is reconnected (See page General>INTRODUCTION>REPAIR INSTRUCTION>INITIALIZATION).
6.ADD ENGINE COOLANT
7.INSPECT FOR COOLANT LEAK
8.INSPECT FOR FUEL LEAK
11259
9.INSTALL V-BANK COVER
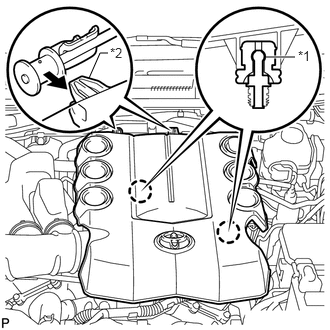
Attach the 2 V-bank cover hooks to the bracket. Then align the 2 V-bank cover grommets with the 2 pins and press down on the V-bank cover to attach the pins.
| *1 | Pin |
| *2 | Hook |
51405A
10.INSTALL NO. 1 ENGINE UNDER COVER SUB-ASSEMBLY
52129B
11.INSTALL FRONT BUMPER COVER LOWER