EXTERIOR PANELS / TRIM REAR BUMPER(w/ TOYOTA Parking Assist-sensor System) REASSEMBLY
PROCEDURE

 89348
1.INSTALL NO. 1 ULTRASONIC SENSOR RETAINER
89348A
2.INSTALL NO. 2 ULTRASONIC SENSOR RETAINER
89348D
3.INSTALL ULTRASONIC SENSOR CLIP
89341A
4.INSTALL NO. 1 ULTRASONIC SENSOR
52751A
5.INSTALL REAR BUMPER CENTER MOULDING
Attach the 4 claws to install the rear bumper center moulding.
Install the 6 outside moulding retainers.
52162B
6.INSTALL NO. 1 REAR BUMPER PLATE
Attach the claw to install the No. 1 rear bumper plate.
Install the outside moulding retainer.
52163A
7.INSTALL REAR BUMPER PLATE RH
Attach the claw to install the rear bumper plate RH.
Install the outside moulding retainer.
52164A
8.INSTALL REAR BUMPER PLATE LH
Attach the claw to install the rear bumper plate LH.
Install the 2 outside moulding retainers.
52186A
9.INSTALL REAR BUMPER SIDE BRACKET LH
Install the rear bumper side bracket LH with the 2 screws and clip.
52185A
10.INSTALL REAR BUMPER SIDE BRACKET RH
- HINT:
-
Use the same procedure as for the LH side.
82163
11.INSTALL NO. 3 FLOOR WIRE
Clean the rear bumper surface.
Using a heat light, heat the rear bumper surface.
Remove the double-sided tape from the rear bumper surface.
Wipe off any tape adhesive residue with cleaner.
Attach the 4 clamps to connect the 4 connectors.
Install the No. 3 floor wire with the new 3 pieces of tape as shown in the illustration.
- HINT:
- ·
With the wire harness contacting the rear bumper cover, wrap tape around as much of the wire harness as possible.
·Do not reuse the tape.
·Be sure to install the wire harness so that it is centered between the guidelines labeled B and attach the tape so that its edges are aligned with the guidelines labeled A.
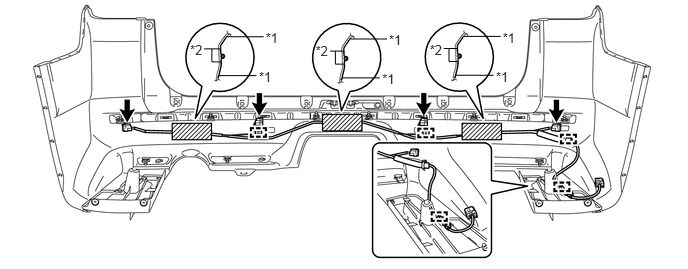
| *1 | Guideline A | *2 | Guideline B |