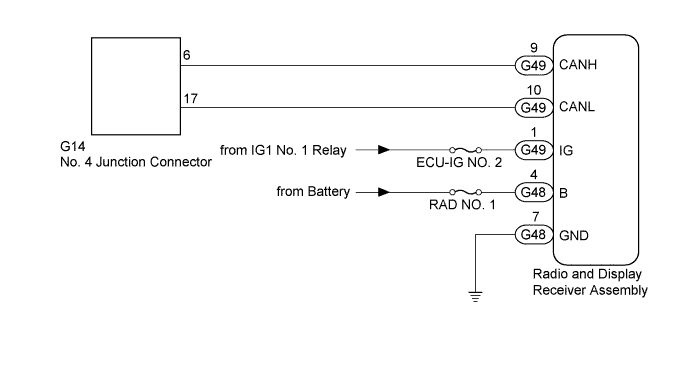
CAN COMMUNICATION SYSTEM > Audio Receiver Assembly Communication Stop Mode |
| Detection Item | Symptom | Trouble Area |
| Audio Receiver Assembly Communication Stop Mode | Either condition is met:
|
|
| 1.DISCONNECT CABLE FROM NEGATIVE BATTERY TERMINAL |
Disconnect the cable from the negative (-) battery terminal before measuring the resistances of the main wire and branch wire.
| NEXT | |
 |
| 2.CHECK FOR OPEN IN CAN BUS WIRE (RADIO AND DISPLAY RECEIVER ASSEMBLY BRANCH WIRE) |
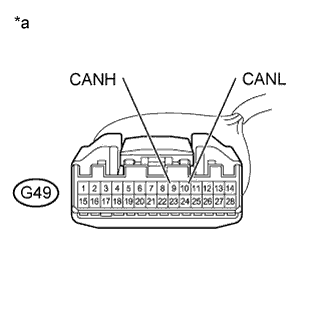 |
Disconnect the G49 radio and display receiver assembly connector.
Measure the resistance according to the value(s) in the table below.
| Tester Connection | Switch Condition | Specified Condition |
| G49-9 (CANH) - G49-10 (CANL) | Ignition switch off | 54 to 69 Ω |
| *a | Front view of wire harness connector (to Radio and Display Receiver Assembly) |
|
| ||||
| OK | |
|
| 3.CHECK HARNESS AND CONNECTOR (RADIO AND DISPLAY RECEIVER ASSEMBLY - BATTERY AND BODY GROUND) |
 |
Connect the cable to the negative (-) battery terminal.
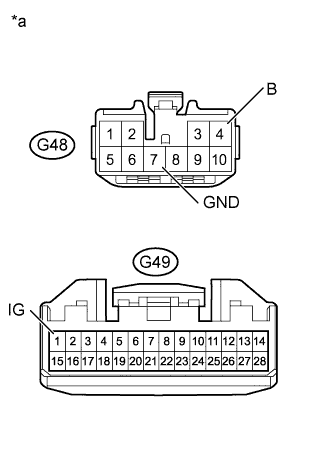
Disconnect the G48 and G49 radio and display receiver assembly connectors.
Measure the resistance according to the value(s) in the table below.
| Tester Connection | Condition | Specified Condition |
| G48-7 (GND) - Body ground | Always | Below 1 Ω |
Measure the voltage according to the value(s) in the table below.
| Tester Connection | Condition | Specified Condition |
| G49-1 (IG) - Body ground | Ignition switch ON | 11 to 14 V |
| G48-4 (B) - Body ground | Always | 11 to 14 V |
| *a | Front view of wire harness connector (to Radio and Display Receiver Assembly) |
|
| ||||
| OK | ||
 | ||
| ||
