Home › Drivetrain · VF2A TRANSFER / 4WD / AWD › TRANSFER SYSTEM

TRANSFER SYSTEM > INSPECTION

for Preparation Click here


1. TRANSFER SYSTEM

NOTICE:
  1. To shift from H2 to H4, move the transfer shift lever while keeping the wheels facing straight ahead.
  2. To shift from H4 to L4, stop the vehicle, move the shift lever to N and then move the transfer shift lever.
  3. To shift from L4 to H4, stop the vehicle, move the shift lever to N and then move the transfer shift lever.


2. INSPECT INDICATOR LIGHT
  1. 4WD Indicator Light:

    1. Start the engine.

    2. Move the transfer shift lever from the H2 position to the H4, L4 or N position.

    3. Check that the 4WD indicator light illuminates.

      OK:
      4WD indicator light comes on or 4WD indicator light comes on after blinking.

      If the result is not as specified, inspect the transfer indicator switch (4WD position) and four wheel drive control ECU. If the system is normal, there may be a malfunction in the CAN communication system or combination meter. In this case, first check the CAN communication system (Click here). Then check the combination meter (Click here).

  1. 4LO Indicator Light:

    1. Turn the ignition switch to ON.

    2. Move the shift lever to N (vehicle is stopped).

    3. Move the transfer shift lever from the H2, H4 or N position to the L4 position.

    4. Check the 4LO indicator light.

      OK:
      4LO indicator light comes on or 4LO indicator light comes on after blinking.

      If the result is not as specified, inspect the transfer indicator switch (L4 position) and four wheel drive control ECU. If the system is normal, there may be a malfunction in the CAN communication system or combination meter. In this case, first check the CAN communication system (Click here). Then check the combination meter (Click here).


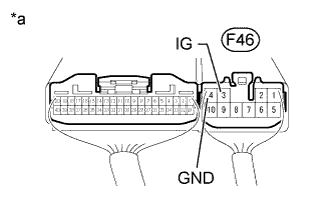
3. INSPECT FOUR WHEEL DRIVE CONTROL ECU (POWER SUPPLY)


    C217417E01
  1. Measure the voltage according to the value(s) in the table below.

    Standard voltage:
    Tester Connection
    Switch Condition
    Specified Condition
    F46-3 (IG) - Body ground
    Ignition switch ON
    11 to 14 V

    Text in Illustration 
    *a
    Component with harness connected
    (Four Wheel Drive Control ECU)
    If the result is not as specified, inspect the fuse, harness or connector. If the harness or connector is malfunctioning, repair or replace the harness or connector. If the harness or connector is normal, replace the four wheel drive control ECU (Click here).

  1. Measure the resistance according to the value(s) in the table below.

    Standard resistance:
    Tester Connection
    Condition
    Specified Condition
    A29-4 (GND) - Body ground
    Always
    Below 1 Ω

    If the result is not as specified, repair or replace the harness, fuse or connector.


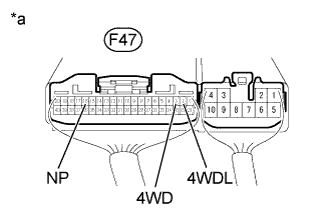
4. INSPECT FOUR WHEEL DRIVE CONTROL ECU (TRANSFER INDICATOR SWITCH)


    C217417E05
  1. Measure the voltage according to the value(s) in the table below.

    Standard voltage:
    Tester Connection
    Switch Condition
    Specified Condition
    F47-2 (4WDL) - Body ground
    Ignition switch ON
    Transfer shift lever position H2 or H4
    10.5 to 14 V
    Ignition switch ON
    Transfer shift lever position L4 or N
    Below 1.5 V
    F47-3 (4WD) - Body ground
    Ignition switch ON
    Transfer shift lever position H2
    10.5 to 14 V
    Ignition switch ON
    Transfer shift lever position H4, L4 or N
    Below 1.5 V
    F47-16 (NP) - Body ground
    Ignition switch ON
    Transfer shift lever position N
    Below 1.5 V
    Ignition switch ON
    Transfer shift lever position not N
    9.5 to 14 V

    Text in Illustration 
    *a
    Component with harness connected
    (Four Wheel Drive Control ECU)
    If the result is not as specified, check the power supply. If the power supply is normal, inspect the transfer indicator switch (Click here).


5. CHECK HARNESS AND CONNECTOR (FOUR WHEEL DRIVE CONTROL ECU - TRANSFER INDICATOR SWITCH)


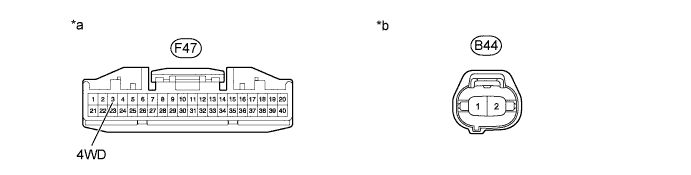
  1. Check the transfer indicator switch (4WD position).


    C217463E01


    1. Disconnect the F47 ECU connector.

    2. Disconnect the B44 switch connector.

    3. Measure the resistance according to the value(s) in the table below.

      Standard resistance:
      Tester Connection
      Condition
      Specified Condition
      F47-3 (4WD) - B44-1
      Always
      Below 1 Ω
      F47-3 (4WD) - Body ground
      Always
      100 kΩ or higher


      Text in Illustration 
      *a
      Front view of wire harness connector
      (to Four Wheel Drive Control ECU)
      *b
      Front view of wire harness connector
      (to Transfer Indicator Switch)
      If the result is not as specified, repair or replace the harness or connector.


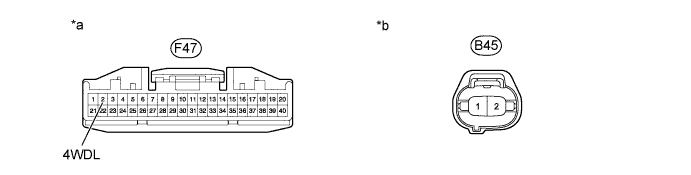
  1. Check the transfer indicator switch (L4 position).


    C217463E04


    1. Disconnect the F47 ECU connector.

    2. Disconnect the B45 switch connector.

    3. Measure the resistance according to the value(s) in the table below.

      Standard resistance:
      Tester Connection
      Condition
      Specified Condition
      F47-2 (4WDL) - B45-1
      Always
      Below 1 Ω
      F47-2 (4WDL) - Body ground
      Always
      100 kΩ or higher


      Text in Illustration 
      *a
      Front view of wire harness connector
      (to Four Wheel Drive Control ECU)
      *b
      Front view of wire harness connector
      (to Transfer Indicator Switch)
      If the result is not as specified, repair or replace the harness or connector.


  1. Check the transfer indicator switch (neutral position).


    C217464E02


    1. Disconnect the F47 ECU connector.

    2. Disconnect the B46 switch connector.

    3. Measure the resistance according to the value(s) in the table below.

      Standard resistance:
      Tester Connection
      Condition
      Specified Condition
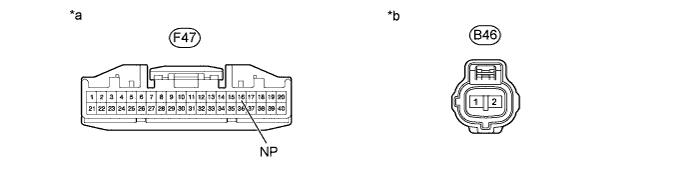
      F47-16 (NP) - B45-1
      Always
      Below 1 Ω
      F47-16 (NP) - Body ground
      Always
      100 kΩ or higher


      Text in Illustration 
      *a
      Front view of wire harness connector
      (to Four Wheel Drive Control ECU)
      *b
      Front view of wire harness connector
      (to Transfer Indicator Switch)
      If the result is not as specified, repair or replace the harness or connector.


6. INSPECT A.D.D. ACTUATOR


  1. Check the harness and connector (ECU - A.D.D. actuator).

    1. Disconnect the F46 and F47 ECU connectors.

    2. Disconnect the D1 actuator connector.


    3. Measure the resistance according to the value(s) in the table below.


      C217496E01

      Standard resistance:
      Tester Connection
      Condition
      Specified Condition
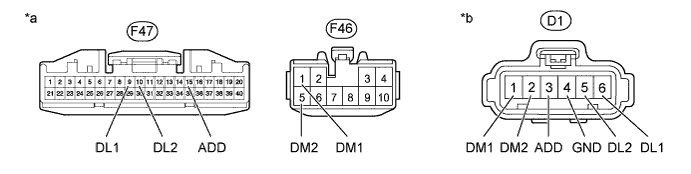
      F47-9 (DL1) - D1-6 (DL1)
      Always
      Below 1 Ω
      F47-9 (DL1) - Body ground
      Always
      100 kΩ or higher
      F47-10 (DL2) - D1-5 (DL2)
      Always
      Below 1 Ω
      F47-10 (DL2) - Body ground
      Always
      100 kΩ or higher
      F47-15 (ADD) - D1-3 (ADD)
      Always
      Below 1 Ω
      F47-15 (ADD) - Body ground
      Always
      100 kΩ or higher
      F46-1 (DM1) - D1-1 (DM1)
      Always
      Below 1 Ω
      F46-1 (DM1) - Body ground
      Always
      100 kΩ or higher
      F46-5 (DM2) - D1-2 (DM2)
      Always
      Below 1 Ω
      F46-5 (DM2) - Body ground
      Always
      100 kΩ or higher
      D1-4 (GND) - Body ground
      Always
      Below 1 Ω


      Text in Illustration 
      *a
      Front view of wire harness connector
      (to Four Wheel Drive Control ECU)
      *b
      Front view of wire harness connector
      (to A.D.D. Actuator)
      If the result is not as specified, repair or replace the harness or connector. If the harness or connector is normal, check the ECU output voltage.


  1. Check the four wheel drive control ECU (A.D.D. actuator).

    1. Connect the F46 and F47 ECU connectors.

    2. Connect the D1 actuator connector.


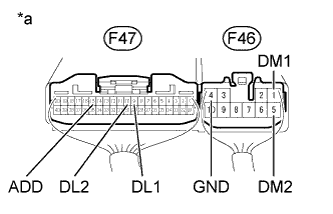
    3. C217417E06
    4. Measure the voltage according to the value(s) in the table below.

      Standard voltage:
      Tester Connection
      Switch Condition
      Specified Condition
      F46-1 (DM1) - F46-4 (GND)
      Ignition switch ON
      Transfer shift lever position H2 → H4, L4 or N (During operation of A.D.D. actuator motor from FREE to LOCK)
      10 to 14 V
      Ignition switch ON
      Transfer shift lever position H2 → H4, L4 or N (A.D.D. actuator motor stopped)
      Below 1.5 V
      F46-5 (DM2) - F46-4 (GND)
      Ignition switch ON
      Transfer shift lever position H4, L4 or N → H2 (During operation of A.D.D. actuator motor from LOCK to FREE)
      10 to 14 V
      Ignition switch ON
      Transfer shift lever position H4, L4 or N → H2 (A.D.D. actuator motor stopped)
      Below 1.5 V
      F47-9 (DL1) - F46-4 (GND)
      Ignition switch ON
      Transfer shift lever position H2
      Below 1.5 V
      Ignition switch ON
      Transfer shift lever position H4, L4 or N
      10.5 to 14 V
      F47-10 (DL2) - F46-4 (GND)
      Ignition switch ON
      Transfer shift lever position H2
      10.5 to 14 V
      Ignition switch ON
      Transfer shift lever position H4, L4 or N
      Below 1.5 V
      F47-15 (ADD) - F46-4 (GND)
      Ignition switch ON
      Transfer shift lever position H2
      9.5 to 14 V
      Ignition switch ON
      Transfer shift lever position H4, L4 or N
      Below 1.5 V

      Text in Illustration 
      *a
      Component with harness connected
      (Four Wheel Drive Control ECU)
      If the result is not as specified, determine if the malfunction is on the ECU side or the actuator side by disconnecting the connector of the A.D.D. actuator, and then checking the ECU output voltage.


  1. Check the four wheel drive control ECU.

    1. Connect the F46 and F47 ECU connectors.

    2. Disconnect the D1 actuator connector.


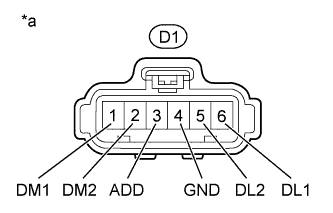
    3. C217499E01
    4. Measure the voltage according to the value(s) in the table below.

      Standard voltage:
      Tester Connection
      Switch Condition
      Specified Condition
      D1-3 (ADD) - D1-4 (GND)
      Ignition switch ON
      9.5 to 14 V
      D1-5 (DL2) - D1-4 (GND)
      Ignition switch ON
      10.5 to 14 V
      D1-6 (DL1) - D1-4 (GND)
      Ignition switch ON
      10.5 to 14 V

      Text in Illustration 
      *a
      Front view of wire harness connector
      (to A.D.D. Actuator)
      If the result is not as specified, replace the four wheel drive control ECU (Click here). If the voltage is normal, inspect the A.D.D. actuator, because the voltage applied to the motor cannot be measured.

  1. Inspect the A.D.D. actuator (Click here).