Home › Suspension › TIRE PRESSURE MONITORING › TIRE PRESSURE WARNING VALVE

TIRE PRESSURE WARNING VALVE > INSTALLATION

for Preparation Click here


NOTICE:
  1. Always use a new grommet and valve core when installing the tire pressure warning valve and transmitter.
  2. Check that the washer and nut are not damaged, and replace them if necessary.


1. INSTALL TIRE PRESSURE WARNING VALVE AND TRANSMITTER


C137898E09
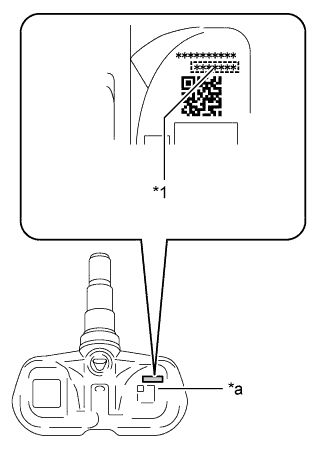
  1. Install a new inner grommet to the tire pressure warning valve and transmitter.
    Text in Illustration 
    *1
    7-digit Number (Transmitter ID)
    *a
    Print Surface

    HINT:
    A new tire pressure warning valve and transmitter comes with a grommet. Therefore, it is not necessary to replace the grommet or install a new one.

  1. Insert the tire pressure warning valve and transmitter into the valve installation hole from the inside of the rim so that the print surface can be seen.
    NOTICE:
    1. Check that there is no visible deformation, damage or other abnormalities on the tire pressure warning valve and transmitter.
    2. Check that there is no foreign matter on the inner grommet or around the rim hole.
    3. If the tire pressure warning valve and transmitter is installed in the reverse direction, it may be damaged or fail to transmit signals when running at high speeds.
    4. If installing a new tire pressure warning valve and transmitter, write down the ID number before installation.
    5. It is necessary to register the ID in the ECU after installation (Click here).


    C139137E07
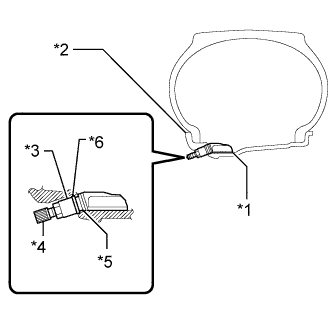
  1. From the outside of the rim, install the washer onto the tire pressure warning valve and transmitter, and tighten the nut.

    Torque:
    4.0 N*m{ 41 kgf*cm , 35 in.*lbf }

    Text in Illustration 
    *1
    Tire Pressure Warning Valve and Transmitter
    *2
    Rim
    *3
    Nut
    *4
    Cap
    *5
    Grommet
    *6
    Washer

    NOTICE:
    1. Check that there is no foreign matter on the washer or nut.
    2. If the tire and tire pressure warning valve and transmitter have been removed, replace the grommet with a new one.
    3. Check that there is no oil, water or lubricant around the rim hole, tire pressure warning valve and transmitter, washer or nut. Failing to do so may result in improper installation.


    C166179E05
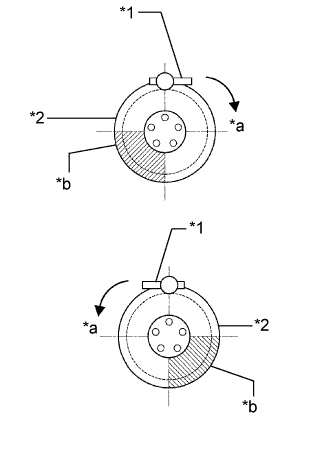
  1. Install the wheel disc to a mounting machine and install the lower tire bead. Position the main body of the tire pressure warning valve and transmitter in the shaded area shown in the illustration.
    Text in Illustration 
    *1
    Mount Tool of Mounting Machine
    *2
    Rim
    *a
    Rim Rotating Direction
    *b
    Area for Transmitter

    NOTICE:
    If the tire pressure warning valve and transmitter is positioned outside this area, it will interfere with the tire bead and this may cause damage to the tire pressure warning valve and transmitter. If the use of lubricant is required when installing the bead, do not apply the lubricant directly to the tire pressure warning valve and transmitter.

  1. Install the upper bead.

    NOTICE:
    Make sure that the tire bead and tool do not interfere with the main body of the tire pressure warning valve and transmitter and that the tire pressure warning valve and transmitter is not clamped by the bead.

  1. Install a new valve core to the tire pressure warning valve and transmitter.

  1. Inflate the tire. If the valve nut is loose after inflating the tire, retighten the nut to the specified torque and then check for air leaks with soapy water.

    Torque:
    4.0 N*m{ 41 kgf*cm , 35 in.*lbf }

    NOTICE:
    Do not tighten the nut further after tightening it to the specified torque.

  1. Set the air pressure of the tires to the specified value.

  1. Install the cap to the tire pressure warning valve and transmitter.


2. INSTALL FRONT WHEEL

Torque:
112 N*m{ 1142 kgf*cm , 83 ft.*lbf }


3. INSTALL REAR WHEEL

Torque:
112 N*m{ 1142 kgf*cm , 83 ft.*lbf }


4. INSTALL GROUND SPARE TIRE


5. INSPECT TIRE
  1. Inspect the tire (Click here).


6. REGISTER TRANSMITTER ID
  1. Register the transmitter ID (Click here).


7. CHECK TIRE PRESSURE AFTER REPAIRS
  1. After repairs, confirm that the actual tire pressures are displayed in the Data List (Click here).