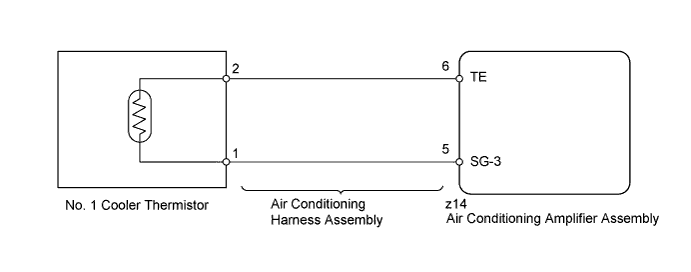
DTC B1413 Evaporator Temperature Sensor Circuit |
| DTC Code | DTC Detection Condition | Trouble Area |
| B1413 | An open or short in the No. 1 cooler thermistor circuit. |
|
| 1.READ VALUE USING TECHSTREAM (NO. 1 COOLER THERMISTOR) |
Use the Data List to check if the No. 1 cooler thermistor is functioning properly (Click here).
| Tester Display | Measurement Item/Range | Normal Condition | Diagnostic Note |
| Evaporator Fin Thermistor | No. 1 cooler thermistor / Min.: -29.7°C (-21.46°F) Max.: 59.55°C (139.19°F) | Actual evaporator temperature displayed | Open in the circuit: -29.7°C (-21.46°F). Short in the circuit: 59.55°C (139.19°F). |
| Result | Proceed to |
| OK (When troubleshooting according to problem symptoms table) | A |
| OK (When troubleshooting according to the DTC) | B |
| NG | C |
|
| ||||
|
| ||||
| A | ||
 | ||
| ||
| 2.INSPECT NO. 1 COOLER THERMISTOR |
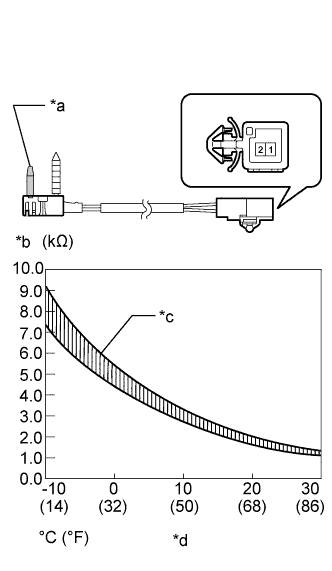 |
Remove the No. 1 cooler thermistor (Click here).
Measure the resistance according to the value(s) in the table below.
| Tester Connection | Condition | Specified Condition |
| 1 - 2 | -10°C (14°F) | 7.30 to 9.10 kΩ |
| -5°C (23°F) | 5.65 to 6.95 kΩ | |
| 0°C (32°F) | 4.40 to 5.35 kΩ | |
| 5°C (41°F) | 3.40 to 4.15 kΩ | |
| 10°C (50°F) | 2.70 to 3.25 kΩ | |
| 15°C (59°F) | 2.14 to 2.58 kΩ | |
| 20°C (68°F) | 1.71 to 2.05 kΩ | |
| 25°C (77°F) | 1.38 to 1.64 kΩ | |
| 30°C (86°F) | 1.11 to 1.32 kΩ |
| *a | Sensing Portion |
| *b | Resistance |
| *c | Allowable Range |
| *d | Temperature |
|
| ||||
| OK | |
 |
| 3.INSPECT AIR CONDITIONING HARNESS ASSEMBLY |
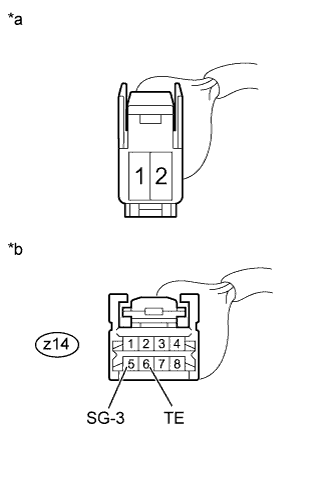 |
Remove the air conditioning harness assembly (Click here).
Measure the resistance according to the value(s) in the table below.
| Tester Connection | Condition | Specified Condition |
| z14-6 (TE) - 2 | Always | Below 1 Ω |
| z14-5 (SG-3) - 1 | Always | Below 1 Ω |
| z14-6 (TE) - Body ground | Always | 10 kΩ or higher |
| z14-5 (SG-3) - Body ground | Always | 10 kΩ or higher |
| *a | Front view of wire harness connector (to No. 1 Cooler Thermistor) |
| *b | Front view of wire harness connector (to Air Conditioning Amplifier Assembly) |
|
| ||||
| OK | ||
| ||
| ||

