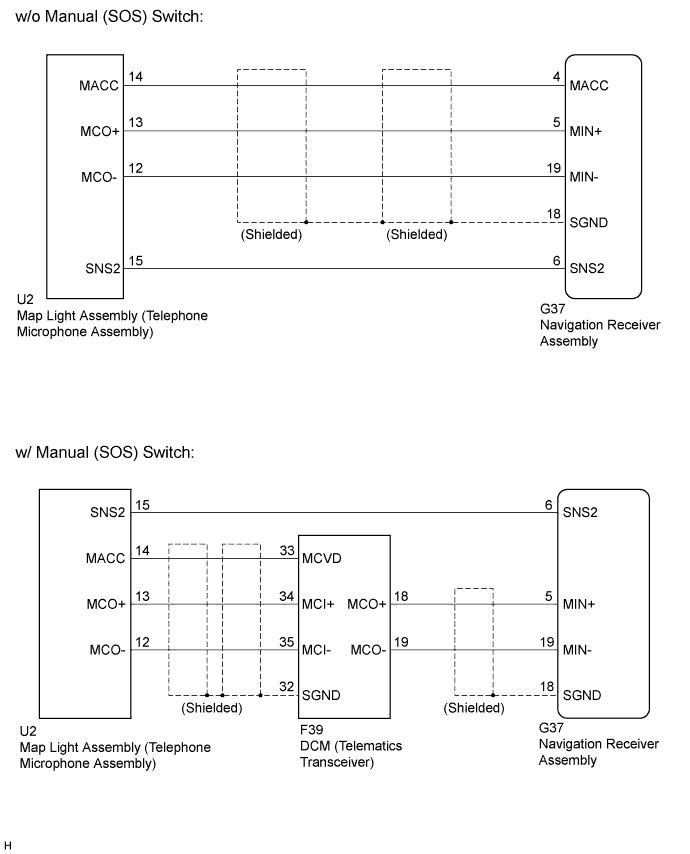
NAVIGATION SYSTEM > Microphone Circuit between Microphone and Navigation Receiver Assembly |
| 1.CONFIRM MODEL |
Choose the model to be inspected.
| Model | Proceed to |
| w/o Manual (SOS) switch | A |
| w/ Manual (SOS) switch | B |
|
| ||||
| A | |
 |
| 2.CHECK HARNESS AND CONNECTOR (NAVIGATION RECEIVER ASSEMBLY - MAP LIGHT ASSEMBLY (TELEPHONE MICROPHONE ASSEMBLY)) |
Disconnect the G37 navigation receiver assembly connector.
Disconnect the U2 map light assembly (telephone microphone assembly) connector.
Measure the resistance according to the value(s) in the table below.
| Tester Connection | Condition | Specified Condition |
| G37-4 (MACC) - U2-14 (MACC) | Always | Below 1 Ω |
| G37-5 (MIN+) - U2-13 (MCO+) | Always | Below 1 Ω |
| G37-19 (MIN-) - U2-12 (MCO-) | Always | Below 1 Ω |
| G37-6 (SNS2) - U2-15 (SNS2) | Always | Below 1 Ω |
| G37-4 (MACC) - Body ground | Always | 10 kΩ or higher |
| G37-5 (MIN+) - Body ground | Always | 10 kΩ or higher |
| G37-19 (MIN-) - Body ground | Always | 10 kΩ or higher |
| G37-18 (SGND) - Body ground | Always | 10 kΩ or higher |
| G37-6 (SNS2) - Body ground | Always | 10 kΩ or higher |
|
| ||||
| OK | |
|
| 3.INSPECT NAVIGATION RECEIVER ASSEMBLY |
Reconnect the G37 navigation receiver assembly connector.
Reconnect the U2 map light assembly (telephone microphone assembly) connector.
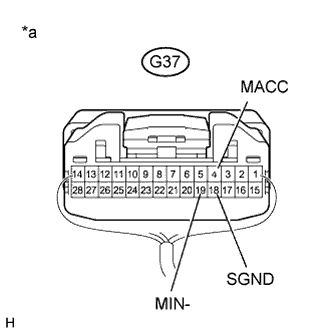 |
Measure the voltage according to the value(s) in the table below.
| Tester Connection | Condition | Specified Condition |
| G37-4 (MACC) - Body ground | Ignition switch ACC | 4 to 6 V |
Measure the resistance according to the value(s) in the table below.
| Tester Connection | Condition | Specified Condition |
| G37-18 (SGND) - Body ground | Always | Below 1 Ω |
| G37-19 (MIN-) - Body ground | Always | Below 1 Ω |
Proceed to the next step based on the inspection result.
| Result | Proceed to |
| NG | A |
| OK | B |
| *a | Component with harness connected (Navigation Receiver Assembly) |
|
| ||||
| A | ||
 | ||
| ||
| 4.CHECK HARNESS AND CONNECTOR (NAVIGATION RECEIVER ASSEMBLY - MAP LIGHT ASSEMBLY (TELEPHONE MICROPHONE ASSEMBLY)) |
Disconnect the G37 navigation receiver assembly connector.
Disconnect the U2 map light assembly (telephone microphone assembly) connector.
Measure the resistance according to the value(s) in the table below.
| Tester Connection | Condition | Specified Condition |
| G37-6 (SNS2) - U2-15 (SNS2) | Always | Below 1 Ω |
|
| ||||
| OK | |
|
| 5.CHECK HARNESS AND CONNECTOR (NAVIGATION RECEIVER ASSEMBLY - DCM (TELEMATICS TRANSCEIVER)) |
Disconnect the G37 navigation receiver assembly connector.
Disconnect the F39 DCM (telematics transceiver) connector.
Measure the resistance according to the value(s) in the table below.
| Tester Connection | Condition | Specified Condition |
| G37-5 (MIN+) - F39-18 (MCO+) | Always | Below 1 Ω |
| G37-19 (MIN-) - F39-19 (MCO-) | Always | Below 1 Ω |
| G37-5 (MIN+) - Body ground | Always | 10 kΩ or higher |
| G37-19 (MIN-) - Body ground | Always | 10 kΩ or higher |
| G37-18 (SGND) - Body ground | Always | 10 kΩ or higher |
|
| ||||
| OK | |
|
| 6.CHECK HARNESS AND CONNECTOR (DCM (TELEMATICS TRANSCEIVER) - MAP LIGHT ASSEMBLY (TELEPHONE MICROPHONE ASSEMBLY)) |
Disconnect the F39 DCM (telematics transceiver) connector.
Disconnect the U2 map light assembly (telephone microphone assembly) connector.
Measure the resistance according to the value(s) in the table below.
| Tester Connection | Condition | Specified Condition |
| F39-33 (MCVD) - U2-14 (MACC) | Always | Below 1 Ω |
| F39-34 (MCI+) - U2-13 (MCO+) | Always | Below 1 Ω |
| F39-35 (MCI-) - U2-12 (MCO-) | Always | Below 1 Ω |
| F39-33 (MCVD) - Body ground | Always | 10 kΩ or higher |
| F39-34 (MCI+) - Body ground | Always | 10 kΩ or higher |
| F39-35 (MCI-) - Body ground | Always | 10 kΩ or higher |
| F39-32 (SGND) - Body ground | Always | 10 kΩ or higher |
|
| ||||
| OK | |
|
| 7.INSPECT NAVIGATION RECEIVER ASSEMBLY |
Disconnect the F39 DCM (telematics transceiver) connector.
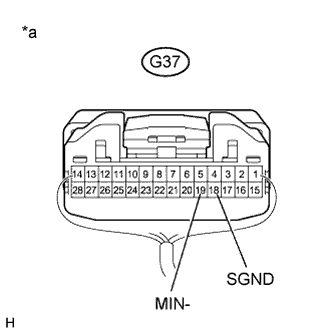 |
Reconnect the G37 navigation receiver assembly connector.
Measure the resistance according to the value(s) in the table below.
| Tester Connection | Condition | Specified Condition |
| G37-18 (SGND) - Body ground | Always | Below 1 Ω |
| G37-19 (MIN-) - Body ground | Always | Below 1 Ω |
| *a | Component with harness connected (Navigation Receiver Assembly) |
|
| ||||
| OK | |
|
| 8.INSPECT DCM (TELEMATICS TRANSCEIVER) |
Reconnect the F39 DCM (telematics transceiver) connector.
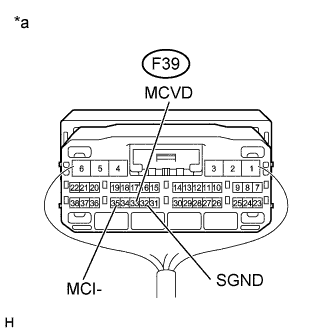 |
Measure the voltage according to the value(s) in the table below.
| Tester Connection | Condition | Specified Condition |
| F39-33 (MCVD) - Body ground | Ignition switch ACC | 4 to 6 V |
Measure the resistance according to the value(s) in the table below.
| Tester Connection | Condition | Specified Condition |
| F39-35 (MCI-) - Body ground | Always | Below 1 Ω |
| F39-32 (SGND) - Body ground | Always | Below 1 Ω |
| *a | Component with harness connected (DCM (Telematics Transceiver)) |
|
| ||||
| OK | |
|
| 9.INSPECT MAP LIGHT ASSEMBLY (TELEPHONE MICROPHONE ASSEMBLY) |
Disconnect the U2 map light assembly (telephone microphone assembly) connector.
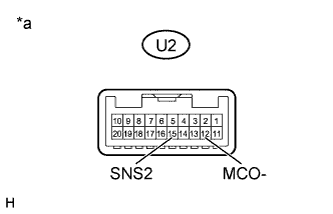 |
Measure the resistance according to the value(s) in the table below.
| Tester Connection | Condition | Specified Condition |
| U2-15 (SNS2) - U2-12 (MCO-) | Always | Below 1 Ω |
| *a | Component without harness connected (Map Light Assembly (Telephone Microphone Assembly)) |
|
| ||||
| OK | |
|
| 10.INSPECT MAP LIGHT ASSEMBLY (TELEPHONE MICROPHONE ASSEMBLY) |
Reconnect the F39 DCM (telematics transceiver) connector.
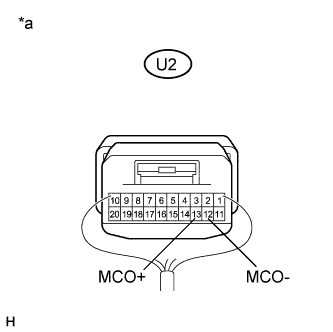 |
Reconnect the U2 map light assembly (telephone microphone assembly) connector.
Turn the ignition switch to ACC.
Connect an oscilloscope to terminals 13 (MCO+) and 12 (MCO-) of the map light assembly (telephone microphone assembly) connector.
Check the waveform of the telephone microphone assembly using the oscilloscope.
| Result | Proceed to |
| A waveform synchronized with the voice input to the map light assembly (telephone microphone assembly) is output | A |
| A waveform synchronized with the voice input to the map light assembly (telephone microphone assembly) is not output | B |
| *a | Component with harness connected (Map Light Assembly (Telephone Microphone Assembly)) |
|
| ||||
| A | ||
| ||
| ||

