Home › Brake › BRAKE CONTROL / DYNAMIC CONTROL SYSTEMS › BRAKE ACTUATOR

BRAKE ACTUATOR > INSTALLATION

for Preparation Click here


1. INSTALL BRAKE ACTUATOR ASSEMBLY WITH BRAKE ACTUATOR BRACKET
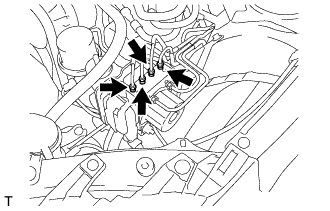
  1. Install the brake actuator assembly with brake actuator bracket using the 4 bolts.

    Torque:
    33 N*m{ 338 kgf*cm , 24 ft.*lbf }

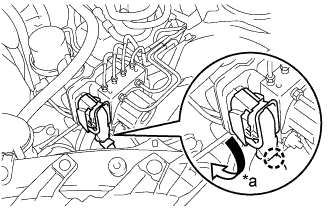
  1. Connect the brake actuator connector to the brake actuator.


    C257481E01
  1. Turn the locking lever downwards, and engage the wire harness connector locking claw to lock the connector.
    Text in Illustration 
    *a
    Turn

    NOTICE:
    1. Make sure that the actuator connector can be connected smoothly. Do not allow water, oil or dirt to enter.
    2. Make sure that the connector is locked securely.
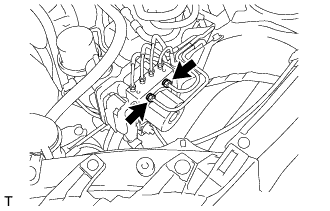


    C262299
  1. Using a union nut wrench 12 mm, tighten 2 brake tubes.

    Torque:
    19 N*m{ 194 kgf*cm , 14 ft.*lbf }

    NOTICE:
    Use the formula to calculate the special torque values for situations where the union nut wrench is combined with a torque wrench (Click here).


    C257482
  1. Using a union nut wrench 10 mm, tighten the 4 brake tubes.

    Torque:
    15 N*m{ 155 kgf*cm , 11 ft.*lbf }

    NOTICE:
    Use the formula to calculate the special torque values for situations where the union nut wrench is combined with a torque wrench (Click here).

  1. Connect the front speed sensor LH harness clamp to the brake actuator bracket assembly.

  1. Connect the cooler pipe to the clamp.

  1. Connect the 2 harness clamp to the brake actuator bracket.


2. ADD BRAKE FLUID


3. BLEED BRAKE SYSTEM
(Click here)


4. INSPECT FLUID LEAK


5. INSPECT BRAKE FLUID LEVEL


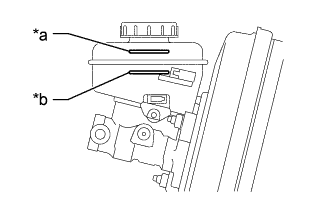
    C259961E01
  1. Check the fluid level.
    Text in Illustration 
    *a
    MAX Line
    *b
    MIN Line
    If brake fluid level is lower than the MIN line, check for leaks and inspect the disc brake pads. If necessary, refill the reservoir with brake fluid to the MAX line after repair or replacement.

    Brake Fluid:
    SAE J1703 or FMVSS No. 116 DOT 3

    NOTICE:
    If using a dropper to adjust the fluid amount, make sure that the dropper has not been used with mineral oils, water or deteriorated brake fluid. Sealed areas may deteriorate and lead to fluid leaks, or the fluid may deteriorate and lead to decreased efficiency.


6. INSTALL FRONT FENDER LINER LH
  1. Install the front fender liner LH with the 18 clips.

  1. Install the new grommet.

  1. Install the bolt.

    Torque:
    7.5 N*m{ 76 kgf*cm , 66 in.*lbf }


7. INSTALL FRONT WHEEL LH

Torque:
120 N*m{ 1224 kgf*cm , 89 ft.*lbf }


8. VSC SENSOR NEUTRAL MEMORIZATION
(Click here)


9. INSPECT SPEED SENSOR
(Click here)