FA20 FUEL FUEL SENDER GAUGE ASSEMBLY INSTALLATION
PROCEDURE

 83320B
1.INSTALL NO. 2 FUEL SENDER GAUGE ASSEMBLY
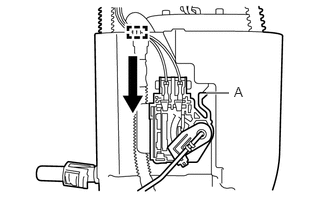
Slide the No. 2 fuel sender gauge assembly downwards and attach the claw labeled A to install the No. 2 fuel sender gauge assembly.

|
Slide |
Connect the No. 2 fuel sender gauge assembly connector.
77204A
2.INSTALL FUEL TANK RETURN TUBE
Install a new gasket to the fuel tank assembly.
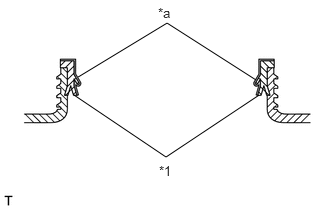
Apply a light coat of gasoline to a gasket.
| *1 | Gasket |
| *a | Application area |
- NOTICE:
- ·
Apply gasoline in the area indicated in the illustration.
·Ensure that gasoline does not adhere to the threads of the fuel tank assembly.
·Check that there is no fuel or foreign matter in the seal section.
Engage the clamp to install the tube and set the fuel tank return tube into the fuel tank assembly.
- NOTICE:
-
Be careful not to bend the arm of the No. 2 fuel sender gauge assembly.
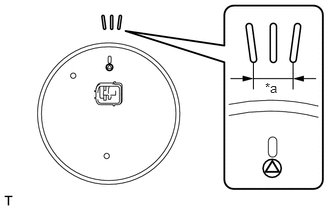
Set the fuel suction tube assembly with pump and gauge within the fuel tank assembly installation position marks.
| *a | Installation position marks |
Attach a new sheet ring and fuel pump gauge retainer, and temporarily tighten the fuel pump gauge retainer.
Temporarily install SST (plate and 4 claws) to the fuel pump gauge retainer.
- SST
- 09808-14030 (09808-01030, 09808-01050)
09808-01071
- NOTICE:
-
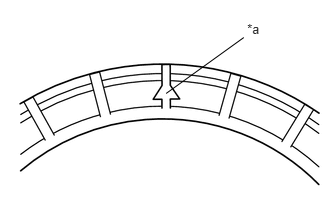 2.574,0.215 2.794,0.420 0.220,0.205 10 *a 1.73,0.973 2.539,0.39 false
-
Do not apply a claw of SST at the marked part.
| *a | Marked Part |
- HINT:
- ·
Be sure to use SST (claws) as shown in the illustration.
·Engage SST (claws) securely with the fuel pump gauge retainer ribs to secure SST.
While securely pressing SST (claws) against the fuel pump gauge retainer ribs, tighten the 4 bolts.
- HINT:
-
Install SST while pressing SST (claws) against the fuel pump gauge retainer (towards the center of SST).
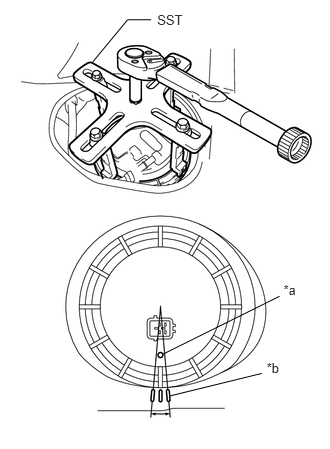
Using SST, tighten the fuel pump gauge retainer.
- Torque:
- 85 N*m (867 kgf*cm, 63 ft.*lbf)
- NOTICE:
- ·
Do not use any tools other than those specified in this operation. Damage to the fuel pump gauge retainer or fuel tank may result.
·Do not press down on SST excessively as this may make the fuel pump gauge retainer hard to rotate, and may damage components.
·Make sure to rotate SST horizontally. If SST is rotated at an angle, SST may come off.
·Do not spin SST too fast or use an impact wrench as this may result in damage to components.
·If SST comes off of the fuel pump gauge retainer, loosen SST (bolts) and reinstall SST.
·Check that the fuel suction tube assembly with pump and gauge position marks are within the fuel tank assembly installation position marks, as shown in the illustration.
·After tightening to the specified torque, check that it has been tightened to the correct torque.
- HINT:
- ·
Lightly press down on SST to prevent it from separating from the fuel pump gauge retainer. While pressing SST, rotate the handle slowly to tighten the fuel pump gauge retainer.
·The tips of SST (claws) can be fitted onto the ribs of the fuel pump gauge retainer.
| *a | Position mark |
| *b | Installation position marks |
83320
3.INSTALL FUEL SENDER GAUGE ASSEMBLY
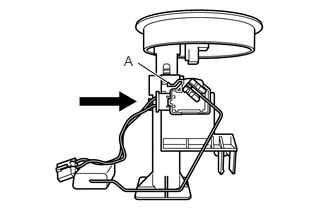
Slide the fuel sender gauge assembly downwards and attach the claw labeled A to install the fuel sender gauge assembly.
|
|
Slide |
Connect the fuel pump harness to the 2 clamps.
Connect the fuel sender gauge assembly connector.
77020A
4.INSTALL FUEL SUCTION TUBE ASSEMBLY WITH PUMP AND GAUGE
5.CONNECT CABLE TO NEGATIVE BATTERY TERMINAL
6.INSPECT FOR FUEL LEAK
58311F
7.INSTALL NO. 2 REAR FLOOR SERVICE HOLE COVER
58311E
8.INSTALL REAR FLOOR SERVICE HOLE COVER
Connect the fuel tank return tube connector.
Install the rear floor service hole cover with new butyl tape.
71470S
9.INSTALL SEPARATE TYPE REAR SEAT CUSHION ASSEMBLY LH
71460S
10.INSTALL SEPARATE TYPE REAR SEAT CUSHION ASSEMBLY RH