FA20 BATTERY / CHARGING CHARGING SYSTEM ON-VEHICLE INSPECTION
PROCEDURE

 28800
1.CHECK BATTERY CONDITION
- NOTICE:
-
If the battery is weak or if the engine is difficult to start, perform the following procedures.
Check the battery for damage and deformation. If severe damage, deformation or leakage is found, replace the battery.
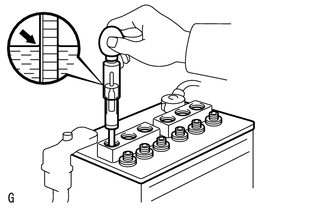
Check the volume of electrolyte quantity in each cell.
If the electrolyte volume is below the lower line, add distilled water to each cell. Then, recharge the battery and check the electrolyte specific gravity.
- Standard specific gravity:
1.25 to 1.29 at 20°C (68°F)
If the electrolyte volume is above the lower line, check the battery voltage when cranking the engine. If the battery voltage is less than 9.6 V, recharge or replace the battery.
- HINT:
-
Before checking the battery voltage, turn off all the electrical systems (headlights, blower motor, rear defogger, etc.).
2.INSPECT BATTERY TERMINAL AND FUSE
Check that the battery terminals are not loose or corroded.
If the terminal is corroded, clean the terminal.
Measure the resistance of the H-fuses and fuses.
- Standard resistance:
Below 1 Ω
If the result is not as specified, replace the fuse.
16361A
3.INSPECT FAN AND GENERATOR V BELT
4.INSPECT GENERATOR WIRING
Visually check the generator wiring.
Check that the wiring is in good condition.
5.CHECK FOR ABNORMAL NOISES
Listen for abnormal noises from the generator.
Check that no abnormal noises are heard from the generator while the engine is running.
6.INSPECT CHARGE WARNING LIGHT CIRCUIT
Turn the ignition switch to ON. Check that the charge warning light comes on.
Start the engine and check that the light goes off.
If the light does not operate as specified, troubleshoot the charge warning light circuit.
7.INSPECT CHARGING CIRCUIT WITHOUT LOAD
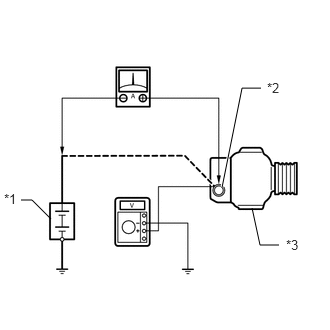
Connect a voltmeter and ammeter to the charging circuit as follows.
Disconnect the wire from terminal B of the generator, and then connect it to the negative (-) lead of an ammeter.
| *1 | Battery |
| *2 | Terminal B |
| *3 | Generator Assembly |
Connect the positive (+) lead of the ammeter to terminal B of the generator.
Connect the positive (+) lead of a voltmeter to terminal B of the generator.
Ground the negative (-) lead of the voltmeter.
Check the charging circuit.
Maintain the engine speed at 2000 rpm and check the reading on the ammeter and voltmeter.
- Standard current:
20 A or less
- Standard voltage:
11.3 to 15.6 V
If the result is not as specified, replace the generator assembly.
- HINT:
-
If the battery is not fully charged, the ammeter reading will sometimes be higher than the standard current.
8.INSPECT CHARGING CIRCUIT WITH LOAD
With the engine running at 2000 rpm, turn the high beam headlights on and turn the heater blower switch to the HI position.
Check the reading on the ammeter.
- Standard current:
30 A or higher
If the ammeter reading is below the standard current, repair the generator.
- HINT:
-
If the battery is fully charged, the indication will sometimes be below the standard current. If this is the case, add more electrical load (operate the wipers, rear window defogger, etc.) and check the reading on the ammeter again.