POWER DISTRIBUTION MAIN BODY ECU INSTALLATION
PROCEDURE

 89111
1.INSTALL NETWORK GATEWAY ECU
- NOTICE:
- ·
Prevent foreign matter from being mixed into the engagement, connector or terminals.
- ·
Do not touch the network gateway ECU connector terminals.
- HINT:
- ·
Use the same procedure for RHD and LHD vehicles.
·The procedure listed below is for LHD vehicles.
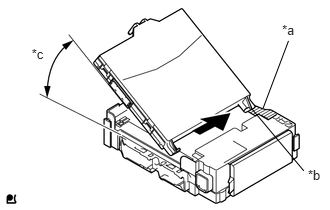
Make the network gateway ECU guide to contact the housing side wall.
- HINT:
-
The angle between the junction block and the network gateway ECU guide should be 20° or more.
| *a | Housing Side Wall |
| *b | Guide |
| *c | 20° or more |
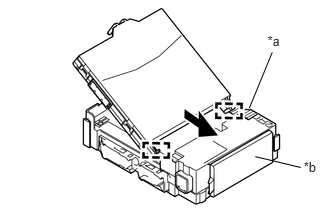
While aligning the guide with the housing side wall, slide the network gateway ECU toward the fuse area of the instrument panel junction block assembly and engage the 2 guides.
| *a | Hosing Side Wall |
| *b | Fuse Area |
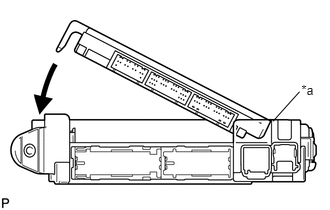
Slide the network gateway ECU until it contacts the A surface.
Rotate the network gateway ECU while holding it against the instrument panel junction block assembly surface (axis of rotation).
- NOTICE:
- ·
Slide gently the network gateway ECU.
·Do not apply strong impact to the side of the network gateway ECU.
| *a | A surface |
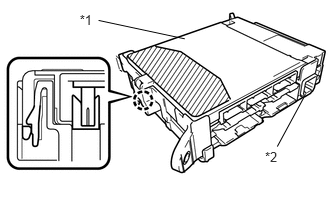
Rotate the network gateway ECU until it engages with the lock to install it.
- NOTICE:
- ·
When pressing the network gateway ECU, press the push area as shown in the illustration.
·A lock sound will be heard when the network gateway ECU is engaged.
- ·
Do not hit or weight the network gateway ECU when it engages with the instrument panel junction block assembly.
- HINT:
-
If a lock sound is not heard, visually check the lock engagement. Check that the height of the network gateway ECU and instrument panel junction block assembly match.
| *1 | Network Gateway ECU |
| *2 | Instrument Panel Junction Block Assembly |

|
Push Area |
82730
2.INSTALL INSTRUMENT PANEL JUNCTION BLOCK ASSEMBLY
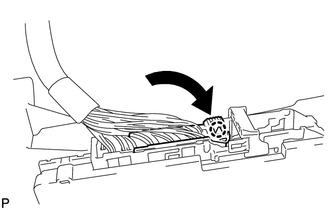
Connect the connector as shown in the illustration.
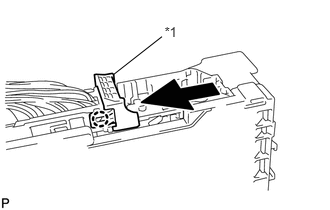
Slide the lever as indicated by the arrow shown in the illustration.
| *1 | Lever |
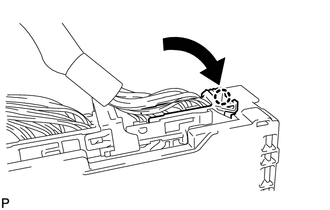
Connect the connector indicated as shown in the illustration.
Install the instrument panel junction block assembly with the bolt and the nut.
- Torque:
- 7.5 N*m (76 kgf*cm, 66 in.*lbf)
Connect 6 connectors to the instrument panel junction block assembly.
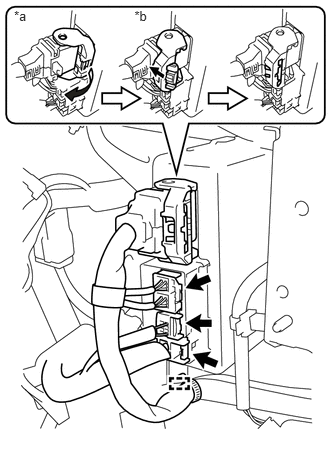
Connect the 3 connectors to the power steering ECU assembly.
Connect the connector to the power steering ECU assembly.
As shown in the illustration, return the lock lever to its original position to connect the connector and securely push in the lock of the lock lever.
| *a | Return the lock lever |
| *b | Push the lock |
55606
3.INSTALL NO. 1 INSTRUMENT PANEL UNDER COVER SUB-ASSEMBLY (w/o Knee Airbag)
55606
4.INSTALL NO. 1 INSTRUMENT PANEL UNDER COVER SUB-ASSEMBLY (w/ Knee Airbag)
55318C
5.INSTALL INSTRUMENT SIDE PANEL LH