Home › Vehicle Interior › METER / GAUGE / DISPLAY › METER / GAUGE SYSTEM
RM2090E _58 Vehicle Interior _060699 METER / GAUGE / DISPLAY _0297701 METER / GAUGE SYSTEM J

METER / GAUGE / DISPLAY  METER / GAUGE SYSTEM  Operating Light Control Rheostat does not Change Light Brightness  


DESCRIPTION

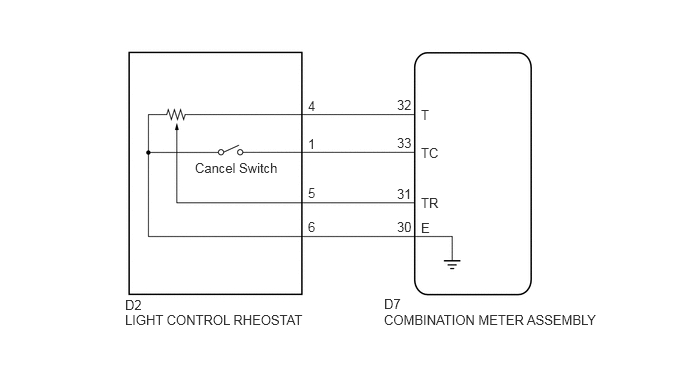
The brightness of the combination meter assembly is controlled by rotating the light control rheostat knob in upward and downward.

WIRING DIAGRAM
E246792E03
4,3.25 6.406,3.448 2.406,0.198 10 false COMBINATION METER ASSEMBLY 2.031,1.667 3.01,1.875 0.979,0.208 10 false Cancel Switch 1.302,3.25 3.76,3.594 2.458,0.344 10 false LIGHT CONTROL RHEOSTAT 1.302,3.094 2.156,3.26 0.854,0.167 10 false D2 4,3.083 4.667,3.26 0.667,0.177 10 false D7 4.385,1.115 4.844,1.281 0.458,0.167 10 false T 4.385,1.51 5.042,1.698 0.656,0.188 10 false TC 4.385,2.031 5.031,2.208 0.646,0.177 10 false TR 4.385,2.292 4.594,2.458 0.208,0.167 10 false E 4.135,2.281 4.635,2.448 0.5,0.167 10 false 30 4.135,1.938 4.615,2.115 0.479,0.177 10 false 31 4.135,1.406 4.854,1.573 0.719,0.167 10 false 33 4.135,1.01 4.927,1.177 0.792,0.167 10 false 32 3.208,2.281 3.417,2.448 0.208,0.167 10 false 6 3.208,1.927 3.417,2.094 0.208,0.167 10 false 5 3.208,1.417 3.417,1.583 0.208,0.167 10 false 1 3.208,1.021 3.417,1.188 0.208,0.167 10 false 4

PROCEDURE

1.READ VALUE USING GTS (RHEOSTAT SWITCH)
a.

Connect the GTS to the DLC3.


b.

Turn the ignition switch to ON.


c.

Turn the GTS on.


d.

Enter the following menus: Body Electrical / Combination Meter / Data List.


e.

According to the display on the tester, read the Data List.

Combination Meter
Tester Display Measurement Item/Range Normal Condition Diagnostic Note
Tail Cancel SW Light control rheostat switch (cancel switch) / OFF or ON OFF: Light control rheostat switch (cancel switch) → OFF -
ON: Light control rheostat switch (cancel switch) → TAIL
Rheostat value Light control rheostat switch input /
Min.: 0
Max.: 100
Displays rheostat volume figure
0 to 100
-

OK:

The value displayed on the GTS changes in accordance with the actual rheostat switch operation.


OK

REPLACE COMBINATION METER ASSEMBLY

NG

2.INSPECT LIGHT CONTROL RHEOSTAT
a.

Remove the light control rheostat (See page Vehicle Interior>METER / GAUGE / DISPLAY>LIGHT CONTROL RHEOSTAT>REMOVAL).
E246793E03
3.927,4.125 4.229,4.271 0.302,0.146 10 false OFF 3.448,1.448 4.302,1.594 0.854,0.146 10 false 4380 to 4841 3.448,1.677 4.302,1.823 0.854,0.146 10 false 3601 to 3980 3.438,2.115 4.292,2.26 0.854,0.146 10 false 2822 to 3119 3.448,2.573 4.302,2.719 0.854,0.146 10 false 2043 to 2258 3.458,3.01 4.313,3.156 0.854,0.146 10 false 1264 to 1397 3.531,3.167 4.385,3.313 0.854,0.146 10 false 485 to 536 4,1.073 4.302,1.219 0.302,0.146 10 false (Ω) 4,4.417 4.229,4.563 0.229,0.146 10 false ON 4.531,3.406 4.729,3.552 0.198,0.146 10 false 1A 4.833,3.406 5.031,3.552 0.198,0.146 10 false 2A 5.115,3.406 5.313,3.552 0.198,0.146 10 false 3A 5.406,3.406 5.604,3.552 0.198,0.146 10 false 4A 5.698,3.406 5.896,3.552 0.198,0.146 10 false 5A 5.99,3.396 6.188,3.542 0.198,0.146 10 false 6A 4.26,3.417 4.469,3.563 0.208,0.146 10 false 0A 3.469,0.521 3.677,0.677 0.208,0.156 10 false 0A 3.469,0.917 3.667,1.063 0.198,0.146 10 false 1A 3.344,1.26 3.542,1.406 0.198,0.146 10 false 2A 3.083,1.594 3.281,1.74 0.198,0.146 10 false 3A 2.729,1.802 2.917,1.948 0.188,0.146 10 false 4A 2.354,1.854 2.552,2 0.198,0.146 10 false 5A 1.969,1.833 2.167,1.979 0.198,0.146 10 false 6A 0.885,2.292 1.083,2.438 0.198,0.146 10 false *a 4.292,4.5 4.615,4.813 0.323,0.313 10 false Dark 5.917,4.5 6.281,4.813 0.365,0.313 10 false Blight 2.969,4.292 3.875,4.604 0.906,0.313 10 false Cancel Switch 2.073,2.573 3.344,3.24 1.271,0.667 10 false Resistance between terminals 5 and 6.


b.

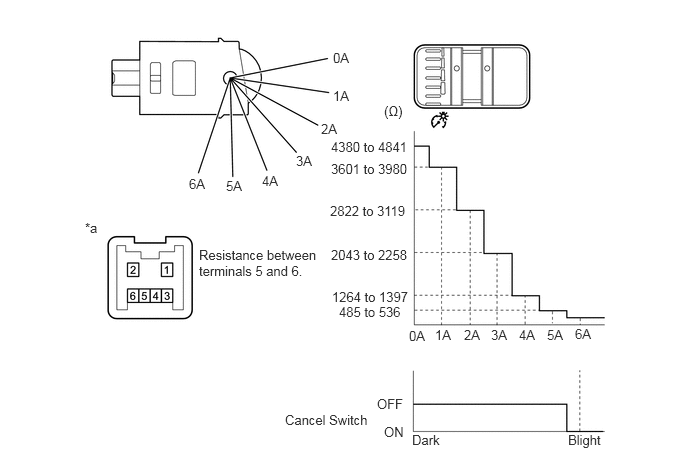
Measure the resistance according to the value(s) in the table below.

Standard Resistance:
Tester Connection Switch Condition Specified Condition
1 - 6 Cancel switch off → on 10 kΩ or higher → Below 1 Ω
4 - 6 Always 4475 to 4946 Ω
5 - 6 Light control rheostat fully up → Light control rheostat fully down 485 to 536 Ω → 4380 to 4841 Ω


Text in Illustration
*a Component without harness connected
(Light Control Rheostat)


OK

3.CHECK HARNESS AND CONNECTOR (COMBINATION METER ASSEMBLY - LIGHT CONTROL RHEOSTAT)

NG

3.CHECK HARNESS AND CONNECTOR (COMBINATION METER ASSEMBLY - LIGHT CONTROL RHEOSTAT)
a.

Disconnect the D7 combination meter assembly connector.


b.

Disconnect the D2 light control rheostat connector.


c.

Measure the resistance according to the value(s) in the table below.

Standard Resistance (Check for Open):
Tester Connection Condition Specified Condition
D7-30 (E) - D2-6 Always Below 1 Ω
D7-31 (TR) - D2-5 Always Below 1 Ω
D7-32 (T) - D2-4 Always Below 1 Ω
D7-33 (TC) - D2-1 Always Below 1 Ω


Standard Resistance (Check for Short):
Tester Connection Condition Specified Condition
D7-30 (E) or D2-6 - Body ground Always 10 kΩ or higher
D7-31 (TR) or D2-5 - Body ground Always 10 kΩ or higher
D7-32 (T) or D2-4 - Body ground Always 10 kΩ or higher
D7-33 (TC) or D2-1 - Body ground Always 10 kΩ or higher


OK

REPLACE COMBINATION METER ASSEMBLY

NG

REPAIR OR REPLACE HARNESS OR CONNECTOR