HEATING / AIR CONDITIONING AIR CONDITIONING SYSTEM(for Automatic Air Conditioning System) Blower Motor Circuit
DESCRIPTION
The blower motor with fan sub-assembly is operated by signals from the air conditioning control assembly. Blower motor speed signals are transmitted in accordance with changes in the duty ratio.
WIRING DIAGRAM
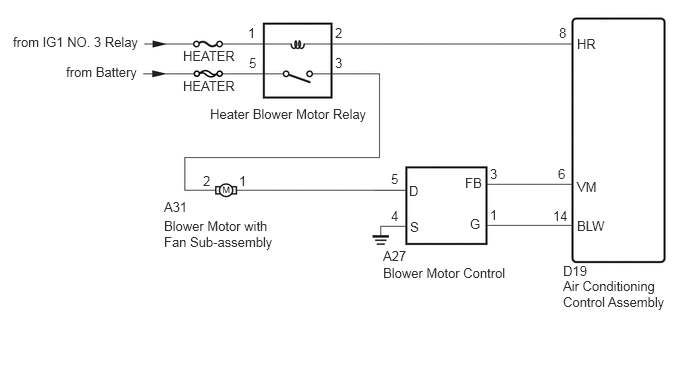
CAUTION / NOTICE / HINT
- NOTICE:
-
Inspect the fuses for circuits related to this system before performing the following inspection procedure.
PROCEDURE
Connect the GTS to the DLC3.
Turn the ignition switch to ON.
Turn the GTS on.
Enter the following menus: Body Electrical / Air Conditioner / Active Test.
Check the operation by referring to the table below.
| Tester Display | Test Part | Control Range | Diagnostic Note |
|---|---|---|---|
| Blower Motor | Blower motor with fan sub-assembly | Min.: 0, Max.: 31 | - |
- Result:
Result Proceed to OK A NG (Blower motor with fan sub-assembly does not operate) B NG (Blower motor with fan sub-assembly operates but does not change speed) C
A
B
C
Remove the heater blower motor relay assembly.
Inspect the heater blower motor relay assembly (See page Vehicle Interior>HEATING / AIR CONDITIONING>RELAY>ON-VEHICLE INSPECTION).
OK
NG
Inspect the heater blower motor relay assembly.
Disconnect the D19 air conditioning control assembly.
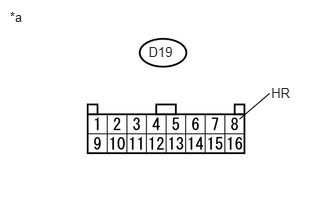
Measure the voltage according to the value(s) in the table below.
- Standard Voltage:
Tester Connection Condition Specified Condition D19-8(HR) - Body ground Always 11 to 14 V
| *a | Front view of wire harness connector
(to Air Conditioning Control Assembly) |
OK
NG
Disconnect the A31 blower motor with fan sub-assembly.
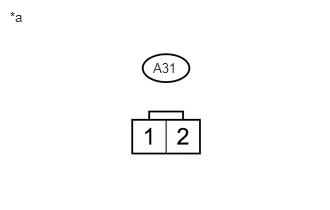
Measure the voltage according to the value(s) in the table below.
- Standard Voltage:
Tester Connection Condition Specified Condition A31-2 - Body ground Ignition switch ON
Blower switch ON11 to 14 V
| *a | Front view of wire harness connector
(to Blower Motor with Fan Sub-assembly) |
OK
NG
Reconnect the blower motor with fan sub-assembly (See page Vehicle Interior>HEATING / AIR CONDITIONING>BLOWER RESISTOR>REMOVAL).
Inspect the blower motor with fan sub-assembly (See page Vehicle Interior>HEATING / AIR CONDITIONING>FRONT BLOWER MOTOR>INSPECTION).
OK
NG
Disconnect the A27 blower resistor.
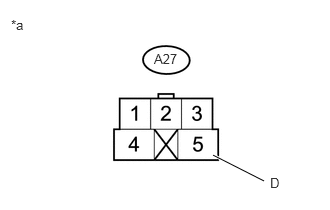
Measure the voltage according to the value(s) in the table below.
- Standard Voltage:
Tester Connection Condition Specified Condition A27-5(D) - Body ground Ignition switch ON
Blower switch ON11 to 14 V
| *a | Front view of wire harness connector
(to blower resistor) |
OK
NG
Disconnect the A27 air conditioning control assembly connector.
Measure the resistance according to the value(s) in the table below.
- Standard Resistance:
Tester Connection Condition Specified Condition A27-4(S) - Body ground Always Below 1 Ω
OK
NG
Disconnect the D19 air conditioning control assembly connector.
Measure the resistance according to the value(s) in the table below.
- Standard Resistance:
Tester Connection Condition Specified Condition A27-1(G) - D19-14(BLW) Always Below 1 Ω A27-3(FB) - D19-6(VM) Always Below 1 Ω A27-1(G) - Body ground Always 10 kΩ or higher A27-3(FB) - Body ground Always 10 kΩ or higher
OK
NG
Replace the blower motor control with a new or normally functioning one (See page Vehicle Interior>HEATING / AIR CONDITIONING>BLOWER RESISTOR>REMOVAL).
NEXT
Connect the GTS to the DLC3.
Turn the ignition switch to ON.
Turn the GTS on.
Enter the following menus: Body Electrical / Air Conditioner / Active Test.
Check the operation by referring to the table below.
| Tester Display | Test Part | Control Range | Diagnostic Note |
|---|---|---|---|
| Blower Motor | Blower motor with fan sub-assembly | Min.: 0, Max.: 31 | - |
OK
NG