HEATING / AIR CONDITIONING AIR CONDITIONING SYSTEM(for Automatic Air Conditioning System) B1438/49 Open in Air Outlet Damper Position Sensor Circuit B1439/-49 Short in Air Outlet Damper Position Sensor Circuit B1443/E49 Air Outlet Damper Control Servomotor Circuit
DESCRIPTION
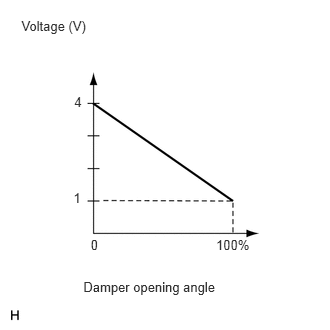
This sensor detects the position of the air outlet damper and sends appropriate signals to the A/C amplifier assembly.
The position sensor is built into the air outlet control servo motor.
- HINT:
-
Confirm that no mechanical problem is present because this diagnostic code can be output when either a damper link or the damper is mechanically locked.
| DTC No. | DTC Detection Condition | Trouble Area |
|---|---|---|
| B1438/49 | Open in Air Outlet Damper Position Sensor Circuit | ·
No. 3 air conditioning radiator damper servo sub-assembly (air outlet) ·
Harness or connector between No. 3 air conditioning radiator damper servo sub-assembly (air outlet) and air conditioning control assembly ·
Air conditioning control assembly |
| B1439/-49 | Short in Air Outlet Damper Position Sensor Circuit | ·
No. 3 air conditioning radiator damper servo sub-assembly (air outlet) ·
Harness or connector between No. 3 air conditioning radiator damper servo sub-assembly (air outlet) and air conditioning control assembly ·
Air conditioning control assembly |
| B1443/43 | Air outlet damper Control servo motor circuit | ·
No. 3 air conditioning radiator damper servo sub-assembly (air outlet) ·
Harness or connector between No. 3 air conditioning radiator damper servo sub-assembly (air outlet) and air conditioning control assembly ·
Air conditioning control assembly |
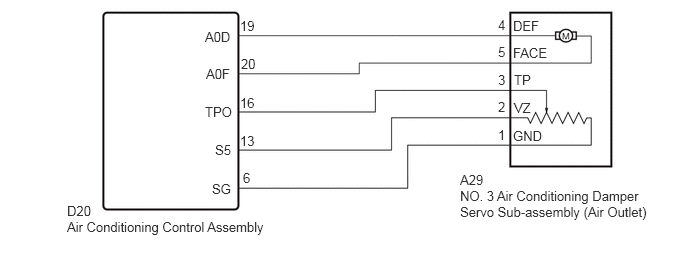
WIRING DIAGRAM
CAUTION / NOTICE / HINT
- NOTICE:
-
This DTC is stored even for damper link and damper lock, etc. Prior to inspection, confirm that there are no parts with mechanical problems.
PROCEDURE
Connect the GTS to the DLC3.
Turn the ignition switch to ON.
Turn the GTS on.
Operate the MODE switch.
Enter the following menus: Body Electrical / Air Conditioner / Data List.
Check the value(s) by referring to the table below.
| Tester Display | Measurement Item/Range | Normal Condition | Diagnostic Note |
|---|---|---|---|
| Air Outlet Damper Position | Air outlet damper position /
Min.: -32.68%, Max.: 133.33% |
FACE: -16.7%
B/L: 10% FOOT-0: 50% (Manual operation) FOOT/DEF: 90% DEF: 116.7% |
- |
| Air Outlet Damper Target | Air outlet damper target position /
Min.: -32.68%, Max.: 133.33% |
FACE: -16.7%
B/L: 10% FOOT-0: 50% (Manual operation) FOOT/DEF: 90% DEF: 116.7% |
- |
- OK:
The display is as specified in the normal condition column.
OK
NG
- OK:
DTC is not output.
OK
NG
Disconnect the D20 air conditioning control assembly.
Disconnect the A29 No. 3 air conditioning radiator damper servo sub-assembly (air outlet).
Measure the resistance according to the valve(s) in the table below.
- Standard Resistance:
Test Connection Condition Specified Condition A29-1(GND) - D20-6(SG) Always Below 1Ω A29-2(VZ) - D20-13(S5) Always Below 1Ω A29-3(TP) - D20-16(TPO) Always Below 1Ω A29-4(DEF) - D20-19(A0D) Always Below 1Ω A29-5(FACE) - D20-20A0F) Always Below 1Ω A29-1(GND) - Body ground Always 10 kΩ or higher A29-2(VZ) - Body ground Always 10 kΩ or higher A29-3(TP) - Body ground Always 10 kΩ or higher A29-4(DEF) - Body ground Always 10 kΩ or higher A29-5(FACE) - Body ground Always 10 kΩ or higher
OK
NG
Remove the No. 3 air conditioning radiator damper servo sub-assembly (air outlet) (See page Vehicle Interior>HEATING / AIR CONDITIONING>AIR CONDITIONING UNIT>DISASSEMBLY).
Potentiometer circuit inspection
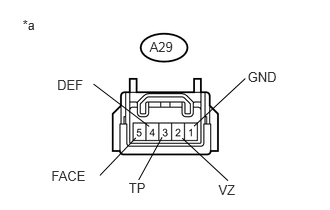
Measure the resistance according to the value(s) in the table below.
| Tester Connection | Condition | Specified Condition |
|---|---|---|
| A29-1(GND) - A29-2(VZ) | Always | 4.2 to 7.8 kΩ |
| *a | Component without harness connected
(No. 3 air conditioning radiator damper servo sub-assembly) |
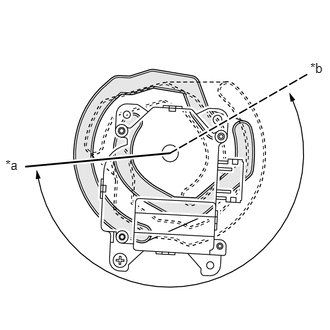
Measure the resistance according to the value(s) in the table below.
| Tester Connection | Condition | Specified Condition |
|---|---|---|
| A29-1(GND) - A29-3(TP) | FACE position | 3.4 to 6.2 kΩ |
| A29-1(GND) - A29-3(TP) | DEF position | 0.8 to 1.6 kΩ |
| *a | FACE |
| *b | DEF |
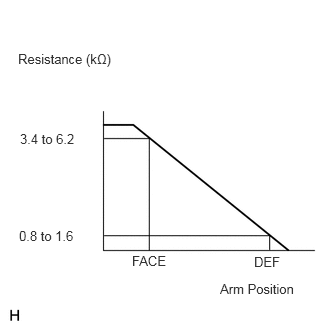
As the arm of the No. 3 air conditioning radiator damper servo motor moves from the FACE side to the DEF side, the resistance decreases gradually without interruption.
Motor circuit inspection
When the terminal 5 (FACE) of the connector A29 is connected to the battery positive terminal, and terminal 4 (DEF) of the connector A29 is connected to the battery negative terminal, confirm that the arm smoothly rotates from DEF to FACE.
- HINT:
-
Because the arm does not automatically stop at servo unit inspection, at inspection, turn off the power supply near FACE
When the terminal 4 (DEF) of the connector A29 is connected to the battery positive terminal, and terminal 5 (FACE) of the connector A29 is connected to the battery negative terminal, confirm that the arm smoothly rotates from FACE to DEF.
- HINT:
-
Because the arm does not automatically stop at servo unit inspection, at inspection, turn off the power supply near DEF
OK
NG