INTERIOR PANELS / TRIM UPPER INSTRUMENT PANEL REMOVAL
PROCEDURE

 1. TABLE OF BOLT, SCREW AND NUT
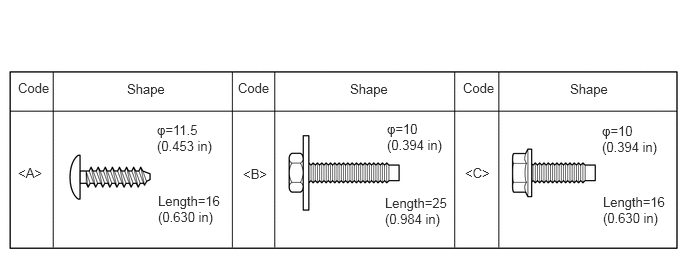
All bolts, screws and nuts relevant to installing and removing the instrument panel are shown along with their alphabetical code in the table.
2. PRECAUTION
- CAUTION:
-
Be sure to read Precaution thoroughly before servicing (See page Vehicle Interior>SUPPLEMENTAL RESTRAINT SYSTEMS>AIRBAG SYSTEM>PRECAUTION).
- NOTICE:
-
After turning the ignition switch off, waiting time may be required before disconnecting the cable from the negative (-) battery terminal. Therefore, make sure to read the disconnecting the cable from the negative (-) battery terminal notices before proceeding with work (See page General>INTRODUCTION>REPAIR INSTRUCTION>INITIALIZATION).
3.DISCONNECT CABLE FROM NEGATIVE BATTERY TERMINAL
- CAUTION:
-
Wait at least 90 seconds after disconnecting the cable from the negative (-) battery terminal to disable the SRS system.
- NOTICE:
- ·
The power window system utilizes a mechanism that the door glass moves down slightly when the door is opened, and that the glass moves up when closing the door in order to prevent the door molding from being damaged. When the battery negative (-) terminal needs to be disconnected for servicing, fully open the driver and passenger door glasses in advance.
55303B
4.REMOVE LOWER INSTRUMENT PANEL SUB-ASSEMBLY
55409F
5.REMOVE NO. 2 INSTRUMENT PANEL SPEAKER PANEL SUB-ASSEMBLY
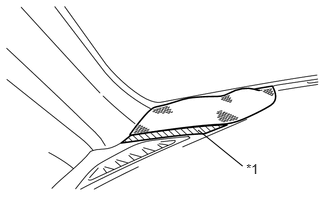
Apply protective tape to the area shown in the illustration.
| *1 | Protective Tape |
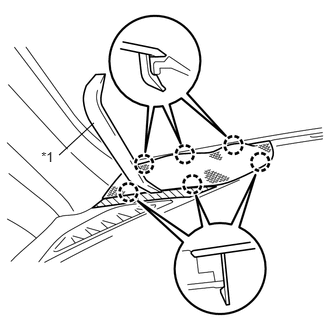
Using a moulding remover, disengage the 6 claws and remove the No. 2 instrument panel speaker panel sub-assembly.
| *1 | Moulding Remover |
Disconnect the connector.
86160P
6.REMOVE FRONT NO. 2 SPEAKER ASSEMBLY (for 6 Speakers)
55408F
7.REMOVE NO. 1 INSTRUMENT PANEL SPEAKER PANEL SUB-ASSEMBLY
- HINT:
-
Use the same procedure described for the No. 2 instrument panel speaker panel sub-assembly.
86160P
8.REMOVE FRONT NO. 2 SPEAKER ASSEMBLY (for 6 Speakers)
62212
9.REMOVE FRONT PILLAR GARNISH LH
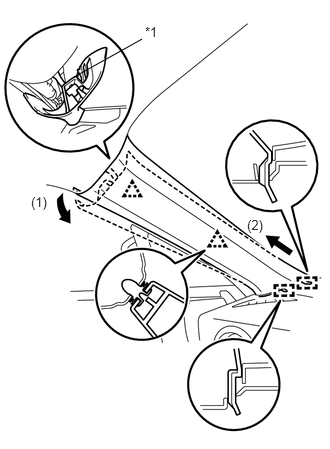
Pull the upper part of the front pillar garnish LH in the direction of the arrow (1), and disengage the 2 clips and the front pillar garnish clip.
| *1 | Front Pillar Garnish Clip |
- HINT:
-
The front pillar garnish clip should be remained on the front pillar garnish LH.
Pull the front pillar garnish LH in the direction of the arrow (2) and disengage the 2 guides.
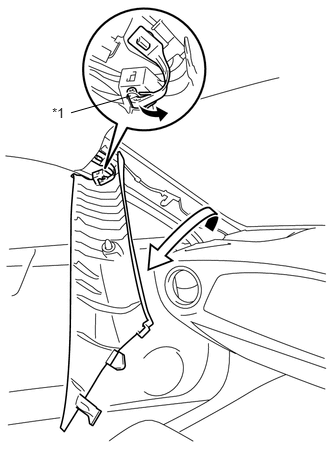
Turn the front pillar garnish LH in the direction of the arrow.
- NOTICE:
-
While turning, be careful not to damage the curtain shield airbag.
Disengage the tip of the front pillar garnish clip and remove the front pillar garnish LH.
- NOTICE:
- ·
Do not use any tools to disengage the tip of the front pillar garnish clip.
·Be careful not to damage the front pillar garnish clip.
| *1 | Front Pillar Garnish Clip |
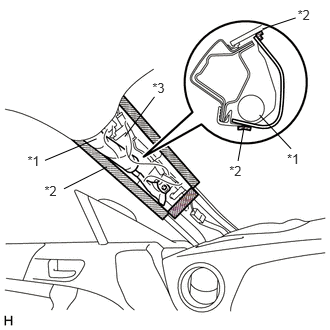
Protect the curtain shield airbag assembly (w/curtain shield airbag).
| *1 | Curtain Shield Airbag Assembly |
| *2 | Adhesive Tape |
| *3 | Protective Cover |
Cover the airbag with a piece of cloth or nylon and secure the edges of the cover with tape as shown in the illustration.
- NOTICE:
-
Cover the curtain shield airbag with a protective cover as soon as the front pillar garnish LH is removed.
62211
10.REMOVE FRONT PILLAR GARNISH RH
- HINT:
-
Use the same procedure described for the LH side.
83100
11.REMOVE COMBINATION METER ASSEMBLY
55461A
12.REMOVE INSTRUMENT PANEL ORNAMENT
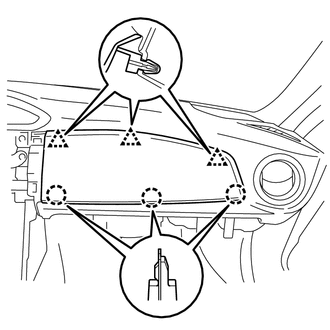
Disengage the 3 clips and 3 claws to remove the instrument panel ornament.
89120A
13.REMOVE AUTOMATIC LIGHT CONTROL SENSOR (w/ Automatic Light Control System)
73960A
14.REMOVE INSTRUMENT PANEL PASSENGER AIRBAG ASSEMBLY
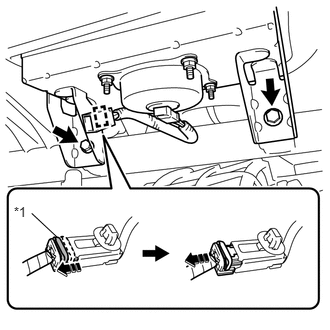
Disengage the clamp.
Slide the slider and disconnect the passenger airbag connector.
| *1 | Slider |
Remove the 2 bolts and the instrument panel passenger airbag assembly.
55302C
15.REMOVE INSTRUMENT PANEL SUB-ASSEMBLY
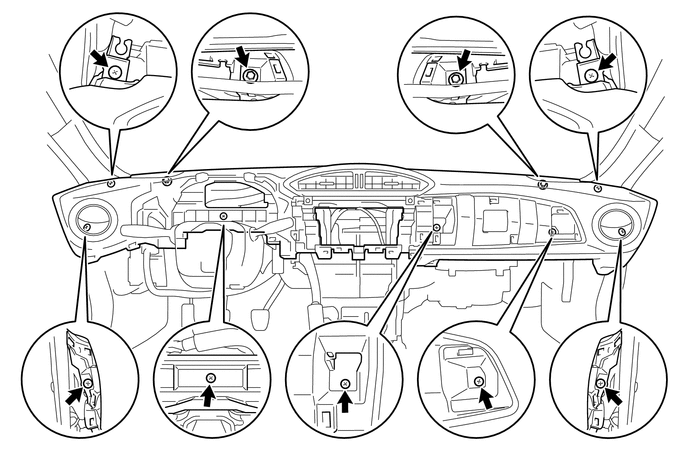
Remove the 2 bolts and 7 screws to remove the instrument panel sub-assembly.