INTERIOR PANELS / TRIM FRONT CONSOLE BOX INSTALLATION
PROCEDURE

 58810J
1.INSTALL CONSOLE BOX ASSEMBLY
Connect the connector.
Install the console box assembly with the 4 screws and 2 bolts.
- Torque:
- Bolt : 6.5 N*m (66 kgf*cm, 58 in.*lbf)
55436A
2.INSTALL INSTRUMENT PANEL FINISH PANEL END LH
Engage the 4 claws to install the instrument panel finish panel end LH.
55435A
3.INSTALL INSTRUMENT PANEL FINISH PANEL END RH
- HINT:
-
Use the same procedure as for the LH side.
58941A
4.INSTALL PARKING BRAKE HOLE COVER
Engage the 5 claws to install the parking brake hole cover.
55620A
5.INSTALL CUP HOLDER CUSHION
Install the cup holder cushion.
55620B
6.INSTALL INSTRUMENT PANEL CUP HOLDER
Install the instrument panel cup holder.
74103
7.INSTALL NO. 1 ASH RECEPTACLE SUB-ASSEMBLY (w/ Ashtray)
Install the No. 1 ash receptacle sub-assembly.
84720J
8.INSTALL PATTERN SELECT SWITCH ASSEMBLY (for Manual Transmission)
58808
9.INSTALL SHIFTING HOLE COVER SUB-ASSEMBLY (for Manual Transmission)
Install the shifting hole cover sub-assembly with the 4 screws.
58804A
10.INSTALL UPPER CONSOLE PANEL SUB-ASSEMBLY (for Manual Transmission)
Connect the connector.
Engage the 2 clips and 4 claws to install the upper console panel sub-assembly.
33504F
11.INSTALL SHIFT LEVER KNOB SUB-ASSEMBLY (for Manual Transmission)
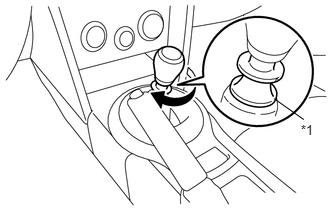
Turn the knob clockwise to install the shift lever knob sub-assembly.
| *1 | Pull collar |
- NOTICE:
- ·
Tighten the shift lever knob until the tightening on the shift lever knob stiffens.
·Check that the transmission moves into reverse when the pull collar is pulled.
84720J
12.INSTALL PATTERN SELECT SWITCH ASSEMBLY (for Automatic Transmission)
58808
13.INSTALL SHIFTING HOLE COVER SUB-ASSEMBLY (for Automatic Transmission)
Engage the claw.
Install the shifting hole cover sub-assembly with the 2 screws.
35978
14.INSTALL SHIFT POSITION INDICATOR (for Automatic Transmission)
Engage the clamp.
Install the shift position indicator with the 2 screws.
58804A
15.INSTALL UPPER CONSOLE PANEL SUB-ASSEMBLY (for Automatic Transmission)
Connect the connector.
Engage the 2 clips and 4 claws to install the upper console panel sub-assembly.
33504F
16.INSTALL SHIFT LEVER KNOB SUB-ASSEMBLY (for Automatic Transmission)
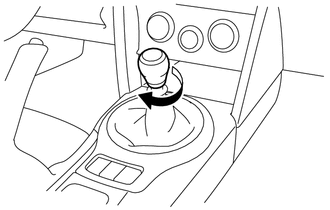
Turn the knob clockwise to install the shift lever knob sub-assembly.
- NOTICE:
- ·
Tighten the shift lever knob until the tightening on the shift lever knob stiffens.
- ·
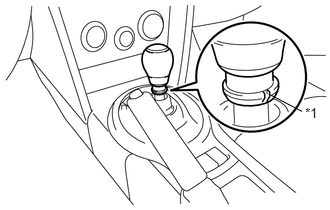 3.178,1.097 3.375,1.268 0.196,0.171 10 *1 2.799,0.979 3.147,1.161 false
Face the groove on the shift lever knob toward the rear of the vehicle.
Text in Illustration *1 Groove
86190C
17.INSTALL NO. 1 STEREO JACK ADAPTER ASSEMBLY (w/ Stereo Jack Adapter)
58818A
18.INSTALL FRONT CONSOLE BOX COVER (w/o Entry and Start System)
Engage the 6 claws to install the front console box cover.
89992
19.INSTALL INDOOR ELECTRICAL KEY OSCILLATOR (w/ Entry and Start System)
89611
20.INSTALL PUSH START SWITCH (w/ Entry and Start System)
58818A
21.INSTALL FRONT CONSOLE BOX COVER (w/ Entry and Start System)
Connect the connector.
Engage the 6 claws to install the front console box cover.