METER / GAUGE / DISPLAY METER / GAUGE SYSTEM Speed Signal Circuit
DESCRIPTION
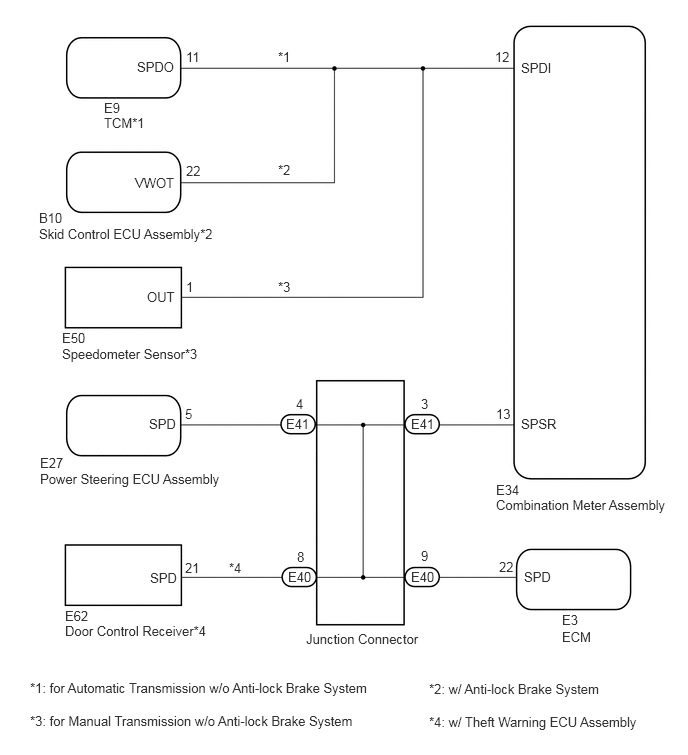
The vehicle speed sensor signal consists of pulses sent to the combination meter assembly from the TCM*1, skid control ECU assembly*2 or speedometer sensor*3.
*1: for Automatic Transmission w/o Anti-lock Brake System
*2: w/ Anti-lock Brake System
*3: for Manual Transmission w/o Anti-lock Brake System
WIRING DIAGRAM
PROCEDURE
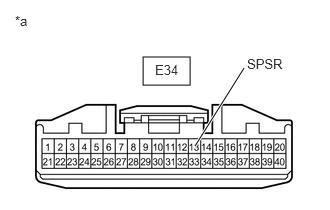
| *a | Front view of wire harness connector
(to Combination Meter Assembly) |
Disconnect the E34 combination meter assembly connector.
Measure the voltage according to the value(s) in the table below.
- Standard Voltage:
Tester Connection Switch Condition Specified Condition E34-13 (SPSR) - Body ground Ignition switch ON 4.5 to 14 V
- HINT:
-
If any of the ECUs specified in the wiring diagram supplies power to the combination meter assembly, the combination meter assembly will output a waveform.
- Result:
Result Proceed to NG A OK (for Automatic Transmission) B OK (for Manual Transmission w/ Anti-lock Brake System) C OK (for Manual Transmission w/o Anti-lock Brake System) D
A
B
C
D
Disconnect the E41 Junction connector.
Measure the resistance according to the value(s) in the table below.
- Standard Resistance (Check for Open):
Tester Connection Condition Specified Condition E34-13 (SPSR) - E41-3 Always Below 1 Ω
- Standard Resistance (Check for Short):
Tester Connection Condition Specified Condition E34-13 (SPSR) - Body ground Always 10 kΩ or higher
- Result:
Proceed to OK NG
OK
NG
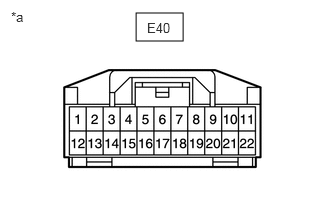
| *a | Front view of wire harness connector
(to Junction Connector) |
Disconnect the E40 junction connector.
Measure the voltage according to the value(s) in the table below.
- Standard Voltage:
Tester Connection Switch Condition Specified Condition E40-9 - Body ground Ignition switch ON 4.5 to 14 V
- Result:
Proceed to OK NG
OK
NG
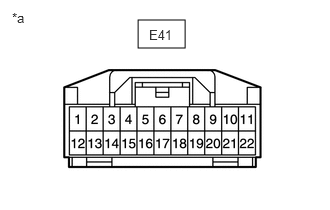
| *a | Front view of wire harness connector
(to Junction Connector) |
Disconnect the E41 junction connector.
Measure the voltage according to the value(s) in the table below.
- Standard Voltage:
Tester Connection Switch Condition Specified Condition E41-4 - Body ground Ignition switch ON 4.5 to 14 V
- Result:
Result Proceed to OK (w/ Theft Warning ECU Assembly) A OK (w/o Theft Warning ECU Assembly) B NG C
A
B
C
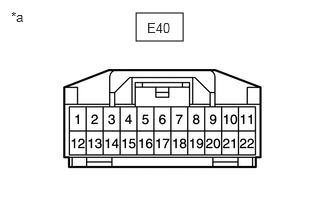
| *a | Front view of wire harness connector
(to Junction Connector) |
Disconnect the E40 junction connector.
Measure the voltage according to the value(s) in the table below.
- Standard Voltage:
Tester Connection Switch Condition Specified Condition E40-8 - Body ground Ignition switch ON 4.5 to 14 V
- Result:
Proceed to OK NG
OK
NG
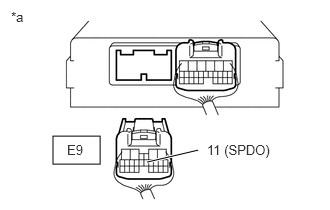
| *a | Rear view of wire harness connector
(to TCM) |
Disconnect the E9 TCM connector.
Measure the voltage according to the value(s) in the table below.
- Standard Voltage:
Tester Connection Switch Condition Specified Condition E9-11 (SPDO) - Body ground Ignition switch ON 11 to 14 V
- Result:
Proceed to OK NG
OK
NG
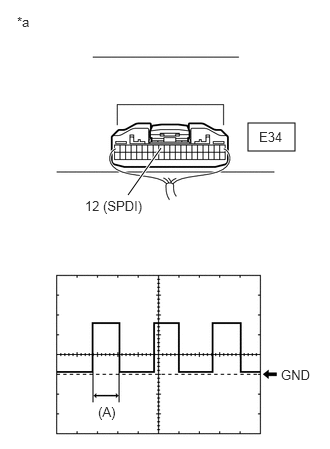
| *a | Component with harness connected
(Combination Meter Assembly) |
Check the input waveform.
Remove the combination meter assembly with the connector still connected.
Connect an oscilloscope to terminal E34-12 (SPDI) and body ground.
Turn the ignition switch to ON.
Turn the wheel slowly.
Check the signal waveform according to the condition(s) in the table below.
| Item | Condition |
|---|---|
| Tool setting | 5 V/DIV., 20 ms./DIV. |
| Vehicle condition | Driving at approx. 20 km/h (12 mph) |
- OK:
The waveform is displayed as shown in the illustration.
- HINT:
-
When the system is functioning normally, one wheel revolution generates 4 pulses. As the vehicle speed increases, the width indicated by (A) in the illustration narrows.
- Result:
Proceed to OK NG
OK
NG
Disconnect the E3 ECM connector.
Measure the resistance according to the value(s) in the table below.
- Standard Resistance (Check for Open):
Tester Connection Condition Specified Condition E3-22 (SPD) - E40-9 Always Below 1Ω
- Standard Resistance (Check for Short):
Tester Connection Condition Specified Condition E40-9 - Body ground Always 10 kΩ or higher
- Result:
Result Proceed to NG A OK (3SZ-VE) B OK (K3-VE) C
A
B
C
Disconnect the E62 door control receiver connector.
Measure the resistance according to the value(s) in the table below.
- Standard Resistance (Check for Open):
Tester Connection Condition Specified Condition E62-21 (SPD) - E40-8 Always Below 1Ω
- Standard Resistance (Check for Short):
Tester Connection Condition Specified Condition E40-8 - Body ground Always 10 kΩ or higher
- Result:
Proceed to OK NG
OK
NG
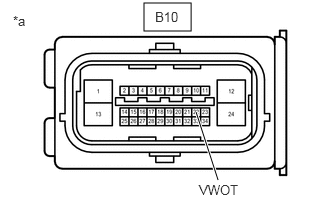
| *a | Front view of wire harness connector
(to skid control ECU assembly) |
Disconnect the B10 skid control ECU assembly connector.
Measure the voltage according to the value(s) in the table below.
- Standard Voltage:
Tester Connection Switch Condition Specified Condition B10-22 (VWOT) - Body ground Ignition switch ON 11 to 14 V
- Result:
Proceed to OK NG
OK
NG
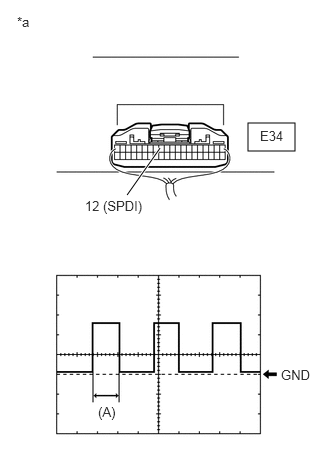
| *a | Component with harness connected
(Combination Meter Assembly) |
Check the input waveform.
Remove the combination meter assembly with the connector still connected.
Connect an oscilloscope to terminal E34-12 (SPDI) and body ground.
Turn the ignition switch to ON.
Turn the wheel slowly.
Check the signal waveform according to the condition(s) in the table below.
| Item | Condition |
|---|---|
| Tool setting | 5 V/DIV., 20 ms./DIV. |
| Vehicle condition | Driving at approx. 20 km/h (12 mph) |
- OK:
The waveform is displayed as shown in the illustration.
- HINT:
-
When the system is functioning normally, one wheel revolution generates 4 pulses. As the vehicle speed increases, the width indicated by (A) in the illustration narrows.
- Result:
Proceed to OK NG
OK
NG
Disconnect the E34 combination meter assembly connector.
Disconnect the E9 TCM connector.
Measure the resistance according to the value(s) in the table below.
- Standard Resistance (Check for Open):
Tester Connection Condition Specified Condition E34-12 (SPD1) - E9-11 (SPDO) Always Below 1 Ω
- Standard Resistance (Check for Short):
Tester Connection Condition Specified Condition E9-11 (SPDO) - Body ground Always 10 kΩ or higher
- Result:
Proceed to OK NG
OK
NG
Disconnect the E27 power steering ECU assembly connector.
Measure the resistance according to the value(s) in the table below.
- Standard Resistance (Check for Open):
Tester Connection Condition Specified Condition E27-5 (SPD) - E41-4 Always Below 1Ω
- Standard Resistance (Check for Short):
Tester Connection Condition Specified Condition E41-4 - Body ground Always 10 kΩ or higher
- Result:
Proceed to OK NG
OK
NG
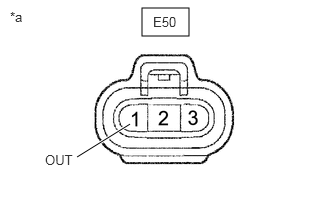
| *a | Front view of wire harness connector
(to speedometer sensor) |
Disconnect the E50 speedometer sensor connector.
Measure the voltage according to the value(s) in the table below.
- Standard Voltage:
Tester Connection Switch Condition Specified Condition E50-1 (OUT) - Body ground Ignition switch ON 11 to 14 V
- Result:
Proceed to OK NG
OK
NG
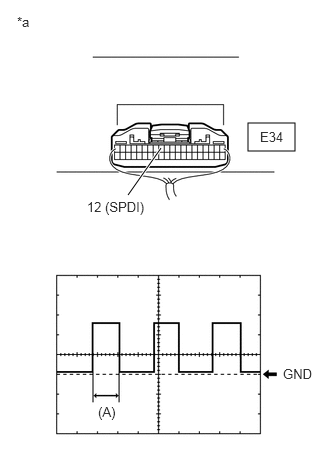
| *a | Component with harness connected
(Combination Meter Assembly) |
Check the input waveform.
Remove the combination meter assembly with the connector still connected.
Connect an oscilloscope to terminal E34-12 (SPDI) and body ground.
Turn the ignition switch to ON.
Turn the wheel slowly.
Check the signal waveform according to the condition(s) in the table below.
| Item | Condition |
|---|---|
| Tool setting | 5 V/DIV., 20 ms./DIV. |
| Vehicle condition | Driving at approx. 20 km/h (12 mph) |
- OK:
The waveform is displayed as shown in the illustration.
- HINT:
-
When the system is functioning normally, one wheel revolution generates 4 pulses. As the vehicle speed increases, the width indicated by (A) in the illustration narrows.
- Result:
Proceed to OK NG
OK
NG
Disconnect the E34 combination meter assembly connector.
Disconnect the B10 skid control ECU assembly connector.
Measure the resistance according to the value(s) in the table below.
- Standard Resistance (Check for Open):
Tester Connection Condition Specified Condition E34-12 (SPD1) - B10-22 (VWOT) Always Below 1 Ω
- Standard Resistance (Check for Short):
Tester Connection Condition Specified Condition B10-22 (VWOT) - Body ground Always 10 kΩ or higher
- Result:
Proceed to OK NG
OK
NG
Disconnect the E34 combination meter assembly connector.
Disconnect the E50 speedometer sensor connector.
Measure the resistance according to the value(s) in the table below.
- Standard Resistance (Check for Open):
Tester Connection Condition Specified Condition E34-12 (SPD1) - E50-1 (OUT) Always Below 1 Ω
- Standard Resistance (Check for Short):
Tester Connection Condition Specified Condition E50-1 (OUT) - Body ground Always 10 kΩ or higher
- Result:
Proceed to OK NG
OK
NG