INTERIOR PANELS / TRIM UPPER INSTRUMENT PANEL REMOVAL
CAUTION / NOTICE / HINT
- HINT:
- ·
Use the same procedure for the RHD and LHD vehicles.
·The procedure listed below is for the RHD vehicle.
PROCEDURE

 1.DISCONNECT CABLE FROM NEGATIVE BATTERY TERMINAL
- CAUTION:
-
Wait at least 90 seconds after disconnecting the cable from the negative (-) battery terminal to disable the SRS system.
- NOTICE:
-
When disconnecting the cable, some systems need to be initialized after the cable is reconnected (Click here General>INTRODUCTION>REPAIR INSTRUCTION>INITIALIZATION).
67914B
2.REMOVE FRONT DOOR SCUFF PLATE LH
67913B
3.REMOVE FRONT DOOR SCUFF PLATE RH
- HINT:
-
Use the same procedure as for the LH side.
62112
4.REMOVE COWL SIDE TRIM BOARD LH
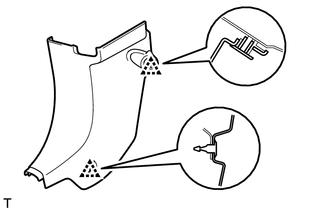
Remove the 2 clips and cowl side trim board LH.
62111C
5.REMOVE COWL SIDE TRIM BOARD RH
- HINT:
-
Use the same procedure as for the LH side.
62312B
6.REMOVE FRONT DOOR OPENING TRIM WEATHERSTRIP LH
62311B
7.REMOVE FRONT DOOR OPENING TRIM WEATHERSTRIP RH
- HINT:
-
Use the same procedure as for the LH side.
62212
8.REMOVE FRONT PILLAR GARNISH LH (for 6 Speakers)
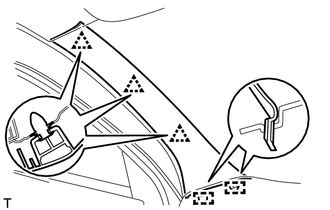
Disengage the 3 clips and 2 guides to remove the front pillar garnish LH.
62211
9.REMOVE FRONT PILLAR GARNISH RH (for 6 Speakers)
- HINT:
-
Use the same procedure as for the LH side.
62212
10.REMOVE FRONT PILLAR GARNISH LH (for 4 Speakers)
- HINT:
-
Use the same procedure as for the front pillar garnish LH (w/ 6 speakers).
62211
11.REMOVE FRONT PILLAR GARNISH RH (for 4 Speakers)
- HINT:
-
Use the same procedure as for the front pillar garnish LH (w/ 6 speakers).
86160P
12.REMOVE PILLAR SPEAKER RH (for 6 Speakers)
86160J
13.REMOVE PILLAR SPEAKER LH (for 6 Speakers)
- HINT:
-
Use the same procedure as for the LH side.
55411G
14.REMOVE NO. 1 INSTRUMENT CLUSTER FINISH PANEL
55501A
15.REMOVE GLOVE COMPARTMENT DOOR SUB-ASSEMBLY
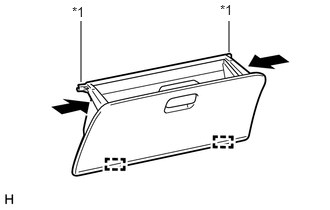
| *1 | Stopper |
Push the sections indicated by the arrows to release the 2 stoppers and open the glove compartment door sub-assembly until it is horizontal.
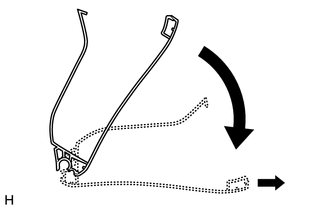
Pull the glove compartment door sub-assembly horizontally backward to disengage the 2 hinges and remove the glove compartment door sub-assembly.
- NOTICE:
-
Be sure to pull the glove compartment door sub-assembly horizontally to remove it.
55557A
16.REMOVE GLOVE COMPARTMENT DOOR CHECK CUSHION
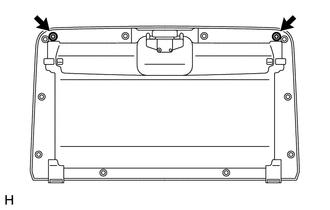
Remove the 2 glove compartment door check cushions from the glove compartment door sub-assembly.
55560A
17.REMOVE GLOVE COMPARTMENT DOOR LOCK ASSEMBLY
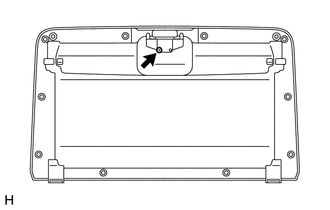
Remove the screw and the glove compartment door lock assembly.
73970A
18.REMOVE INSTRUMENT PANEL PASSENGER AIRBAG ASSEMBLY
55412D
19.REMOVE CENTER INSTRUMENT CLUSTER FINISH PANEL SUB-ASSEMBLY
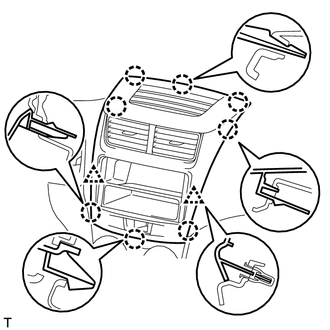
Disengage the 2 clips and 8 claws to remove the center instrument cluster finish panel sub-assembly.
20.REMOVE TELLTALE LIGHT ASSEMBLY
55061
21.REMOVE NO. 1 INSTRUMENT PANEL REGISTER SUB-ASSEMBLY
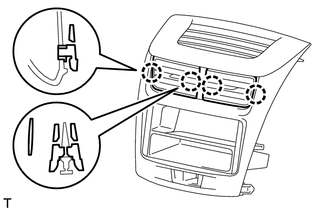
Disengage the 2 claws to remove the No. 1 instrument panel register sub-assembly.
55062
22.REMOVE NO. 2 INSTRUMENT PANEL REGISTER SUB-ASSEMBLY
- HINT:
-
Use the same procedure as for the No. 1 instrument panel register sub-assembly.
55422C
23.REMOVE CENTER UPPER INSTRUMENT CLUSTER FINISH PANEL
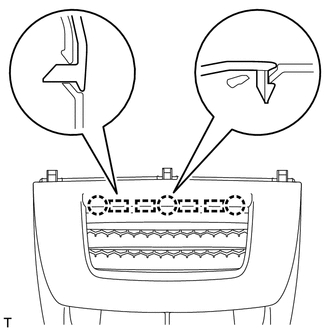
Disengage the 3 claws and 4 guides to remove the center upper instrument cluster finish panel.
86180
24.REMOVE STEREO COMPONENT TUNER ASSEMBLY WITH BRACKET (w/ USB Audio System)
86180
25.REMOVE STEREO COMPONENT TUNER ASSEMBLY WITH BRACKET (w/o USB Audio System)
55522B
26.REMOVE RADIO RECEIVER OPENING COVER WITH BRACKET (w/ Radio Receiver Opening Cover, for 1-piece Type)
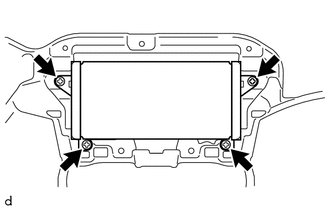
Remove the 4 screws and the radio receiver opening cover with bracket.
55522F
27.REMOVE RADIO RECEIVER OPENING COVER WITH BRACKET (w/ Radio Receiver Opening Cover, for 2-piece Type)
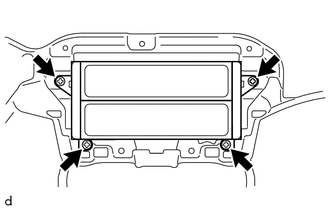
Remove the 4 screws and the radio receiver opening cover with bracket.
55301
28.REMOVE INSTRUMENT PANEL SUB-ASSEMBLY
Remove the 4 screws.
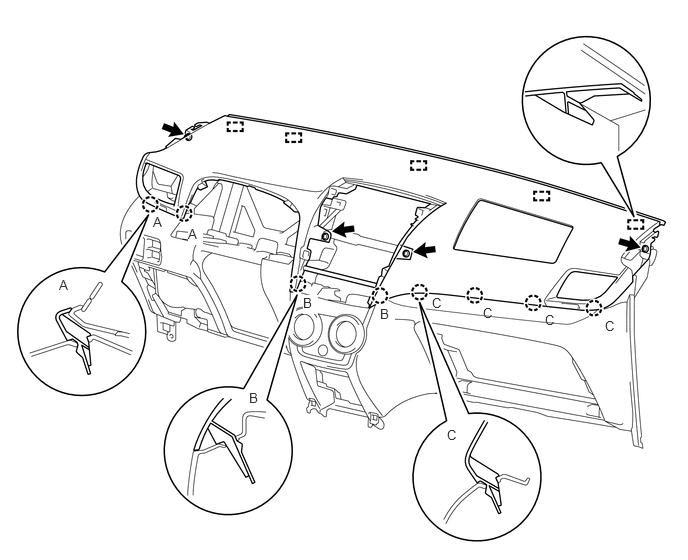
Disengage the 8 claws and 5 guides to remove the instrument panel sub-assembly.
- NOTICE:
-
Be careful not to damage the instrument panel sub-assembly when removing it.