1NR-VE ENGINE MECHANICAL CYLINDER HEAD GASKET INSTALLATION
PROCEDURE

 11115
1.INSTALL CYLINDER HEAD GASKET
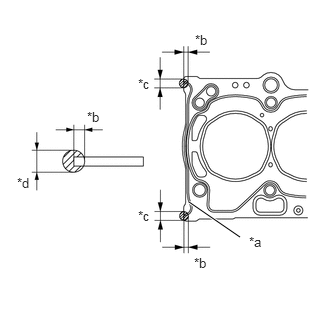
| *a | Bead |
| *b | 4.0 to 7.0 mm (0.157 to 0.276 in.) |
| *c | 6.5 to 8.0 mm (0.256 to 0.315 in.) |
| *d | 7.0 to 10.0 mm (0.276 to 0.394 in.) |
Apply seal packing to a new cylinder head gasket as shown in the illustration.
- Seal packing:
Toyota Genuine Seal Packing Black, Three Bond 1207B or equivalent
- NOTICE:
- ·
Clean the sealing surfaces of the cylinder head gasket, cylinder head sub-assembly and cylinder block sub-assembly.
·Install the cylinder head sub-assembly within 3 minutes and tighten the cylinder head set bolts within 15 minutes of applying seal packing.
- HINT:
-
Apply seal packing to the bead on the cylinder head gasket.
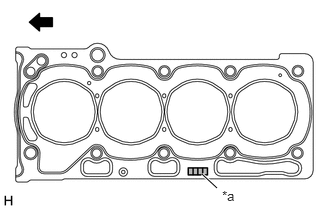
| *a | Lot No. |

|
Engine Front |
Place the cylinder head gasket on the cylinder block sub-assembly surface with the Lot No. stamp facing upward.
- NOTICE:
- ·
Remove any oil from the contact surface.
·Make sure that the cylinder head gasket is installed in the correct direction.
11101
2.INSTALL CYLINDER HEAD SUB-ASSEMBLY
Apply a light coat of engine oil to the cylinder head set bolt threads and the area beneath the cylinder head set bolt heads that come in contact with the plate washers.
Temporarily install the 10 cylinder head set bolts and 10 plate washers to the cylinder head sub-assembly.
- NOTICE:
-
Do not drop the plate washers into the cylinder head sub-assembly.
Step 1
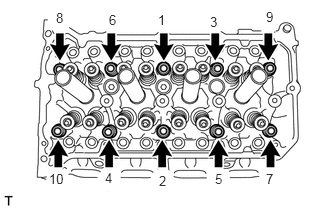
Using a 10 mm bi-hexagon wrench, uniformly tighten the 10 cylinder head set bolts and 10 plate washers in several steps and in the order shown in the illustration.
- Torque:
- 32 N*m (326 kgf*cm, 24 ft.*lbf)
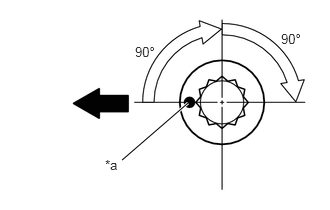
| *a | Paint Mark |
|
|
Engine Front |
Step 2
Mark the front side of the cylinder head set bolts with paint.
Tighten the cylinder head set bolts 90° in the order shown in step 1.
- NOTICE:
-
Do not tighten the same cylinder head set bolt twice consecutively.
Step 3
Tighten the cylinder head set bolts 90° in the order shown in step 1.
- NOTICE:
-
Do not tighten the same cylinder head set bolt twice consecutively.
Check that the paint mark is now at a 180° angle to the front.
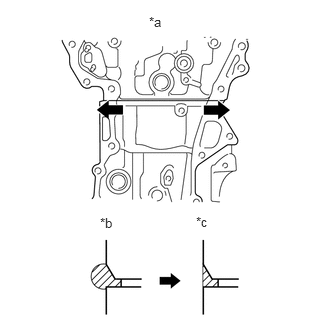
| *a | Direction to wipe off |
| *b | Before wiping off |
| *c | After wiping off |
Wipe off the seal packing seeped out from the contact surface between the cylinder head sub-assembly and cylinder block sub-assembly.
- HINT:
-
Be sure to wipe off the seal packing from inside to outside, in parallel to the joint line.
3.CONNECT WATER BY-PASS HOSES
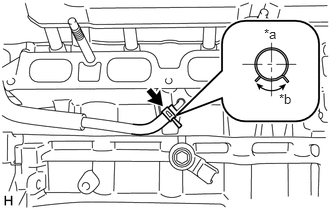
| *a | Upper Side |
| *b | 90° |
w/ Heater:
Connect the No. 5 water by-pass hose with the No. 2 water by-pass hose and No. 3 water by-pass hose with the clamp as shown in the illustration.
- HINT:
-
Install the clamp so that it is positioned as shown in the illustration.
w/o Heater:
Connect the No. 5 water by-pass hose with the water by-pass hose and No. 3 water by-pass hose with the clamp as shown in the illustration.
- HINT:
-
Install the clamp so that it is positioned as shown in the illustration.
4.INSTALL HARNESS BRACKET
Install the harness bracket with the bolt.
- Torque:
- 7.0 N*m (71 kgf*cm, 62 in.*lbf)
Connect the engine coolant temperature sensor connector.
16261
5.CONNECT WATER BY-PASS HOSE
Connect the water by-pass hose with the clamp.
16591A
6.CONNECT RADIATOR PIPE RADIATOR HOSE
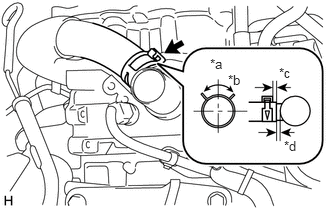
| *a | Upper Side |
| *b | 90° |
| *c | 0 to 5.0 mm (0 to 0.197 in.) |
| *d | 1.0 to 5.0 mm (0.039 to 0.197 in.) |
Connect the radiator pipe radiator hose with the hose clamp as shown in the illustration.
- HINT:
-
Install the hose clamp so that it is positioned as shown in the illustration.
17111
7.INSTALL INTAKE MANIFOLD
25051
8.INSTALL EXHAUST MANIFOLD CONVERTER SUB-ASSEMBLY
11103
9.INSTALL CAMSHAFT HOUSING SUB-ASSEMBLY