METER / GAUGE / DISPLAY METER / GAUGE SYSTEM Fuel Receiver Gauge Malfunction
DESCRIPTION
The combination meter assembly controls the fuel receiver gauge in accordance with the resistance of the fuel sender gauge that varies depending on the amount of fuel remaining in the fuel tank.
WIRING DIAGRAM
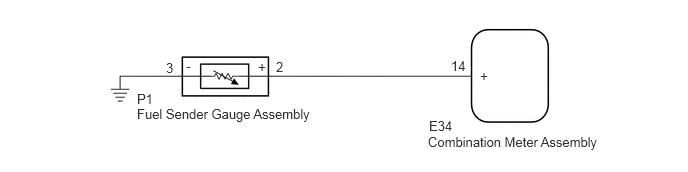
PROCEDURE
Connect the GTS or Techstream to the DLC3.
Turn the ignition switch to ON.
Turn the GTS or Techstream on.
Enter the following menus: Body Electrical / Meter / Data List.
According to the display on the GTS or Techstream, read the Data List.
| Tester Display | Measurement Item | Range | Normal Condition | Diagnostic Note |
|---|---|---|---|---|
| Remaining fuel amount | Fuel Level | Min.: 0 L
Max.: 127.5 L |
Fuel Level input value | Unit: Liter |
- OK:
Engine speed displayed on the GTS or Techstream is approximately the same as the actual engine speed.
- Result:
Result Proceed to Fuel level data displayed on the GTS or Techstream is almost the same as the fuel receiver gauge indication. A Fuel level data displayed on the GTS or Techstream differs from the fuel receiver gauge indication. B
A
B
Disconnect the P1 fuel sender gauge assembly connector.
Disconnect the E34 combination meter assembly connector.
Measure the resistance according to the value(s) in the table below.
- Standard resistance (Check for Open):
Tester Connection Condition Specified Condition P1-2 (+) - E34-14 (+) Always Below 1 Ω P1-3 (-) - Body ground Always Below 1 Ω
- Standard resistance (Check for Short):
Tester Connection Condition Specified Condition P1-2 (+) or E34-14 (+) - Body ground Always 10 kΩ or higher
- Result:
Proceed to OK NG
OK
NG
Remove the fuel sender gauge assembly.
for 1NR-VE
Click hereEngine / Hybrid System>1NR-VE FUEL>FUEL PUMP>REMOVAL
for 2NR-VE
Click hereEngine / Hybrid System>2NR-VE FUEL>FUEL PUMP>REMOVAL
Inspect the fuel sender gauge assembly.
for 1NR-VE
Click hereEngine / Hybrid System>1NR-VE FUEL>FUEL PUMP>INSPECTION
for 2NR-VE
Click hereEngine / Hybrid System>2NR-VE FUEL>FUEL PUMP>INSPECTION
- Result:
Result Proceed to OK A NG (for 1NR-VE) B NG (for 2NR-VE) C
A
B
C
Visually check for deformation on the fuel suction tube with pump and gauge assembly connector.
- OK:
There is no deformation.
- Result:
Result Proceed to OK A NG (for 1NR-VE) B NG (for 2NR-VE) C
A
B
C