WINDOW / GLASS POWER WINDOW REGULATOR MOTOR(for Rear Door) REMOVAL
CAUTION / NOTICE / HINT
The necessary procedures (adjustment, calibration, initialization or registration) that must be performed after parts are removed and installed, or replaced during the power window regulator motor removal/installation are shown below.
| Replaced Part or Performed Procedure | Necessary Procedure | Effect/Inoperative when not Performed | Link |
|---|---|---|---|
| Disconnect cable from negative auxiliary battery terminal | Memorize steering angle neutral point | Lane departure alert system (w/ Steering Control) | ( ) |
| Simple intelligent parking assist system*1 | |||
| Toyota parking assist-sensor system*1 | |||
| Pre-collision system | |||
| Initialize back door lock | Power door lock control system | ()
|
|
·
Door window regulator assembly ·
Power window regulator motor assembly ·
Door glass ·
Door glass run |
Initialize Power Window Control System | ·
Auto up and down function ·
Jam protection function ·
Catch protection function ·
Remote control function ·
Key-linked function ·
Wireless transmitter-linked function ·
Key-off operation function ·
Window open warning function |
()
|
*1: When performing learning using the GTS.
- HINT:
- ·
Use the same procedure for RHD and LHD vehicles.
·The procedure listed below is for LHD vehicles.
·Use the same procedure for the RH and LH sides.
·The procedure listed below is for the LH side.
PROCEDURE

 1.DISCONNECT CABLE FROM NEGATIVE AUXILIARY BATTERY TERMINAL
- NOTICE:
-
When disconnecting the cable, some systems need to be initialized after the cable is reconnected.
-
Click hereGeneral>INTRODUCTION>REPAIR INSTRUCTION>INITIALIZATION
69284D
2.REMOVE REAR DOOR INSIDE HANDLE BEZEL PLUG
84810D
3.REMOVE REAR POWER WINDOW REGULATOR SWITCH ASSEMBLY WITH REAR DOOR ARMREST BASE UPPER PANEL
67498
4.REMOVE REAR DOOR REAR FRAME BRACKET
67604
5.REMOVE REAR DOOR TRIM BOARD SUB-ASSEMBLY
67498
6.REMOVE REAR DOOR GLASS INNER WEATHERSTRIP
68197
7.REMOVE REAR DOOR BELT SEAL
68199
8.REMOVE REAR DOOR BELT REAR SEAL
67842E
9.REMOVE REAR DOOR SERVICE HOLE COVER
67674A
10.REMOVE REAR DOOR FRAME GARNISH
68152C
11.REMOVE REAR DOOR GLASS RUN
67408F
12.REMOVE REAR DOOR WINDOW REAR LOWER FRAME SUB-ASSEMBLY
68104
13.REMOVE REAR DOOR GLASS SUB-ASSEMBLY
14.REMOVE REAR DOOR WINDOW REGULATOR SUB-ASSEMBLY
15.REMOVE POWER WINDOW REGULATOR MOTOR ASSEMBLY
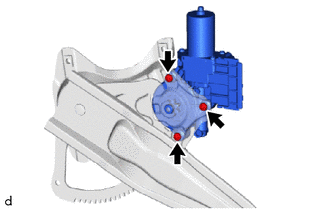
Using a T25 "TORX" socket wrench, remove the 3 screws and power window regulator motor assembly.