M20A-FXS FUEL FUEL PUMP ECU REMOVAL
CAUTION / NOTICE / HINT
The necessary procedures (adjustment, calibration, initialization or registration) that must be performed after parts are removed and installed, or replaced during fuel pump control ECU assembly removal/installation are shown below.
| Replaced Part or Performed Procedure | Necessary Procedure | Effect/Inoperative Function when Necessary Procedure not Performed | Link |
|---|---|---|---|
|
*1: When performing learning using the GTS. Click here( |
|||
| Disconnect cable from negative auxiliary battery terminal | Perform steering sensor zero point calibration | Lane departure alert system (w/ Steering Control) | ( ) |
| Simple intelligent parking assist system*1 | |||
| Parking Support Brake System*1 | |||
| Toyota parking assist-sensor system*1 | |||
| Pre-collision System | |||
| Initialize back door lock | Power door lock control system | ()
|
|
PROCEDURE

 1. PRECAUTION
- NOTICE:
-
After turning the power switch off, waiting time may be required before disconnecting the cable from the negative (-) auxiliary battery terminal. Therefore, make sure to read the disconnecting the cable from the negative (-) auxiliary battery terminal notices before proceeding with work.
-
Click hereGeneral>INTRODUCTION>REPAIR INSTRUCTION>PRECAUTION
2.DISCONNECT CABLE FROM NEGATIVE AUXILIARY BATTERY TERMINAL
Click hereGeneral>MAINTENANCE>M20A-FXS AUXILIARY BATTERY>REMOVAL
- NOTICE:
-
When disconnecting the cable, some systems need to be initialized after the cable is reconnected.
-
Click hereGeneral>INTRODUCTION>REPAIR INSTRUCTION>INITIALIZATION
3.REMOVE REAR SEATBACK ASSEMBLY LH
4.REMOVE BENCH TYPE REAR SEAT CUSHION ASSEMBLY
72693
5.REMOVE REAR SEAT CUSHION LOCK HOOK
64330D
6.REMOVE PACKAGE TRAY TRIM PANEL ASSEMBLY (w/ Package Tray Trim)
64910J
7.REMOVE TONNEAU COVER ASSEMBLY (w/ Tonneau Cover)
58410B
8.REMOVE DECK BOARD ASSEMBLY
64995
9.REMOVE DECK FLOOR BOX RH (w/ Spare Tire)
64429B
10.REMOVE LUGGAGE ROOM BOX (w/ Spare Tire)
58440
11.REMOVE BATTERY SERVICE HOLE COVER ASSEMBLY (w/o Spare Tire)
64991
12.REMOVE DECK FLOOR FRONT BOX (w/o Spare Tire)
62332A
13.SEPARATE REAR DOOR OPENING TRIM WEATHERSTRIP LH
Separate the rear door opening trim weatherstrip LH.
67918A
14.REMOVE REAR DOOR SCUFF PLATE LH
71304C
15.REMOVE REAR SEATBACK HINGE SUB-ASSEMBLY LH
62552F
16.REMOVE REAR SEAT SIDE GARNISH LH
64716D
17.REMOVE DECK TRIM REAR COVER
81330
18.REMOVE NO. 1 LUGGAGE COMPARTMENT LIGHT ASSEMBLY
64740C
19.REMOVE DECK TRIM SIDE PANEL ASSEMBLY LH
89570A
20.REMOVE FUEL PUMP CONTROL ECU ASSEMBLY
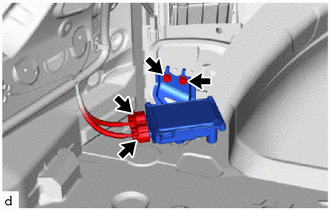
Disconnect the 2 fuel pump control ECU assembly connectors.
Remove the 2 bolts and fuel pump control ECU assembly.
- NOTICE:
-
Do not reuse the fuel pump control ECU assembly if it has been dropped or subjected to a severe impact.
- HINT:
-
If a malfunction such as pump lock occurs and the fuel pump is damaged, excessive current may be continuously applied to the fuel pump control ECU assembly, damaging its internal parts. Make sure to replace the fuel pump control ECU assembly at the same time when replacing the fuel pump.