P610 HYBRID TRANSMISSION / TRANSAXLE TRANSMISSION CONTROL CABLE INSTALLATION
PROCEDURE

 33820B
1.INSTALL TRANSMISSION CONTROL CABLE ASSEMBLY
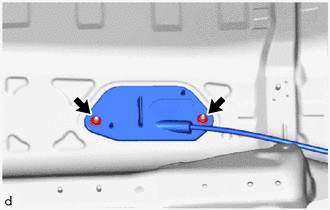
Pass the transmission control cable assembly into the vehicle and install the transmission control cable assembly to the vehicle body with the 2 nuts.
- Torque:
- 5.0 N*m (51 kgf*cm, 44 in.*lbf)
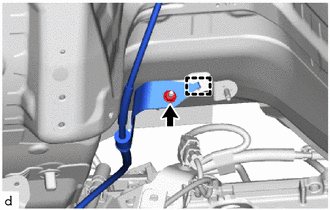
Engage the guide to connect the transmission control cable assembly to vehicle body.
Install the nut.
- Torque:
- 5.0 N*m (51 kgf*cm, 44 in.*lbf)
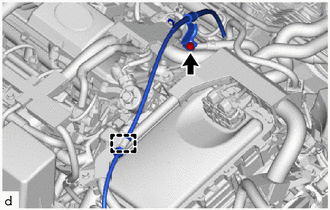
Install the transmission control cable assembly from the cylinder head cover sub-assembly with the bolt.
- Torque:
- 5.0 N*m (51 kgf*cm, 44 in.*lbf)
Engage the clamp to connect the transmission control cable assembly.
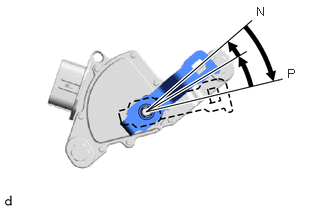
Turn the control shaft lever clockwise until it stops, and then from that position turn it counterclockwise by 2 notches to set it to the N position.
Connect the transmission control cable assembly to the No. 1 transmission control cable bracket with a new clip.
Connect the transmission control cable assembly to the control shaft lever with the nut.
- Torque:
- 12 N*m (122 kgf*cm, 9 ft.*lbf)
for TMMT Made:
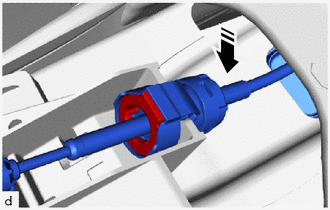

|
Install in this Direction |
Connect the transmission control cable assembly to the floor shift shift lever assembly.
- NOTICE:
-
Make sure that the transmission control cable assembly is securely locked.
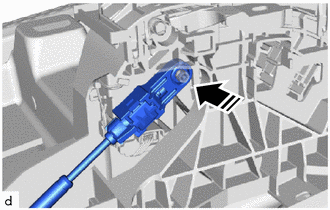
|
|
Install in this Direction |
Connect the end of the transmission control cable assembly to the floor shift shift lever assembly.
- NOTICE:
- ·
Before connecting the transmission control cable assembly, check that the park/neutral position switch and shift lever are in N.
·Install the end of the transmission control cable assembly so that the lock piece faces the driver side.
·Install the end of the transmission control cable assembly all the way to the base of the pin.
for TMC Made:
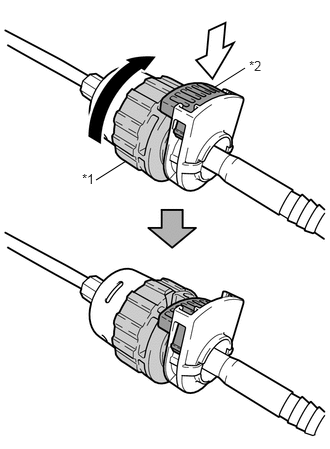
| *1 | Nut |
| *2 | Lock |

|
Rotate approximately 180° |

|
Push in |
Rotate the nut of the transmission control cable assembly approximately 180° in the direction shown in the illustration, and while holding the nut in that position, push in the lock.
- NOTICE:
-
Rotating the nut too much will damage the internal spring, and the transmission control cable assembly will not be reusable. Do not turn the nut too far.
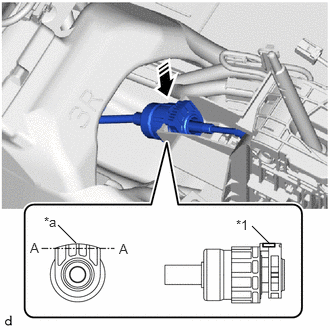
| *1 | Lock |
| *a | Protrusion |
|
|
Install in this Direction |
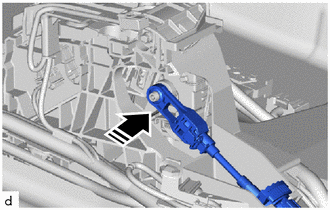
Install the transmission control cable assembly to the floor shift shift lever assembly.
- NOTICE:
- ·
Install the transmission control cable assembly with the protrusion facing upwards.
·After installation, make sure that the lock is projecting from A as shown in the illustration.
·Make sure that the transmission control cable assembly is securely locked.
|
|
Install in this Direction |
Confirm that the shift lever is in N, and then connect the end of the transmission control cable assembly to the floor shift shift lever assembly.
- NOTICE:
- ·
Securely install the end of the transmission control cable assembly to the floor shift shift lever assembly.
·Install the end of the transmission control cable assembly so that its adjustment lock section is on the driver side.
58151
2.INSTALL FRONT NO. 1 FLOOR HEAT INSULATOR
Install the front No. 1 floor heat insulator to the vehicle body with the 3 nuts.
- Torque:
- 5.0 N*m (51 kgf*cm, 44 in.*lbf)
17410
3.INSTALL FRONT EXHAUST PIPE ASSEMBLY (TWC: Rear Catalyst)
57533B
4.INSTALL FRONT FLOOR CENTER BRACE
5.INSTALL REAR CONSOLE BOX ASSEMBLY
33504F
6.INSTALL SHIFT LEVER KNOB SUB-ASSEMBLY
7.INSPECT SHIFT LEVER POSITION
8.ADJUST SHIFT LEVER POSITION
9.INSPECT FOR EXHAUST GAS LEAK
Click hereEngine / Hybrid System>2ZR-FXE (INTAKE / EXHAUST)>EXHAUST PIPE>INSTALLATION
- HINT:
-
Perform Inspection After Repair after repairing an exhaust gas leak.
-
Click hereEngine / Hybrid System>2ZR-FXE (ENGINE CONTROL)>SFI SYSTEM>INITIALIZATION
51444A
10.INSTALL REAR ENGINE UNDER COVER LH
51441
11.INSTALL NO. 1 ENGINE UNDER COVER