2ZR-FXE ENGINE MECHANICAL CAMSHAFT INSTALLATION
PROCEDURE

 1.INSTALL NO. 1 CAMSHAFT BEARING
2.INSTALL NO. 2 CAMSHAFT BEARING
13050
3.INSTALL CAMSHAFT TIMING GEAR ASSEMBLY
- HINT:
-
Perform "Inspection After Repair" after replacing the camshaft timing gear assembly.
-
Click hereEngine / Hybrid System>2ZR-FXE (ENGINE CONTROL)>SFI SYSTEM>INITIALIZATION
Secure the hexagonal portion of the camshaft in a soft jaw vise.
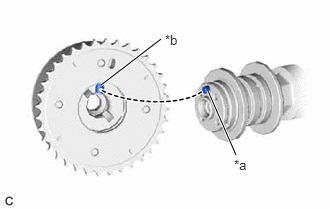
| *a | Knock Pin |
| *b | Knock Pin Hole |
Align and fit the knock pin of the camshaft to the knock pin hole of the camshaft timing gear assembly.
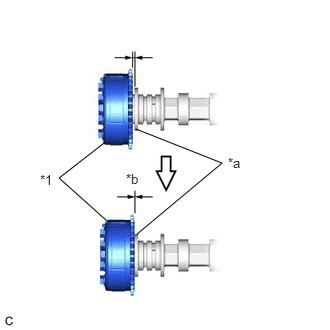
| *1 | Camshaft Timing Gear Assembly |
| *a | Camshaft Flange |
| *b | No Gap |
Check that there is no gap between the camshaft timing gear assembly and camshaft flange.
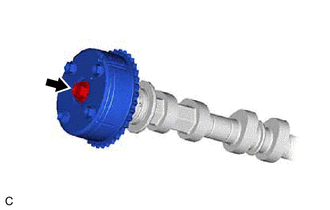
Tighten the bolt with the camshaft timing gear assembly secured in place.
- Torque:
- 54 N*m (551 kgf*cm, 40 ft.*lbf)
- NOTICE:
-
When tightening the bolt, do not allow the camshaft timing gear assembly to rotate.
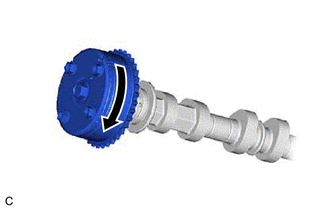

|
Lock |
Check that the camshaft timing gear assembly can move in the retard direction (clockwise) and locks in the most retarded position.
13801
4.SET NO. 1 VALVE ROCKER ARM SUB-ASSEMBLY
13511
5.INSTALL CAMSHAFT
- HINT:
-
Perform "Inspection After Repair" after replacing the camshaft.
-
Click hereEngine / Hybrid System>2ZR-FXE (ENGINE CONTROL)>SFI SYSTEM>INITIALIZATION
Clean the camshaft journals.
Apply a light coat of engine oil to the camshaft journals, camshaft housing sub-assembly and camshaft bearing caps.
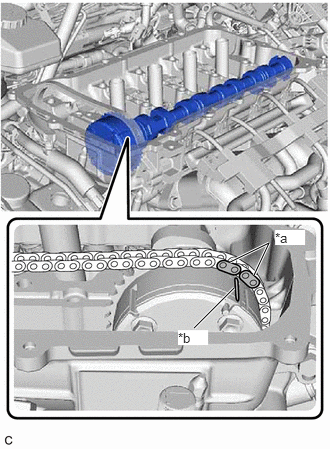
| *a | Paint Mark |
| *b | Timing Mark |
Hold up the chain sub-assembly, align the timing mark with the paint mark and install the camshaft.
13512
6.INSTALL NO. 2 CAMSHAFT
- HINT:
-
Perform "Inspection After Repair" after replacing the No. 2 camshaft.
-
Click hereEngine / Hybrid System>2ZR-FXE (ENGINE CONTROL)>SFI SYSTEM>INITIALIZATION
Clean the No. 2 camshaft journals.
Apply a light coat of engine oil to the No. 2 camshaft journals, camshaft housing sub-assembly and camshaft bearing caps.
Install the No. 2 camshaft to the camshaft housing sub-assembly.
7.INSTALL CAMSHAFT BEARING CAP
Check the marks and numbers on the camshaft bearing caps, and then remove the service bolts and spacers in the order shown in the illustration. Immediately after removing the service bolts and spacers for 1 camshaft bearing cap, install the camshaft bearing cap with the bolts in the order shown in the illustration.
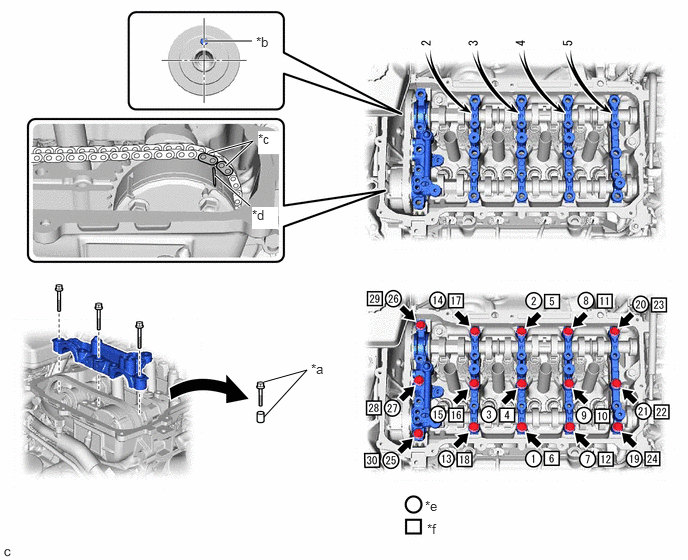
| *a | Service bolt and spacer (Used to temporarily secure the camshaft housing sub-assembly) | *b | Knock Pin |
| *c | Paint Mark | *d | Timing Mark |
| *e | The removal order of the service bolts and spacers for temporarily tightening the camshaft housing sub-assembly | *f | The installation order of the parts |
- Torque:
- 27 N*m (275 kgf*cm, 20 ft.*lbf)
- NOTICE:
-
If the bolts are loosened all at once, seal packing on the camshaft housing sub-assembly and cylinder head sub-assembly may separate, resulting in oil leaks. Therefore, be sure to remove the service bolts and spacers from one camshaft bearing cap at a time.
- HINT:
-
Make sure that the orientation of the straight pin, timing mark and paint mark of the camshaft are as shown in the illustration.
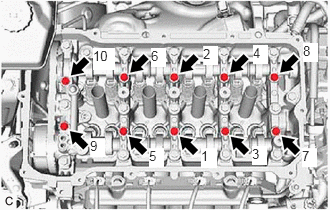
Tighten the 10 bolts in the order shown in the illustration.
- Torque:
- 16 N*m (163 kgf*cm, 12 ft.*lbf)
Check the torque of each bolt again.
13523G
8.INSTALL CAMSHAFT TIMING SPROCKET
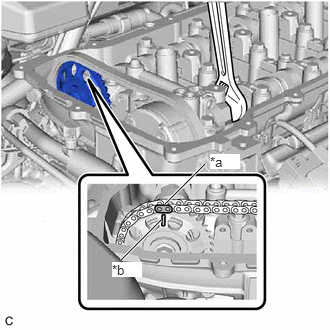
| *a | Paint Mark |
| *b | Timing Mark |
Hold the hexagonal portion of the camshaft with a wrench and turn the camshaft slightly counterclockwise to release the chain sub-assembly.
- NOTICE:
-
Do not turn the camshaft more than necessary.
Align the paint mark with the timing mark to install the chain sub-assembly.
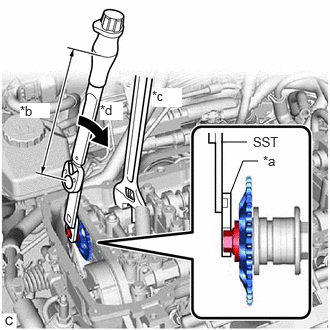
| *a | 14 mm Union Nut Wrench |
| *b | Torque Wrench Fulcrum Length |
| *c | Hold |
| *d | Turn |
Using SST, a 14 mm union nut wrench and a wrench, hold the hexagonal portion of the No. 2 camshaft and install the camshaft timing sprocket to the No. 2 camshaft.
- SST
- 09961-00950
- Torque:
- Specified tightening torque:
54 N*m (551 kgf*cm, 40 ft.*lbf)
- HINT:
- ·
Calculate the torque wrench reading when changing the fulcrum length of the torque wrench.
Click hereGeneral>INTRODUCTION>REPAIR INSTRUCTION>PRECAUTION
·When using a 14 mm union nut wrench (fulcrum length of 25 mm (0.984 in.)) + SST (fulcrum length of 150 mm (5.91 in.)) + torque wrench (fulcrum length of 255 mm (10.0 in.)): 32 N*m (326 kgf*cm, 24 ft.*lbf)
13540
9.INSTALL NO. 1 CHAIN TENSIONER ASSEMBLY
13562
10.INSTALL NO. 2 CHAIN VIBRATION DAMPER
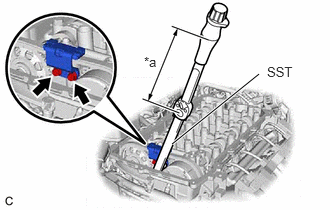
| *a | Torque Wrench Fulcrum Length |
Using SST, install the No. 2 chain vibration damper to the No. 1 camshaft bearing cap with the 2 bolts.
- SST
- 09961-00950
- Torque:
- Specified tightening torque:
10 N*m (102 kgf*cm, 7 ft.*lbf)
- HINT:
- ·
Calculate the torque wrench reading when changing the fulcrum length of the torque wrench.
Click hereGeneral>INTRODUCTION>REPAIR INSTRUCTION>PRECAUTION
·When using SST ((fulcrum length of 150 mm (5.91 in.)) + torque wrench (fulcrum length of 162 mm (6.38 in.)): 5.2 N*m (53 kgf*cm, 46 in.*lbf)
11.SET NO. 1 CYLINDER TO TDC (COMPRESSION)
11193
12.INSTALL SPARK PLUG TUBE GASKET
11213
13.INSTALL CYLINDER HEAD COVER GASKET
11201
14.INSTALL CYLINDER HEAD COVER SUB-ASSEMBLY
23818
15.INSTALL FUEL VAPOR FEED PIPE
17650G
16.INSTALL PURGE VALVE (PURGE VSV)
16297
17.CONNECT NO. 9 WATER BY-PASS HOSE
16296
18.CONNECT NO. 8 WATER BY-PASS HOSE
25610
19.INSTALL EGR PIPE ASSEMBLY
23826
20.CONNECT NO. 1 FUEL VAPOR FEED HOSE
82121
21.CONNECT ENGINE WIRE
Connect the engine wire to the cylinder head cover sub-assembly with the bolt.
- Torque:
- 8.0 N*m (82 kgf*cm, 71 in.*lbf)
Engage the 4 clamps.
Connect the 3 connectors.
11101E
22.INSTALL CAMSHAFT POSITION SENSOR
19500
23.INSTALL IGNITION COIL ASSEMBLY
12262
24.CONNECT NO. 2 VENTILATION HOSE
33820B
25.CONNECT TRANSMISSION CONTROL CABLE ASSEMBLY
Connect the transmission control cable assembly to the cylinder head cover sub-assembly with the bolt.
- Torque:
- 5.0 N*m (51 kgf*cm, 44 in.*lbf)
55701J
26.INSTALL OUTER COWL TOP PANEL SUB-ASSEMBLY (for LHD)
55701J
27.INSTALL OUTER COWL TOP PANEL SUB-ASSEMBLY (for RHD)
55735C
28.INSTALL COWL BODY MOUNTING REINFORCEMENT RH
55736D
29.INSTALL COWL BODY MOUNTING REINFORCEMENT LH
55735A
30.INSTALL WATER GUARD PLATE LH (for TMC Made RHD)
55737B
31.INSTALL NO. 1 HEATER AIR DUCT SPLASH SHIELD SEAL
32.INSTALL WINDSHIELD WIPER MOTOR AND LINK
33.ADD ENGINE COOLANT (for Engine)
34.INSPECT FOR COOLANT LEAK (for Engine)
51441
35.INSTALL NO. 1 ENGINE UNDER COVER