CLUTCH CLUTCH UNIT(for EC6A) INSTALLATION
CAUTION / NOTICE / HINT
- NOTICE:
-
When the manual transaxle assembly is removed, be sure to use a new clutch release cylinder with bearing assembly and new installation bolts. Removal of the manual transaxle assembly allows the compressed clutch release cylinder with bearing assembly to return to its original position. Dust from the moving section may damage the seal of the clutch release cylinder with bearing assembly, possibly causing clutch fluid leaks.
PROCEDURE

 31250
1.INSTALL CLUTCH DISC ASSEMBLY
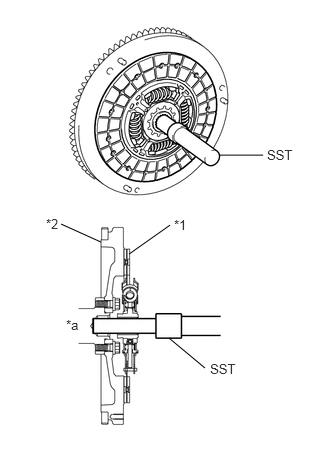
| *1 | Clutch Disc Assembly |
| *2 | Flywheel Sub-assembly |
| *a | Flywheel Sub-assembly Side |
Insert SST into the clutch disc assembly, then insert them both into the flywheel sub-assembly.
- SST
- 09301-00210
- NOTICE:
-
Insert the clutch disc assembly in the correct direction.
31210
2.INSTALL CLUTCH COVER ASSEMBLY
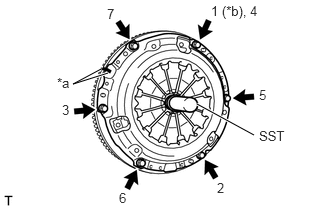
| *a | Matchmarks |
| *b | Temporarily Tighten |
Align the matchmarks on the clutch cover assembly with the one on the flywheel sub-assembly.
Following the procedure shown in the illustration, tighten the 6 bolts in order, starting with the bolt located near the knock pin at the top.
- SST
- 09301-00210
- Torque:
- 19.1 N*m (195 kgf*cm, 14 ft.*lbf)
- HINT:
- ·
Following the order in the illustration, tighten the bolts evenly one at a time.
·Move SST up and down, right and left lightly after checking that the clutch disc assembly is in the center, and tighten the bolts.
31210
3.INSPECT AND ADJUST CLUTCH COVER ASSEMBLY
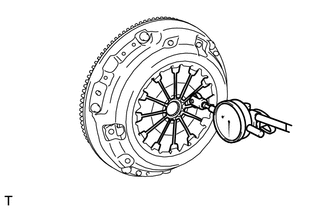
Using a dial indicator with a roller instrument, check the diaphragm spring tip alignment.
- Maximum Non-alignment:
0.5 mm (0.0197 in.)
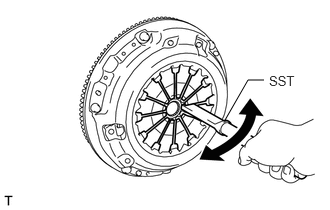
If the alignment is not as specified, using SST, adjust the diaphragm spring tip alignment.
- SST
- 09333-00013
31400
4.INSTALL CLUTCH RELEASE CYLINDER WITH BEARING ASSEMBLY
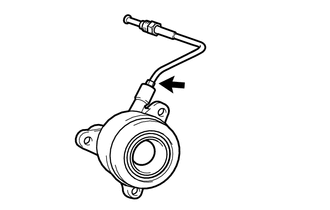
Temporarily tighten the clutch release cylinder to flexible hose tube to a new clutch release cylinder with bearing assembly.
- NOTICE:
-
Do not allow any foreign matter such as dirt or dust to enter the clutch release cylinder to flexible hose tube from the connecting part.
Clean and degrease all installation surfaces for the clutch release cylinder with bearing assembly.
Install the clutch release cylinder with bearing assembly with 3 new bolts.
- Torque:
- 22.5 N*m (229 kgf*cm, 17 ft.*lbf)
- NOTICE:
- ·
The clutch release cylinder with bearing assembly and installation bolts cannot be reused and must be replaced with new ones.
·Clean and degrease all installation surfaces and make sure that the clutch release cylinder with bearing assembly fits securely with the manual transaxle assembly during installation. The first bolt should be tightened by hand holding the clutch release cylinder with bearing assembly.
·Ensure that none of the clutch spline grease adheres to the clutch release cylinder with bearing assembly.
·The clutch release cylinder with bearing assembly cannot be disassembled.
Install the clutch tube boot onto the manual transaxle assembly.
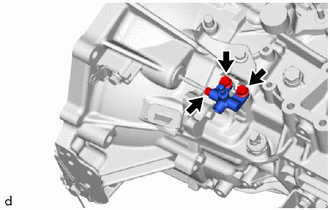
Temporarily tighten the clutch release cylinder to flexible hose tube to the clutch release bleeder sub-assembly.
Temporarily tighten the 2 bolts and install the clutch release bleeder sub-assembly.
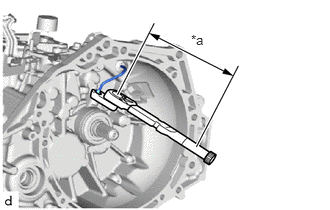
| *a | Torque Wrench Fulcrum Length |
Using a 10 mm union nut wrench, install the clutch release cylinder to flexible hose tube to the clutch release cylinder with bearing assembly.
- Torque:
- Specified Tightening Torque : 15.2 N*m (155 kgf*cm, 11 ft.*lbf)
- NOTICE:
-
Do not kink or damage the clutch release cylinder to flexible hose tube.
- HINT:
- ·
Calculate the torque wrench reading when changing the fulcrum length of the torque wrench.
Click hereGeneral>INTRODUCTION>REPAIR INSTRUCTION>PRECAUTION
·When using a union nut wrench (fulcrum length of 22 mm (0.866 in.)) + torque wrench (fulcrum length of 162 mm (6.38 in.)): 13.4 N*m (137 kgf*cm, 10 ft.*lbf)

|
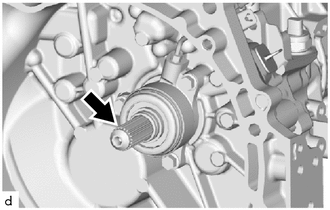
Clutch Spline Grease |
Apply clutch spline grease to the input shaft splines.
- Grease:
Toyota Genuine Clutch Spline Grease or equivalent
31407B
5.REMOVE CLUTCH RELEASE BLEEDER SUB-ASSEMBLY
Separate the clutch release cylinder to flexible hose tube from the clutch release bleeder sub-assembly.
Remove the 2 bolts and clutch release bleeder sub-assembly.
6.INSPECT CLUTCH PIPE LINE
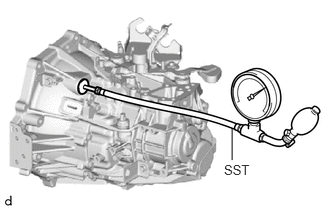
Using SST, apply pressure of 100 kPa (1.0 kgf/cm2, 15 psi) to the clutch pipe location shown in the illustration and confirm that pressure is maintained for 15 seconds or more.
- SST
- 09992-00242
If the pressure drops, replace the clutch release cylinder to flexible hose tube.
31407B
7.INSTALL CLUTCH RELEASE BLEEDER SUB-ASSEMBLY
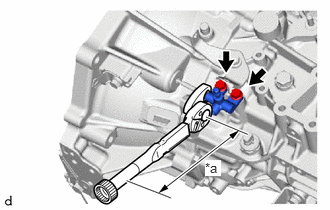
| *a | Torque Wrench Fulcrum Length |
Temporarily tighten the clutch release cylinder to flexible hose tube to the clutch release bleeder sub-assembly.
Install the 2 bolts and clutch release bleeder sub-assembly.
- Torque:
- 16.7 N*m (170 kgf*cm, 12 ft.*lbf)
Using a 10 mm union nut wrench, install the clutch release cylinder to flexible hose tube.
- Torque:
- Specified Tightening Torque : 15.2 N*m (155 kgf*cm, 11 ft.*lbf)
- NOTICE:
- ·
Do not kink or damage the clutch release cylinder to flexible hose tube.
·Do not allow any foreign matter such as dirt or dust to enter the clutch release cylinder to flexible hose tube from the connecting part.
- HINT:
- ·
Calculate the torque wrench reading when changing the fulcrum length of the torque wrench.
Click hereGeneral>INTRODUCTION>REPAIR INSTRUCTION>PRECAUTION
·When using a union nut wrench (fulcrum length of 22 mm (0.866 in.)) + torque wrench (fulcrum length of 162 mm (6.38 in.)): 13.4 N*m (137 kgf*cm, 10 ft.*lbf)
31483E
8.INSTALL BLEEDER CLUTCH RELEASE TUBE
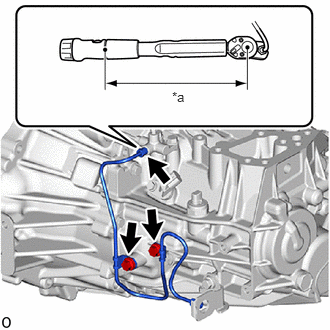
| *a | Torque Wrench Fulcrum Length |
Using a 10 mm union nut wrench, install the bleeder clutch release tube to the clutch release bleeder sub-assembly.
- Torque:
- Specified Tightening Torque : 15.2 N*m (155 kgf*cm, 11 ft.*lbf)
- NOTICE:
- ·
Do not kink or damage the bleeder clutch release tube.
·Do not allow any foreign matter such as dirt or dust to enter the bleeder clutch release tube from the connecting part.
- HINT:
- ·
Calculate the torque wrench reading when changing the fulcrum length of the torque wrench.
Click hereGeneral>INTRODUCTION>REPAIR INSTRUCTION>PRECAUTION
·When using a union nut wrench (fulcrum length of 22 mm (0.866 in.)) + torque wrench (fulcrum length of 162 mm (6.38 in.)): 13.4 N*m (137 kgf*cm, 10 ft.*lbf)
Install the 2 bolts and bleeder clutch release tube to the manual transaxle assembly.
- Torque:
- 11.8 N*m (120 kgf*cm, 9 ft.*lbf)
30300
9.INSTALL MANUAL TRANSAXLE ASSEMBLY
When Not Using the Engine Support Bridge:
When Using the Engine Support Bridge: