EC6A MANUAL TRANSMISSION / TRANSAXLE MANUAL TRANSAXLE ASSEMBLY(When Using the Engine Support Bridge) INSTALLATION
CAUTION / NOTICE / HINT
- NOTICE:
-
When the manual transaxle assembly is removed, be sure to use a new clutch release cylinder with bearing assembly and new installation bolts. Removal of the manual transaxle assembly allows the compressed clutch release cylinder with bearing assembly to return to its original position. Dust from the moving section may damage the seal of the clutch release cylinder with bearing assembly, possibly causing clutch fluid leaks.
PROCEDURE

 1.INSTALL SPEEDOMETER DRIVEN HOLE COVER SUB-ASSEMBLY
Coat a new O-ring with gear oil.
Install the O-ring to the speedometer driven hole cover sub-assembly.
Install the speedometer driven hole cover sub-assembly to the manual transaxle assembly with the bolt.
- Torque:
- 11.3 N*m (115 kgf*cm, 8 ft.*lbf)
33823
2.INSTALL NO. 1 TRANSMISSION CONTROL CABLE BRACKET
Install the No. 1 transmission control cable bracket to the continuously variable transaxle assembly with the 2 bolts.
- Torque:
- 17 N*m (173 kgf*cm, 13 ft.*lbf)
Connect the clamp to the No. 1 transmission control cable bracket.
335A0
3.INSTALL CONTROL CABLE BRACKET ASSEMBLY
Install the control cable bracket assembly to the manual transmission case with the 3 bolts.
- Torque:
- 17 N*m (173 kgf*cm, 13 ft.*lbf)
4.INSTALL WIRE HARNESS CLAMP BRACKET
Install the wire harness clamp bracket to the manual transmission case with the bolt.
- Torque:
- 12.5 N*m (127 kgf*cm, 9 ft.*lbf)
87101A
5.INSTALL NO. 1 HEATER BRACKET SUB-ASSEMBLY
Install the No. 1 heater bracket sub-assembly to the manual transmission case with the bolt.
- Torque:
- 12 N*m (122 kgf*cm, 9 ft.*lbf)
31400
6.INSTALL CLUTCH RELEASE CYLINDER WITH BEARING ASSEMBLY
31407B
7.REMOVE CLUTCH RELEASE BLEEDER SUB-ASSEMBLY
8.INSPECT CLUTCH PIPE LINE
31407B
9.INSTALL CLUTCH RELEASE BLEEDER SUB-ASSEMBLY
31484
10.INSTALL CLUTCH FLEXIBLE HOSE BRACKET
Install the clutch flexible hose bracket to the manual transaxle assembly with the bolt.
- Torque:
- 12 N*m (122 kgf*cm, 9 ft.*lbf)
31483
11.INSTALL BLEEDER CLUTCH RELEASE TUBE
30300
12.INSTALL MANUAL TRANSAXLE ASSEMBLY
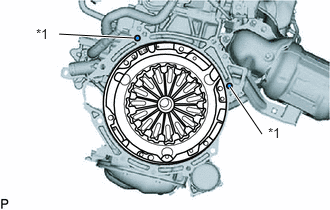
| *1 | Knock Pin |
Confirm that the 2 knock pins are installed on the engine assembly and are not damaged.
Align the input shaft with the clutch disc assembly and install the manual transaxle assembly to the engine assembly.
- NOTICE:
- ·
Make sure that the wire harness or similar items are not pinched between the contact surfaces.
·Do not forcibly pry on the manual transaxle assembly when installing it to the engine assembly.
·Do not apply excessive force to the manual transaxle assembly as this will break the input shaft.
·Make sure that the knock pins fit securely into the holes when installing the manual transaxle assembly to the engine assembly.
·Make sure that the contact surfaces of the engine assembly and manual transaxle assembly are flat against each other before tightening the bolts.
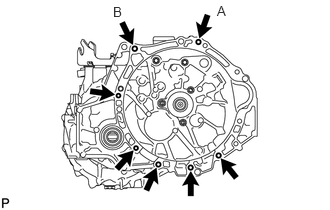
Temporarily install the bolt (A).
Install the bolt (B), then fully tighten the bolt (A).
- Torque:
- for Flange Bolt : 37 N*m (377 kgf*cm, 27 ft.*lbf)
- for Bolt with Washer : 33 N*m (337 kgf*cm, 24 ft.*lbf)
Install the 5 bolts.
- Torque:
- for Flange Bolt : 37 N*m (377 kgf*cm, 27 ft.*lbf)
- for Bolt with Washer : 33 N*m (337 kgf*cm, 24 ft.*lbf)
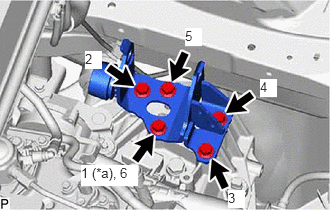
| *a | Temporarily Tighten |
Install the engine mounting bracket LH to the manual transaxle assembly with the 5 bolts in the order shown in the illustration.
- Torque:
- 41 N*m (418 kgf*cm, 30 ft.*lbf)
Engage the hook to temporarily install the engine mounting insulator LH to the vehicle body.
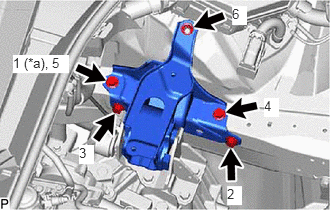
| *a | Temporarily Tighten |
Install the nut and 4 bolts in the order shown in the illustration.
- Torque:
- 42 N*m (428 kgf*cm, 31 ft.*lbf)
Install the transverse engine engine mounting insulator to the engine mounting bracket LH with the bolt and nut.
- Torque:
- 44 N*m (449 kgf*cm, 32 ft.*lbf)
- HINT:
-
Turn the bolt while holding the nut.
11363A
13.INSTALL FLYWHEEL HOUSING SIDE COVER
28100
14.INSTALL STARTER ASSEMBLY (for Cold Area Specification Vehicles)
28100
15.INSTALL STARTER ASSEMBLY (except Cold Area Specification Vehicles)
12364B
16.INSTALL NO. 2 ENGINE MOVING CONTROL ROD
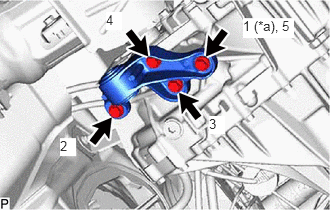
| *a | Temporarily Tighten |
Install the No. 2 engine moving control rod to the manual transaxle assembly with the 4 bolts in the order shown in the illustration.
- Torque:
- 44 N*m (449 kgf*cm, 32 ft.*lbf)
51201
17.INSTALL FRONT SUSPENSION CROSSMEMBER SUB-ASSEMBLY
51108A
18.INSTALL REAR SIDE RAIL REINFORCEMENT SUB-ASSEMBLY LH
51107A
19.INSTALL REAR SIDE RAIL REINFORCEMENT SUB-ASSEMBLY RH
20.REMOVE ENGINE SUPPORT BRIDGE
Remove SST from the vehicle body.
- NOTICE:
-
Prevent SST from contacting the vehicle body or windshield glass.
Install the neck from the windshield washer jar assembly with the clip.
21.REMOVE ENGINE HANGER
Remove the 2 bolts and No. 2 engine hanger from the cylinder head.
Remove the 2 bolts and No. 1 engine hanger from the cylinder head.
Connect the No. 2 earth wire to the engine mounting insulator sub-assembly RH with the bolt.
- Torque:
- 10 N*m (102 kgf*cm, 7 ft.*lbf)
Install the wire harness clamp bracket to the cylinder head sub-assembly with the bolt.
- Torque:
- 39 N*m (398 kgf*cm, 29 ft.*lbf)
Install the engine wire to the wire harness clamp bracket with the nut.
- Torque:
- 10 N*m (102 kgf*cm, 7 ft.*lbf)
Engage the 3 clamps with the wire harness clamp bracket.
Connect the wire harness to the wire harness clamp bracket.
22.INSTALL FRONT DRIVE SHAFT ASSEMBLY (for TMC Made)
23.INSTALL FRONT DRIVE SHAFT ASSEMBLY (for TMMT Made)
12321B
24.INSTALL DRIVE SHAFT HEAT INSULATOR SUB-ASSEMBLY
31481A
25.CONNECT NO. 1 CLUTCH HOSE
Connect the No. 1 clutch hose and install a new clip to the No. 1 clutch hose.
- NOTICE:
-
Install the clip as far as it will go.
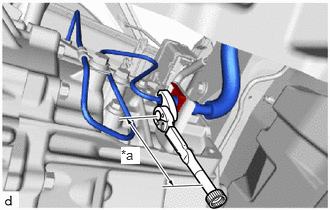
| *a | Torque Wrench Fulcrum Length |
Using a 10 mm union nut wrench, install the bleeder clutch release tube to the No. 1 clutch hose.
- Torque:
- Specified Tightening Torque : 15.2 N*m (155 kgf*cm, 11 ft.*lbf)
- NOTICE:
- ·
Do not kink or damage the No. 1 clutch hose.
·Do not allow any foreign matter such as dirt or dust to enter the No. 1 clutch hose from the clip or bracket.
- HINT:
- ·
Calculate the torque wrench reading when changing the fulcrum length of the torque wrench.
·When using a union nut wrench (fulcrum length of 22 mm (0.866 in.)) + torque wrench (fulcrum length of 162 mm (6.38 in.)): 13.4 N*m (137 kgf*cm, 10 ft.*lbf)
26.CONNECT WIRE HARNESS
Engage the 3 clamps and install the wire harness to the manual transaxle assembly.
Connect the neutral position switch connector.
Engage the 3 clamps and install the heated oxygen sensor wire harness to the front suspension crossmember sub-assembly.
Engage the clamp and install the wire harness to the manual transaxle assembly.
Install the bolt.
- Torque:
- 8.5 N*m (87 kgf*cm, 75 in.*lbf)
Connect the transmission revolution sensor connector.
Connect the back-up light switch assembly connector.
17410
27.INSTALL FRONT EXHAUST PIPE ASSEMBLY (TWC: Rear Catalyst)
57533B
28.INSTALL FRONT FLOOR CENTER BRACE
45025D
29.INSTALL NO. 1 STEERING COLUMN HOLE COVER SUB-ASSEMBLY
30.ALIGN FRONT WHEELS FACING STRAIGHT AHEAD
45260
31.CONNECT NO. 2 STEERING INTERMEDIATE SHAFT ASSEMBLY
45259A
32.INSTALL COLUMN HOLE COVER SILENCER SHEET
33820B
33.CONNECT TRANSMISSION CONTROL CABLE ASSEMBLY
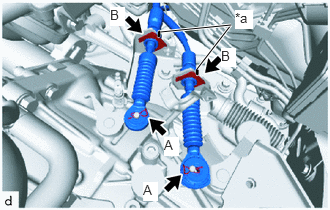
| *a | Paint Mark |
Install the transmission control cable assembly to the control cable bracket assembly with 2 new clips B.
- NOTICE:
-
Make sure that the paint marks on the transmission control cable assembly are aligned with the slits in the control cable bracket assembly before installing the clips.
Connect the transmission control cable assembly to the manual transaxle assembly with the 2 clips A.
74404A
34.INSTALL BATTERY CLAMP SUB-ASSEMBLY
Install the battery clamp sub-assembly to the vehicle with the 3 bolts.
- Torque:
- 15.4 N*m (157 kgf*cm, 11 ft.*lbf)
Engage the clamp to connect the engine wire to the battery clamp sub-assembly.
Connect the engine wire to the battery clamp sub-assembly with the bolt and nut.
- Torque:
- 7.0 N*m (71 kgf*cm, 62 in.*lbf)
89661
35.INSTALL ECM
17701
36.INSTALL AIR CLEANER CASE SUB-ASSEMBLY
37.INSTALL AIR CLEANER CAP WITH AIR CLEANER HOSE
17751
38.INSTALL NO. 1 AIR CLEANER INLET
53141F
39.INSTALL RADIATOR COVER
55701J
40.INSTALL OUTER COWL TOP PANEL SUB-ASSEMBLY (for LHD)
55701J
41.INSTALL OUTER COWL TOP PANEL SUB-ASSEMBLY (for RHD)
55735C
42.INSTALL COWL BODY MOUNTING REINFORCEMENT RH
55736D
43.INSTALL COWL BODY MOUNTING REINFORCEMENT LH
55735A
44.INSTALL WATER GUARD PLATE LH
55737B
45.INSTALL NO. 1 HEATER AIR DUCT SPLASH SHIELD SEAL
46.INSTALL WINDSHIELD WIPER MOTOR AND LINK
47.INSTALL FRONT WHEELS
28800
48.INSTALL BATTERY
49.CONNECT CABLE TO NEGATIVE BATTERY TERMINAL
Click hereGeneral>MAINTENANCE>8NR-FTS BATTERY>INSTALLATION
- NOTICE:
-
When disconnecting the cable, some systems need to be initialized after the cable is reconnected.
-
Click hereGeneral>INTRODUCTION>REPAIR INSTRUCTION>INITIALIZATION
50.ADD MANUAL TRANSAXLE OIL
51.BLEED CLUTCH LINE
52.INSPECT MANUAL TRANSAXLE OIL
53.INSPECT FOR MANUAL TRANSAXLE OIL LEAK
54.INSPECT FOR EXHAUST GAS LEAK
Click hereEngine / Hybrid System>8NR-FTS (INTAKE / EXHAUST)>EXHAUST PIPE (for 2WD)>INSTALLATION
- HINT:
-
Perform "Inspection After Repairs" after repairing or replacing the exhaust system.
-
Click hereEngine / Hybrid System>8NR-FTS (ENGINE CONTROL)>SFI SYSTEM>INITIALIZATION
58166
55.INSTALL FRONT FLOOR COVER LH (w/ Cover)
58165B
56.INSTALL FRONT FLOOR COVER RH (w/ Cover)
51443C
57.INSTALL REAR ENGINE UNDER COVER RH
51444A
58.INSTALL REAR ENGINE UNDER COVER LH
51441
59.INSTALL NO. 1 ENGINE UNDER COVER
60.INSPECT AND ADJUST FRONT WHEEL ALIGNMENT