Home › Vehicle Interior › LIGHTING (INT) › LIGHTING SYSTEM
RM32H0E _58 Vehicle Interior _060018 LIGHTING (INT) _0298022 LIGHTING SYSTEM J

LIGHTING (INT)  LIGHTING SYSTEM  Ambient Illumination Light Circuit  


DESCRIPTION

The main body ECU (multiplex network body ECU) controls the ambient illumination lights.

WIRING DIAGRAM
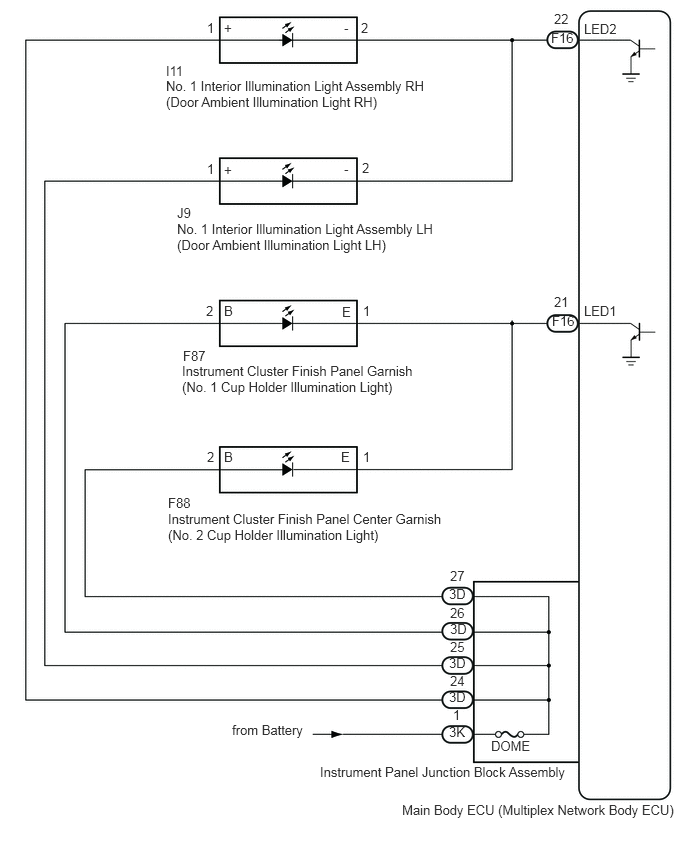
A395204E01
1.729,0.813 4.448,1.448 2.719,0.635 10 false No. 1 Interior Illumination Light Assembly RH (Door Ambient Illumination Light RH) 1.729,0.656 2.083,0.885 0.354,0.229 10 false I11 2.156,0.208 2.51,0.438 0.354,0.229 10 false 1 3.76,0.208 4.115,0.438 0.354,0.229 10 false 2 2.333,0.208 2.688,0.438 0.354,0.229 10 false + 3.583,0.208 3.938,0.438 0.354,0.229 10 false - 2.333,1.688 2.688,1.917 0.354,0.229 10 false + 3.583,1.677 3.938,1.906 0.354,0.229 10 false - 2.156,1.677 2.51,1.906 0.354,0.229 10 false 1 3.771,1.667 4.125,1.896 0.354,0.229 10 false 2 1.844,2.302 4.563,2.802 2.719,0.5 10 false No. 1 Interior Illumination Light Assembly LH (Door Ambient Illumination Light LH) 1.844,2.135 2.198,2.365 0.354,0.229 10 false J9 1.896,3.781 4.333,4.271 2.438,0.49 10 false Instrument Cluster Finish Panel Garnish (No. 1 Cup Holder Illumination Light) 1.906,3.625 2.26,3.854 0.354,0.229 10 false F87 1.75,5.323 4.625,5.729 2.875,0.406 10 false Instrument Cluster Finish Panel Center Garnish (No. 2 Cup Holder Illumination Light) 1.75,5.156 2.104,5.385 0.354,0.229 10 false F88 2.146,3.156 2.5,3.385 0.354,0.229 10 false 2 3.781,3.156 4.135,3.385 0.354,0.229 10 false 1 3.781,4.677 4.135,4.906 0.354,0.229 10 false 1 2.156,4.677 2.51,4.906 0.354,0.229 10 false 2 2.333,3.156 2.688,3.385 0.354,0.229 10 false B 2.333,4.677 2.688,4.906 0.354,0.229 10 false B 3.552,4.677 3.906,4.906 0.354,0.229 10 false E 3.563,3.167 3.917,3.396 0.354,0.229 10 false E 5.74,0.313 6.094,0.542 0.354,0.229 10 false F16 5.75,3.26 6.104,3.49 0.354,0.229 10 false F16 5.771,0.115 6.125,0.344 0.354,0.229 10 false 22 5.771,3.063 6.125,3.292 0.354,0.229 10 false 21 6.083,3.156 6.5,3.385 0.417,0.229 10 false LED1 6.083,0.219 6.5,0.448 0.417,0.229 10 false LED2 4.677,6.104 5.031,6.333 0.354,0.229 10 false 3D 4.688,6.469 5.042,6.698 0.354,0.229 10 false 3D 4.677,6.823 5.031,7.052 0.354,0.229 10 false 3D 4.677,7.177 5.031,7.406 0.354,0.229 10 false 3D 4.677,7.542 5.031,7.771 0.354,0.229 10 false 3K 4.688,5.917 5.042,6.146 0.354,0.229 10 false 27 4.688,6.302 5.042,6.531 0.354,0.229 10 false 26 4.688,6.656 5.042,6.885 0.354,0.229 10 false 25 4.688,7.01 5.042,7.24 0.354,0.229 10 false 24 4.719,7.365 5.073,7.594 0.354,0.229 10 false 1 5.115,7.688 5.552,7.917 0.438,0.229 10 false DOME 2.417,7.521 3.354,7.771 0.938,0.25 10 false from Battery 3.333,7.958 6,8.375 2.667,0.417 10 false Instrument Panel Junction Block Assembly 4.188,8.354 7.104,8.604 2.917,0.25 10 false Main Body ECU (Multiplex Network Body ECU)

CAUTION / NOTICE / HINT

NOTICE:
·

Inspect the lights for circuits related to this system before performing the following procedure.

·

Before replacing the main ECU (multiplex network body ECU), refer to Service Bulletin*1.

*1: w/ Entry and Start System


PROCEDURE

1.PERFORM ACTIVE TEST USING GTS
a.

Connect the GTS to the DLC3.


b.

Turn the ignition switch to ON.


c.

Turn the GTS on.


d.

Enter the following menus: Body Electrical / Main Body / Active Test.


e.

Perform the Active Test according to the display on the GTS.

Body Electrical > Main Body > Active Test
Tester Display Measurement Item Control Range Diagnostic Note
Interior Illumination Light1
·

Cup holder illumination light

·

Door ambient illumination light


ON or OFF Preconditions for using the Active Test to check dimmer controlled illumination:
·

for CVT

-

Ignition switch ON.

-

Shift lever is in any position other than P.


·

for Manual Transaxle

-

Ignition switch ON.

-

Parking brake released.

-

The vehicle speed is more than 3 km/h (1.9 mph)


Interior Illumination Light2
·

Cup holder illumination light

·

Door ambient illumination light


ON or OFF Preconditions for using the Active Test to check dimmer controlled illumination:
·

for CVT

-

Ignition switch ON.

-

Shift lever is in any position other than P.


·

for Manual Transaxle

-

Ignition switch ON.

-

Parking brake released.

-

The vehicle speed is more than 3 km/h (1.9 mph)


Body Electrical > Main Body > Active Test
Tester Display
Interior Illumination Light1
50004 123 68
Body Electrical > Main Body > Active Test
Tester Display
Interior Illumination Light2
50004 123 69
OK:

Ambient illumination lights comes on.


Result:
Result Proceed to
OK A
NG (All ambient lights do not illuminate) B
NG (Cup holder illumination light does not illuminate) C
NG (Door ambient illumination light does not illuminate) D


A

PROCEED TO NEXT SUSPECTED AREA SHOWN IN PROBLEM SYMPTOMS TABLE

B

2.CHECK HARNESS AND CONNECTOR (POWER SOURCE - INSTRUMENT PANEL JUNCTION BLOCK ASSEMBLY)

C

4.INSPECT INSTRUMENT PANEL JUNCTION BLOCK ASSEMBLY

D

7.INSPECT INSTRUMENT PANEL JUNCTION BLOCK ASSEMBLY
2.CHECK HARNESS AND CONNECTOR (POWER SOURCE - INSTRUMENT PANEL JUNCTION BLOCK ASSEMBLY)
a.

Disconnect the 3K instrument panel junction block assembly connector.


b.

Measure the voltage according to the value(s) in the table below.
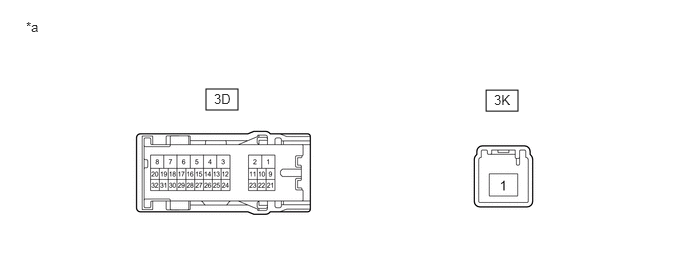
Standard Voltage:
Tester Connection Condition Specified Condition
3K-1 - Body ground Always 11 to 14 V


Result:
Proceed to
OK
NG


OK

3.INSPECT INSTRUMENT PANEL JUNCTION BLOCK ASSEMBLY

NG

REPAIR OR REPLACE HARNESS OR CONNECTOR

3.INSPECT INSTRUMENT PANEL JUNCTION BLOCK ASSEMBLY
a.

Disconnect the 3D instrument panel junction block assembly connector.


b.

Measure the resistance according to the value(s) in the table below.

E341598C05
2.146,0.927 2.479,1.146 0.333,0.219 5.063,0.938 5.396,1.156 0.333,0.219 2.229,0.948 2.542,1.146 0.313,0.198 10 false 3D 0.271,0.198 0.583,0.396 0.313,0.198 10 false *a 5.146,0.958 5.458,1.156 0.313,0.198 10 false 3K
*a Component without harness connected
(Instrument Panel Junction Block Assembly)
- -


Standard Resistance:
Tester Connection Condition Specified Condition
3K-1 - 3D-24 Always Below 1 Ω
3K-1 - 3D-25 Always Below 1 Ω
3K-1 - 3D-26 Always Below 1 Ω
3K-1 - 3D-27 Always Below 1 Ω


Result:
Result Proceed to
OK A
NG (for LHD) B
NG (for RHD) C


A

PROCEED TO NEXT SUSPECTED AREA SHOWN IN PROBLEM SYMPTOMS TABLE

B

REPLACE INSTRUMENT PANEL JUNCTION BLOCK ASSEMBLY

C

REPLACE INSTRUMENT PANEL JUNCTION BLOCK ASSEMBLY

4.INSPECT INSTRUMENT PANEL JUNCTION BLOCK ASSEMBLY
a.

Disconnect the 3D instrument panel junction block assembly connector.


b.

Disconnect the 3K instrument panel junction block assembly connector.


c.

Measure the resistance according to the value(s) in the table below.

E341598C05
2.146,0.927 2.479,1.146 0.333,0.219 5.063,0.938 5.396,1.156 0.333,0.219 2.229,0.948 2.542,1.146 0.313,0.198 10 false 3D 0.271,0.198 0.583,0.396 0.313,0.198 10 false *a 5.146,0.958 5.458,1.156 0.313,0.198 10 false 3K
*a Component without harness connected
(Instrument Panel Junction Block Assembly)
- -


Standard Resistance:
Tester Connection Condition Specified Condition
3K-1 - 3D-26 Always Below 1 Ω
3K-1 - 3D-27 Always Below 1 Ω


Result:
Result Proceed to
OK A
NG (for LHD) B
NG (for RHD) C


A

5.CHECK HARNESS AND CONNECTOR (INSTRUMENT CLUSTER FINISH PANEL GARNISH - INSTRUMENT PANEL JUNCTION BLOCK ASSEMBLY)

B

REPLACE INSTRUMENT PANEL JUNCTION BLOCK ASSEMBLY

C

REPLACE INSTRUMENT PANEL JUNCTION BLOCK ASSEMBLY

5.CHECK HARNESS AND CONNECTOR (INSTRUMENT CLUSTER FINISH PANEL GARNISH - INSTRUMENT PANEL JUNCTION BLOCK ASSEMBLY)
a.

Disconnect the F87 instrument cluster finish panel garnish connector.


b.

Disconnect the F88 instrument cluster finish panel center garnish connector.


c.

Measure the resistance according to the value(s) in the table below.

Standard Resistance:
Tester Connection Condition Specified Condition
F87-2 (B) - 3D-26 Always Below 1 Ω
F88-2 (B) - 3D-27 Always Below 1 Ω
F87-2 (B) or 3D-26 - Body ground Always 10 kΩ or higher
F88-2 (B) or 3D-27 - Body ground Always 10 kΩ or higher


Result:
Proceed to
OK
NG


OK

6.CHECK HARNESS AND CONNECTOR (INSTRUMENT CLUSTER FINISH PANEL GARNISH - MAIN BODY ECU (MULTIPLEX NETWORK BODY ECU))

NG

REPAIR OR REPLACE HARNESS OR CONNECTOR

6.CHECK HARNESS AND CONNECTOR (INSTRUMENT CLUSTER FINISH PANEL GARNISH - MAIN BODY ECU (MULTIPLEX NETWORK BODY ECU))
a.

Disconnect the F16 main body ECU (multiplex network body ECU) connector.


b.

Measure the resistance according to the value(s) in the table below.

Standard Resistance:
Tester Connection Condition Specified Condition
F87-1 (E) - F16-21(LED1) Always Below 1 Ω
F88-1 (E) - F16-21 (LED1) Always Below 1 Ω
F87-1 (E) or F16-21(LED1) - Body ground Always 10 kΩ or higher
F88-1 (E) or F16-21 (LED1) - Body ground Always 10 kΩ or higher


Result:
Result Proceed to
OK (for LHD) A
OK (for RHD) B
NG C


A

REPLACE MAIN BODY ECU (MULTIPLEX NETWORK BODY ECU)

B

REPLACE MAIN BODY ECU (MULTIPLEX NETWORK BODY ECU)

C

REPAIR OR REPLACE HARNESS OR CONNECTOR

7.INSPECT INSTRUMENT PANEL JUNCTION BLOCK ASSEMBLY
a.

Disconnect the instrument panel junction block assembly connectors.


b.

Measure the resistance according to the value(s) in the table below.

E341598C05
2.146,0.927 2.479,1.146 0.333,0.219 5.063,0.938 5.396,1.156 0.333,0.219 2.229,0.948 2.542,1.146 0.313,0.198 10 false 3D 0.271,0.198 0.583,0.396 0.313,0.198 10 false *a 5.146,0.958 5.458,1.156 0.313,0.198 10 false 3K
*a Component without harness connected
(Instrument Panel Junction Block Assembly)
- -


Standard Resistance:
Tester Connection Condition Specified Condition
3K-1 - 3D-24 Always Below 1 Ω
3K-1 - 3D-25 Always Below 1 Ω


Result:
Result Proceed to
OK A
NG (for LHD) B
NG (for RHD) C


A

8.CHECK HARNESS AND CONNECTOR (NO. 1 INTERIOR ILLUMINATION LIGHT ASSEMBLY - INSTRUMENT PANEL JUNCTION BLOCK ASSEMBLY)

B

REPLACE INSTRUMENT PANEL JUNCTION BLOCK ASSEMBLY

C

REPLACE INSTRUMENT PANEL JUNCTION BLOCK ASSEMBLY

8.CHECK HARNESS AND CONNECTOR (NO. 1 INTERIOR ILLUMINATION LIGHT ASSEMBLY - INSTRUMENT PANEL JUNCTION BLOCK ASSEMBLY)
a.

Disconnect the I11 No. 1 interior illumination light assembly RH connector.


b.

Disconnect the J9 No. 1 interior illumination light assembly LH connector.


c.

Measure the resistance according to the value(s) in the table below.

Standard Resistance:
Tester Connection Condition Specified Condition
I11-1 (+) - 3D-24 Always Below 1 Ω
I11-1 (+) or 3D-24 - Body ground Always 10 kΩ or higher
J9-1 (+) - 3D-25 Always Below 1 Ω
J9-1 (+) or 3D-25 - Body ground Always 10 kΩ or higher


Result:
Proceed to
OK
NG


OK

9.CHECK HARNESS AND CONNECTOR (NO. 1 INTERIOR ILLUMINATION LIGHT ASSEMBLY - MAIN BODY ECU (MULTIPLEX NETWORK BODY ECU))

NG

REPAIR OR REPLACE HARNESS OR CONNECTOR

9.CHECK HARNESS AND CONNECTOR (NO. 1 INTERIOR ILLUMINATION LIGHT ASSEMBLY - MAIN BODY ECU (MULTIPLEX NETWORK BODY ECU))
a.

Disconnect the F16 main body ECU (multiplex network body ECU) connector.


b.

Measure the resistance according to the value(s) in the table below.

Standard Resistance:
Tester Connection Condition Specified Condition
I11-2 (-) - F16-22 (LED2) Always Below 1 Ω
I11-2 (-) or F16-22 (LED2) - Body ground Always 10 kΩ or higher
J9-2 (-) - F16-22 (LED2) Always Below 1 Ω
J9-2 (-) or F16-22 (LED2) - Body ground Always 10 kΩ or higher


Result:
Result Proceed to
OK (for LHD) A
OK (for RHD) B
NG C


A

REPLACE MAIN BODY ECU (MULTIPLEX NETWORK BODY ECU)

B

REPLACE MAIN BODY ECU (MULTIPLEX NETWORK BODY ECU)

C

REPAIR OR REPLACE HARNESS OR CONNECTOR