3ZR-FAE FUEL FUEL PUMP REMOVAL
CAUTION / NOTICE / HINT
The necessary procedures (adjustment, calibration, initialization or registration) that must be performed after parts are removed and installed, or replaced during fuel pump removal/installation are shown below.
| Replaced Part or Performed Procedure | Necessary Procedure | Effect/Inoperative Function when Necessary Procedure not Performed | Link |
|---|---|---|---|
| Disconnect cable from negative battery terminal | Perform steering sensor zero point calibration | Toyota parking assist-sensor system*1 | ( ) |
| Simple intelligent parking assist system*1 | |||
| Initialize back door lock | Power door lock control system | ()
|
|
| Replacement of fuel pump | Inspection After Repair | ·
Poor idle, etc. ·
Engine start function, etc. |
()
|
*1: When performing learning using the GTS.
Click hereAudio / Visual / Telematics>PARK ASSIST / MONITORING>TOYOTA PARKING ASSIST-SENSOR SYSTEM>CALIBRATION
- CAUTION:
- ·
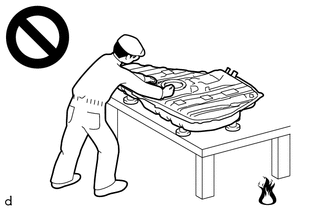
Never perform work on fuel system components near any possible ignition sources.
·Vaporized fuel could ignite, resulting in a serious accident.
·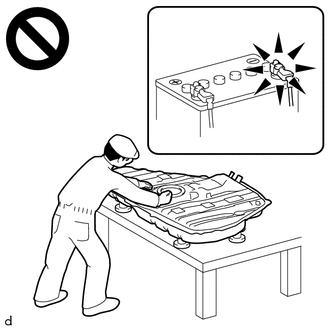
Do not perform work on fuel system components without first disconnecting the cable from the negative (-) battery terminal.
·Sparks could cause vaporized fuel to ignite, resulting in a serious accident.
PROCEDURE

 1. PRECAUTION
- NOTICE:
- ·
Keep fuel away from rubber or leather parts.
·After turning the ignition switch off, waiting time may be required before disconnecting the cable from the negative (-) battery terminal. Therefore, make sure to read the disconnecting the cable from the negative (-) battery terminal notices before proceeding with work.
Click hereGeneral>INTRODUCTION>REPAIR INSTRUCTION>PRECAUTION
2. DISCHARGE FUEL SYSTEM PRESSURE
3.DISCONNECT CABLE FROM NEGATIVE BATTERY TERMINAL
Click hereGeneral>MAINTENANCE>3ZR-FAE BATTERY>REMOVAL
- NOTICE:
-
When disconnecting the cable, some systems need to be initialized after the cable is reconnected.
-
Click hereGeneral>INTRODUCTION>REPAIR INSTRUCTION>INITIALIZATION
4.REMOVE REAR SEAT ASSEMBLY
71305A
5.REMOVE CENTER REAR SEATBACK HINGE SUB-ASSEMBLY
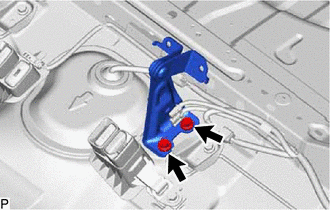
Remove the 2 bolts and center rear seatback hinge sub-assembly from the vehicle body.
58325E
6.REMOVE REAR FLOOR SERVICE HOLE COVER
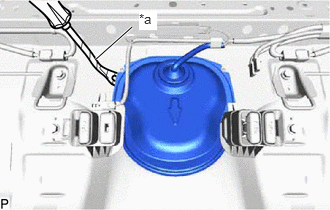
| *a | Protective Tape |
Using a clip remover with its tip wrapped with protective tape, remove the rear floor service hole cover and butyl tape.
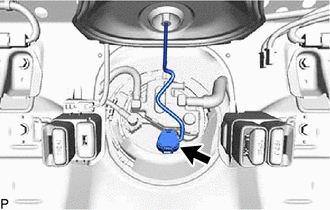
Disconnect the fuel suction tube with pump and gauge assembly connector.
77026A
7.DISCONNECT NO. 1 FUEL EVAPORATION TUBE SUB-ASSEMBLY
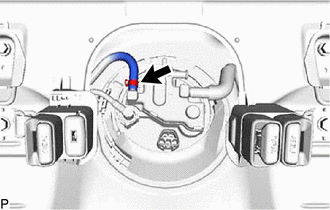
Slide the clip and disconnect the No. 1 fuel evaporation tube sub-assembly from the fuel suction tube with pump and gauge assembly.
77754B
8.DISCONNECT CHARCOAL CANISTER OUTLET HOSE
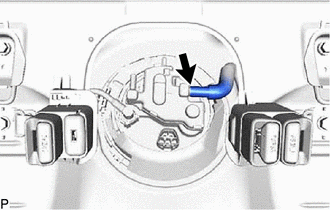
Disconnect the charcoal canister outlet hose from the fuel suction tube with pump and gauge assembly.
77209F
9.DISCONNECT FUEL TANK MAIN TUBE SUB-ASSEMBLY
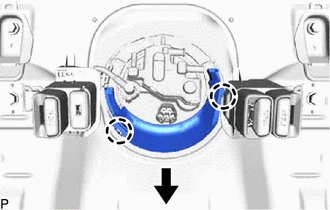

|
Front Side |
Disengage the 2 claws to remove the No. 1 fuel tube clamp.
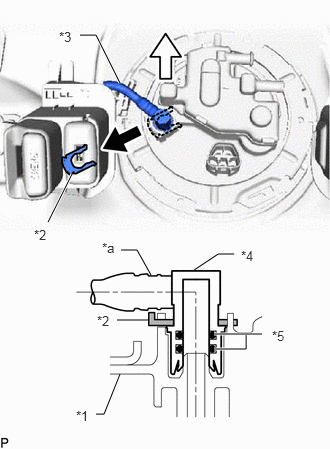
| *1 | No. 1 Plate Sub-assembly |
| *2 | Tube Joint Clip |
| *3 | Fuel Tank Main Tube Sub-assembly |
| *4 | Fuel Tube Joint |
| *5 | O-ring |
| *a | Nylon Tube |
|
|
Pull off |

|
Pull off |
Remove the tube joint clip, and pull off the fuel tube joint of the fuel tank main tube sub-assembly.
- NOTICE:
- ·
Remove any foreign matter on the fuel tube joint before performing this work.
·Do not scratch or allow any foreign matter to get on the parts when disconnecting them as the fuel tube connector has O-rings that seal the pipe (fuel pipe).
·Be sure to disconnect the fuel tube joint by hand.
·Do not bend, twist, pinch or kink the nylon tube.
·Cover the disconnected fuel tube joint with a plastic bag to prevent damage and contamination.
·If the fuel tube joint and No. 1 plate sub-assembly are stuck, push and pull to release them.
77144
10.REMOVE FUEL PUMP GAUGE RETAINER
Remove the fuel pump gauge retainer.
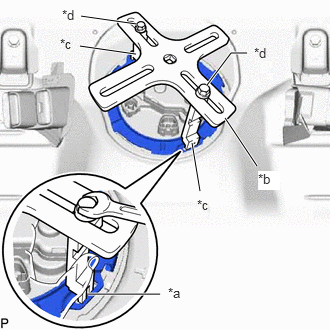
| *a | Insertion Point |
| *b | SST (Plate) |
| *c | SST (Claw) |
| *d | SST (Bolt) |
Temporarily install SST (plate) and SST (claw) to the fuel pump gauge retainer.
- SST
- 09808-01071
09808-14031 (09808-01030, 09808-01090)
- HINT:
-
Securely insert the ends of SST (claw) into the insertion points in the fuel pump gauge retainer.
While firmly pressing SST (claw) into the insertion points in the fuel pump gauge retainer, tighten SST (bolt).
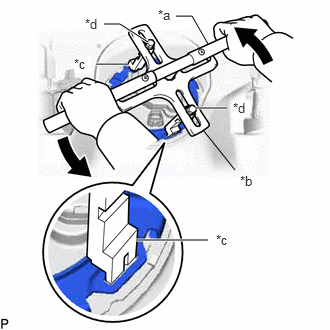
| *a | SST (Handle) |
| *b | SST (Plate) |
| *c | SST (Claw) |
| *d | SST (Bolt) |
Install SST (handle) to SST (plate).
- SST
- 09808-01071
09808-14031 (09808-01010, 09808-01030, 09808-01090)
Lightly press down on SST to prevent it from separating from the fuel pump gauge retainer. While pressing down on SST, rotate SST (handle) slowly to loosen the fuel pump gauge retainer.
- NOTICE:
- ·
Do not use any tools other than specified in this operation as this may result in damage to the fuel pump gauge retainer or the fuel tank assembly.
·Do not press down on SST excessively as this may make the fuel pump gauge retainer hard to rotate, and may damage components.
·Make sure to rotate SST (handle) horizontally. If it is rotated at an angle, SST may come off.
·Do not spin SST too fast or use an impact wrench as this may result in damage to components.
·If SST comes off of the fuel pump gauge retainer, loosen SST (bolt) and reinstall SST.
While pressing down on the fuel suction tube with pump and gauge assembly, remove the fuel pump gauge retainer.
77020A
11.REMOVE FUEL SUCTION TUBE WITH PUMP AND GAUGE ASSEMBLY
Remove the fuel suction tube with pump and gauge assembly from the fuel tank assembly.
- NOTICE:
-
Be careful not to bend the arm of the fuel sender gauge assembly.
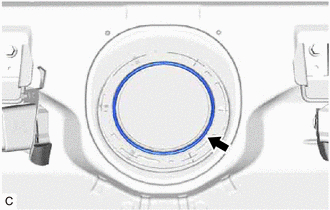
Remove the fuel suction tube set gasket from the fuel tank assembly.