8NR-FTS ENGINE MECHANICAL REAR CRANKSHAFT OIL SEAL REMOVAL
CAUTION / NOTICE / HINT
The necessary procedures (adjustment, calibration, initialization, or registration) that must be performed after parts are removed, installed, or replaced during the rear engine oil seal removal/installation are shown below.
| Replacement Part or Procedure | Necessary Procedure | Effect/Inoperative when not Performed | Link |
|---|---|---|---|
| Disconnect cable from negative battery terminal | Perform steering sensor zero point calibration | Lane departure alert system (w/ Steering Control) | ( ) |
| Toyota parking assist-sensor system*1 | |||
| Parking support brake system*1 | |||
| Simple intelligent parking assist system*1 | |||
| Pre-collision syatem | |||
| Memorize steering angle neutral point | Panoramic view monitor system | ()
|
|
| Initialize back door lock | Power door lock control system | ()
|
|
| Replacement of CVT fluid | ATF thermal degradation estimate reset | The value of the Data List item "ATF thermal Degradation Estimate" is not estimated correctly | for K313
( )
for K313F ( )
|
| Front wheel alignment adjustment | Perform the following procedures in the order shown:
1.
Clear zero point calibration data and store system information 2.
Perform yaw rate and acceleration sensor zero point calibration and store system information |
·
VSC disabled or malfunctions ·
DTCs are stored ·
Slip indicator light illuminates ·
ABS warning light illuminates |
()
|
*1: When performing learning using the GTS
Click hereAudio / Visual / Telematics>PARK ASSIST / MONITORING>TOYOTA PARKING ASSIST-SENSOR SYSTEM>CALIBRATION
PROCEDURE

 30400
1.REMOVE CONTINUOUSLY VARIABLE TRANSAXLE ASSEMBLY (for CVT)
When Using the Engine Support Bridge:
When Not Using the Engine Support Bridge:
When Using the Engine Support Bridge:
When Not Using the Engine Support Bridge:
31250
2.REMOVE CLUTCH DISC ASSEMBLY (for Manual Transaxle)
32101B
3.REMOVE DRIVE PLATE AND RING GEAR SUB-ASSEMBLY (for CVT)
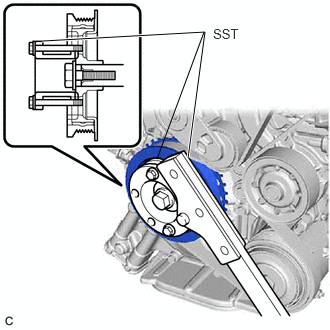
Using SST, hold the crankshaft pulley assembly.
- SST
- 09213-70011 (09213-70020)
09330-00021
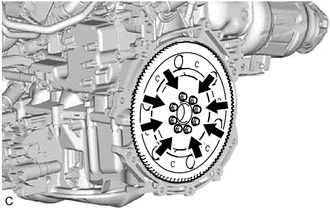
Remove the 8 bolts, the rear drive plate spacer, the drive plate and ring gear sub-assembly and the front drive plate spacer.
13405
4.REMOVE FLYWHEEL SUB-ASSEMBLY (for Manual Transaxle)
Using SST, hold the crankshaft pulley assembly.
- SST
- 09213-70011 (09213-70020)
09330-00021
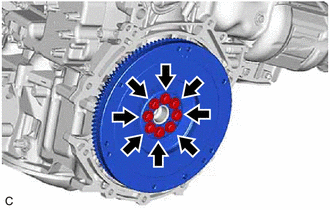
Remove the 8 bolts and flywheel sub-assembly.
11401L
5.REMOVE REAR ENGINE OIL SEAL
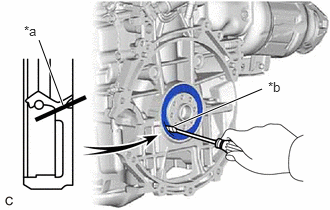
| *a | Cut Position |
| *b | Protective Tape |
Using a knife, cut off the lip of the rear engine oil seal.
Using a screwdriver with its tip wrapped with protective tape, pry out the rear engine oil seal.
- NOTICE:
-
Be careful not to damage the crankshaft.