LIGHTING (EXT) LIGHTING SYSTEM(w/o Headlight ECU) Taillight Relay Circuit
DESCRIPTION
The main body ECU (multiplex network body ECU) controls the operation of the TAIL relay.
WIRING DIAGRAM
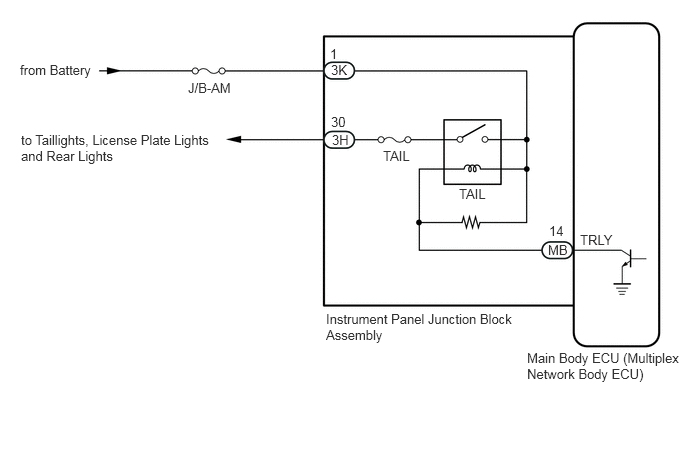
CAUTION / NOTICE / HINT
- NOTICE:
- ·
Inspect the fuses for circuits related to this system before performing the following procedure.
·Before replacing the main body ECU (multiplex network body ECU), refer to Service Bulletin.*1
*1: w/ Entry and Start System
PROCEDURE
Connect the GTS to the DLC3.
Turn the ignition switch to ON.
Turn the GTS on.
Enter the following menus: Body Electrical / Main Body / Active Test.
- Body Electrical > Main Body > Active Test
-
Tester Display Taillight Relay - 50004 123 13
Perform the Active Test according to the display on the GTS.
- Body Electrical > Main Body > Active Test
-
Tester Display Measurement Item Control Range Diagnostic Note Taillight Relay Taillight relay ON/OFF -
- OK:
Taillight relay operates. (Taillights illuminate.)
- Result:
Proceed to OK NG
OK
Click hereVehicle Exterior>LIGHTING (EXT)>LIGHTING SYSTEM (w/o Headlight ECU)>PROBLEM SYMPTOMS TABLE
NG
Disconnect the 3K instrument panel junction block assembly connector.
Measure the voltage according to the value(s) in the table below.
- Standard Voltage:
Tester Connection Condition Specified Condition 3K-1 - Body ground Always 11 to 14 V
- Result:
Proceed to OK NG
OK
NG
Remove the instrument panel junction block assembly.
for LHD: Click herePower Source / Network>POWER DISTRIBUTION>MAIN BODY ECU (for LHD)>REMOVAL
for RHD: Click herePower Source / Network>POWER DISTRIBUTION>MAIN BODY ECU (for RHD)>REMOVAL
Remove the main body ECU (multiplex network body ECU) from the instrument panel junction block assembly.
Connect a positive (+) lead from the battery to terminal 3K-1.
Connect a negative (-) lead from the battery to terminal MB-14 (TRLY).
Measure the voltage according to the value(s) in the table below.
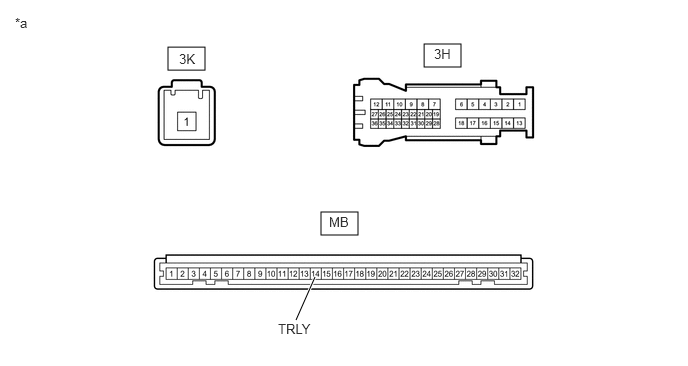
| *a | Component without harness connected
(Instrument Panel Junction Block Assembly) |
- | - |
- Standard Voltage:
Tester Connection Condition Specified Condition 3H-30 - Battery negative (-) terminal Always 11 to 14 V
- Result:
Result Proceed to OK (for LHD) A OK (for RHD) B NG (for LHD) C NG (for RHD) D
A
B
C
D