2006-2011 Camry Aurion · Service Manual RESTRAINTS

REMOVAL

Removal / installation · Vehicles built Oct 2006 – May 2009

Versions by build date: Jun 2006 – Sep 2006 Oct 2006 – May 2009 from Jun 2009

HINT:
  1. Use the same procedure for the RH side and LH side.
  2. The procedure listed below are for the LH side.


1. PRECAUTION

CAUTION:
Be sure to read "PRECAUTION" thoroughly before servicing (Click here).


2. DISCONNECT CABLE FROM NEGATIVE BATTERY TERMINAL (for Manual Seat)

CAUTION:
Wait for 90 seconds after disconnecting the cable to prevent airbag deployment.


3. REMOVE FRONT SEAT HEADREST ASSEMBLY (for Manual Seat)

4. REMOVE OUTER SEAT TRACK BRACKET COVER LH (for Manual Seat)
for 2AZ-FE: Click here
for 2GR-FE LHD: Click here
for 2GR-FE RHD: Click here

5. REMOVE INNER SEAT TRACK BRACKET COVER LH (for Manual Seat)
for 2AZ-FE: Click here
for 2GR-FE LHD: Click here
for 2GR-FE RHD: Click here

6. REMOVE FRONT SEAT ASSEMBLY LH (for Manual Seat)
for 2AZ-FE: Click here
for 2GR-FE LHD: Click here
for 2GR-FE RHD: Click here

7. REMOVE FRONT SEAT HEADREST ASSEMBLY (for Power Seat)

8. REMOVE OUTER SEAT TRACK BRACKET COVER LH (for Power Seat)
for 2AZ-FE: Click here
for 2GR-FE LHD: Click here
for 2GR-FE RHD: Click here

9. REMOVE INNER SEAT TRACK BRACKET COVER LH (for Power Seat)
for 2AZ-FE: Click here
for 2GR-FE LHD: Click here
for 2GR-FE RHD: Click here

10. REMOVE FRONT SEAT ASSEMBLY LH (for Power Seat)
for 2AZ-FE: Click here
for 2GR-FE LHD: Click here
for 2GR-FE RHD: Click here

11. REMOVE FRONT SEAT HEADREST ASSEMBLY (for Manual Seat)

12. REMOVE OUTER SEAT TRACK BRACKET COVER RH (for Manual Seat)

HINT:
Use the same procedure for the RH and LH side.

for 2AZ-FE: Click here
for 2GR-FE LHD: Click here
for 2GR-FE RHD: Click here

13. REMOVE INNER SEAT TRACK BRACKET COVER RH (for Manual Seat)

HINT:
Use the same procedure for the RH and LH side.

for 2AZ-FE: Click here
for 2GR-FE LHD: Click here
for 2GR-FE RHD: Click here

14. REMOVE FRONT SEAT ASSEMBLY RH (for Manual Seat)

HINT:
Use the same procedure for the RH and LH side.

for 2AZ-FE: Click here
for 2GR-FE LHD: Click here
for 2GR-FE RHD: Click here

15. REMOVE FRONT SEAT HEADREST ASSEMBLY (for Power Seat)

16. REMOVE OUTER SEAT TRACK BRACKET COVER RH (for Power Seat)

HINT:
Use the same procedure for the RH and LH side.

for 2AZ-FE: Click here
for 2GR-FE LHD: Click here
for 2GR-FE RHD: Click here

17. REMOVE INNER SEAT TRACK BRACKET COVER RH (for Power Seat)

HINT:
Use the same procedure for the RH and LH side.

for 2AZ-FE: Click here
for 2GR-FE LHD: Click here
for 2GR-FE RHD: Click here

18. REMOVE FRONT SEAT ASSEMBLY RH (for Power Seat)

HINT:
Use the same procedure for the RH and LH side.

for 2AZ-FE: Click here
for 2GR-FE LHD: Click here
for 2GR-FE RHD: Click here

19. REMOVE REAR SEAT CUSHION ASSEMBLY
for Fold Down Seat Type: Click here
for Fixed Seat Type: Click here

20. REMOVE REAR SEAT HEADREST ASSEMBLY

21. REMOVE REAR CENTER SEAT HEADREST ASSEMBLY (w/ Center Armrest)

22. REMOVE REAR SEATBACK ASSEMBLY (for Fixed Seat Type)

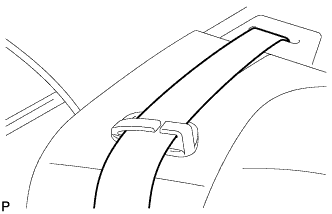
  1. B136576
    Remove the 3 rear seat belts from the 3 rear seat shoulder belt guides.

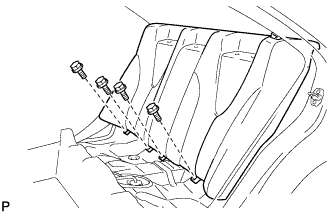
  1. B136577
    Remove the 4 bolts and rear seatback assembly.


23. REMOVE SEPARATE TYPE REAR SEATBACK ASSEMBLY LH (for Fold Down Seat Type)

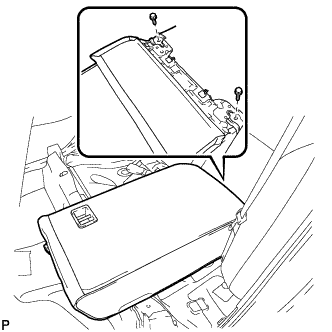
  1. B136539
    Remove the 2 bolts and separate type rear seatback assembly LH.


24. REMOVE SEPARATE TYPE REAR SEATBACK ASSEMBLY RH (for Fold Down Seat Type)

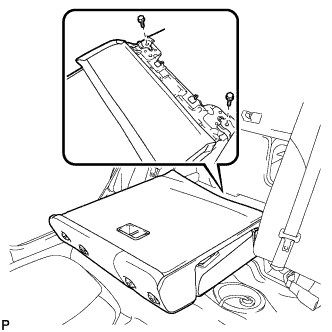
  1. B134700
    Remove the 2 bolts and separate type rear seatback assembly RH.


25. REMOVE REAR SIDE SEATBACK ASSEMBLY LH (for Fold Down Seat Type)

  1. B136561
    Remove the bolt and rear side seatback assembly LH.


26. REMOVE REAR SIDE SEATBACK ASSEMBLY RH (for Fold Down Seat Type)

HINT:
Use the same procedures for the RH side and LH side.


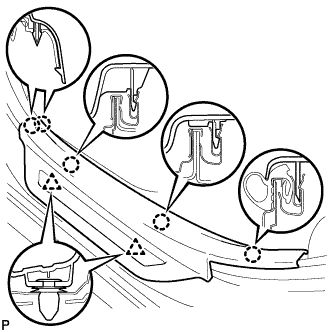
27. REMOVE REAR DOOR SCUFF PLATE LH

  1. B132068
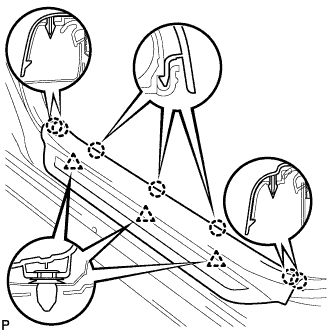
    Disengage the 5 claws and 2 clips, and remove the rear door scuff plate LH.


28. REMOVE REAR DOOR OPENING TRIM WEATHERSTRIP LH

29. REMOVE REAR DOOR SCUFF PLATE RH

HINT:
Use the same procedure for the RH and LH side (Click here).


30. REMOVE REAR DOOR OPENING TRIM WEATHERSTRIP RH

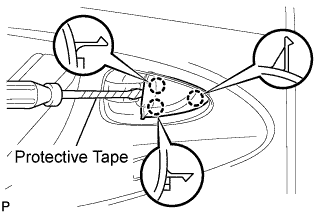
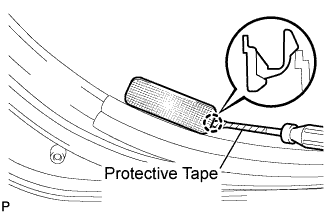
31. REMOVE REAR DOOR INSIDE HANDLE BEZEL PLUG LH

  1. B136443E01
    Using a screwdriver with the tip wrapped with protective tape, disengage the 3 claws and remove the rear door inside handle bezel plug.


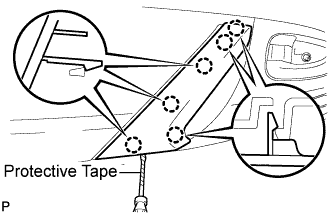
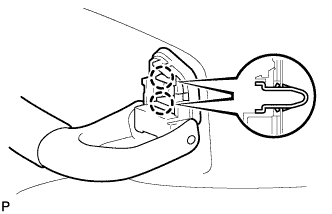
32. REMOVE DOOR ASSIST GRIP COVER LH

  1. B149028E01
    Using a screwdriver with the tip wrapped with protective tape, disengage the 6 claws and remove the door assist grip cover.


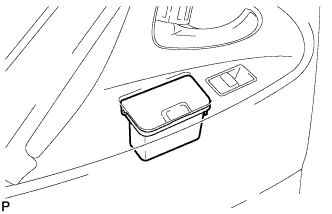
33. REMOVE REAR ASH RECEPTACLE ASSEMBLY LH (w/ Ashtray)

  1. B136442
    Remove the rear ash receptacle assembly.


34. REMOVE COURTESY LIGHT ASSEMBLY (w/ Courtesy Light)

  1. B146097E01
    Using a screwdriver with the tip wrapped with protective tape, disengage the claw and remove the courtesy light assembly.

  1. Disconnect the connector.


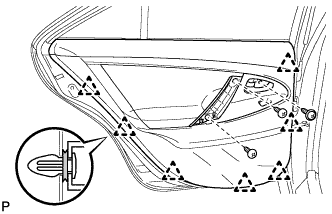
35. REMOVE REAR DOOR TRIM BOARD SUB-ASSEMBLY LH

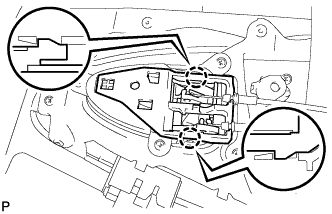
  1. B136451
    Remove the 3 screws.

  1. Using a clip remover, disengage the 7 clips.

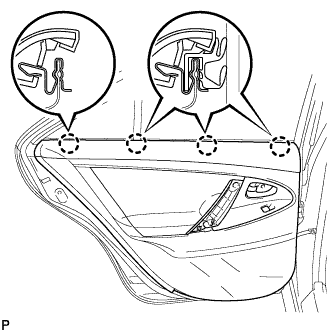
  1. B136452
    Raise the rear door trim board to disengage the 4 claws and remove the rear door trim board together with the rear door inner glass weatherstrip.

  1. Disconnect the connector.

  1. B136453
    Disengage the 2 claws and disconnect the rear door inside handle sub-assembly.

  1. B141704
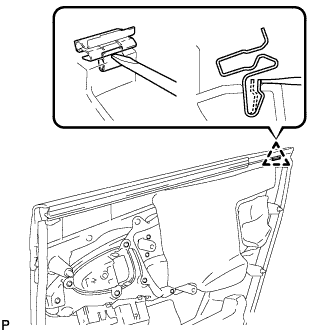
    Disengage the clip as shown in the illustration and remove the No. 1 door scuff plate clamp from the rear door trim board.


36. REMOVE REAR DOOR INNER GLASS WEATHERSTRIP LH

  1. B136456
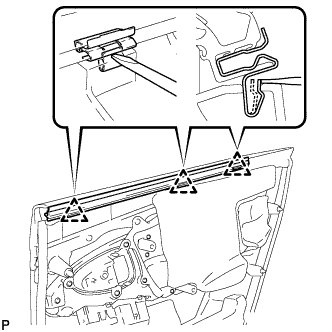
    Disengage the 3 clips as shown in the illustration and remove the rear door inner glass weatherstrip from the rear door trim board.


37. REMOVE FRONT DOOR SCUFF PLATE LH

  1. B132067
    Disengage the 7 claws and 3 clips, and remove the front door scuff plate LH.


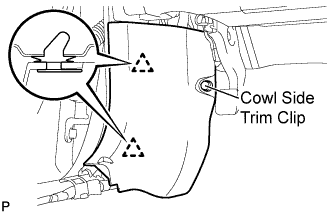
38. REMOVE COWL SIDE TRIM SUB-ASSEMBLY LH

  1. B132116E01
    Remove the cowl side trim clip.

  1. Disengage the 2 clips and remove the cowl side trim sub-assembly LH.


39. REMOVE FRONT DOOR OPENING TRIM WEATHERSTRIP LH

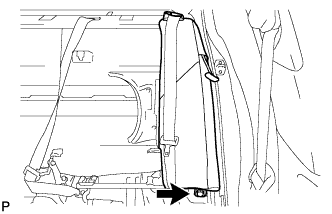
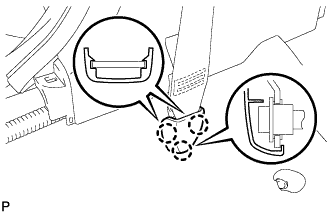
40. REMOVE LAP BELT OUTER ANCHOR COVER (for LH Side)

  1. B131995
    Disengage the 3 claws and remove the lap belt outer anchor cover.


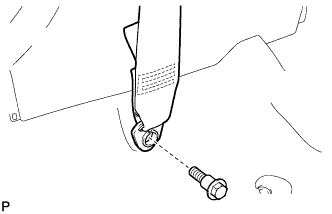
41. DISCONNECT FRONT SEAT OUTER BELT ASSEMBLY LH

  1. B131996
    Remove the bolt and disconnect the floor end of the front seat outer belt assembly LH.


42. REMOVE LOWER CENTER PILLAR GARNISH LH

  1. B132057
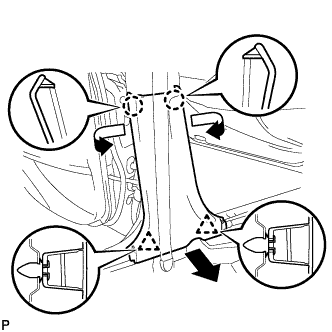
    Disengage the 2 claws and 2 clips, and remove the lower center pillar garnish LH.


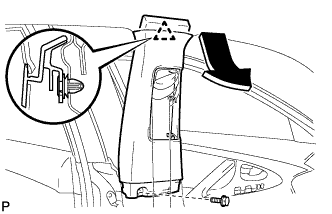
43. REMOVE UPPER CENTER PILLAR GARNISH LH

  1. B132059
    Remove the bolt.

  1. Disengage the clip and remove the upper center pillar garnish LH.


44. REMOVE FRONT DOOR SCUFF PLATE RH

HINT:
Use the same procedure for the RH and LH side (Click here).


45. REMOVE COWL SIDE TRIM SUB-ASSEMBLY RH

HINT:
Use the same procedure for the RH and LH side (Click here).


46. REMOVE FRONT DOOR OPENING TRIM WEATHERSTRIP RH

47. REMOVE LAP BELT OUTER ANCHOR COVER (for RH Side)

HINT:
Use the same procedure for the RH and LH side (Click here).


48. DISCONNECT FRONT SEAT OUTER BELT ASSEMBLY RH

HINT:
Use the same procedure for the RH and LH side (Click here).


49. REMOVE LOWER CENTER PILLAR GARNISH RH

HINT:
Use the same procedure for the RH and LH side (Click here).


50. REMOVE UPPER CENTER PILLAR GARNISH RH

HINT:
Use the same procedure for the RH and LH side (Click here).


51. REMOVE ROOF SIDE INNER GARNISH LH

  1. B132063
    Disengage the 5 clips and 2 claws, and remove the roof side inner garnish LH.


52. REMOVE ROOF SIDE INNER GARNISH RH

HINT:
Use the same procedure for the RH and LH side (Click here).


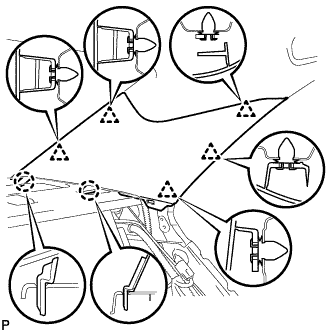
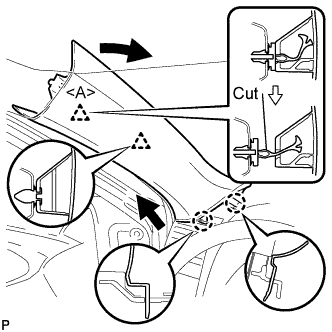
53. REMOVE FRONT PILLAR GARNISH LH

  1. B132056E01
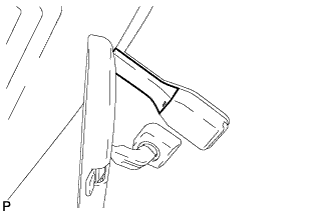
    Pull the upper part of the garnish toward the inside of the cabin and disengage the 2 clips.

  1. Cut off the clip <A>.

  1. Disengage the 2 claws and remove the front pillar garnish LH.

  1. Remove the clip <A> from the vehicle body.

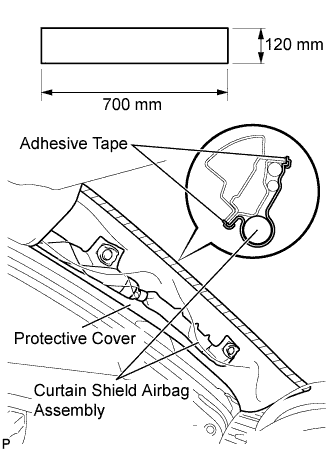
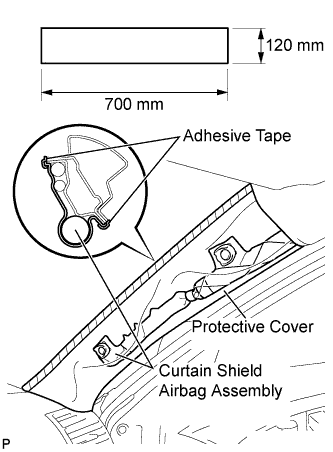
  1. B132100E02
    Protect the curtain shield airbag assembly.

    1. Cover the airbag with a 700 mm (27.56 in.) x 120 mm (4.72 in.) cloth or piece of nylon and fix the ends of the cover with tape, as shown in the illustration.

      NOTICE:
      Cover the curtain shield airbag with a protective cover as soon as the front pillar garnish is removed.


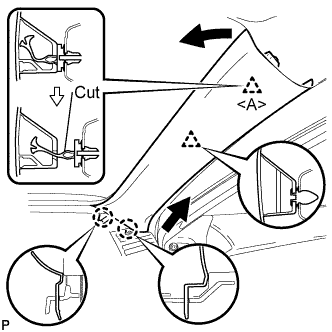
54. REMOVE FRONT PILLAR GARNISH RH

  1. B132055E01
    Pull the upper part of the garnish toward the inside of the cabin and disengage the 2 clips.

  1. Cut off the clip <A>.

  1. Disengage the 2 claws and remove the front pillar garnish RH.

  1. Remove the clip <A> from the vehicle body.

  1. B132099E02
    Protect the curtain shield airbag assembly.

    1. Cover the airbag with a 700 mm (27.56 in.) x 120 mm (4.72 in.) cloth or piece of nylon and fix the ends of the cover with tape, as shown in the illustration.

      NOTICE:
      Cover the curtain shield airbag with a protective cover as soon as the front pillar garnish is removed.


55. REMOVE RAIN SENSOR COVER (w/ Rain Sensor)

  1. E128843
    Remove the rain sensor cover.


56. REMOVE ROOF CONSOLE BOX ASSEMBLY

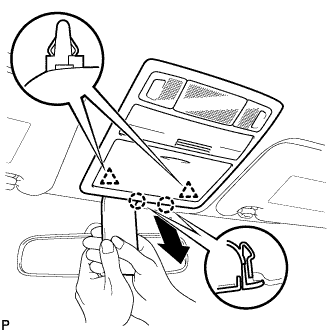
  1. B132064
    Using a moulding remover, disengage the 2 clips and 2 claws.

  1. Disconnect the connectors and remove the roof console box assembly.


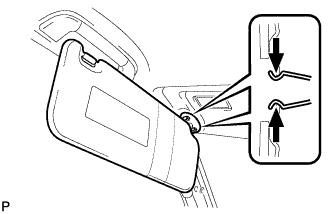
57. REMOVE VISOR ASSEMBLY LH

  1. B132069
    Using a moulding remover, disengage the 4 claws and remove the visor bracket cover.

  1. B132070
    Disengage the 2 clips and remove the visor assembly LH.


58. REMOVE VISOR ASSEMBLY RH

HINT:
Use the same procedure for the RH and LH side (Click here).


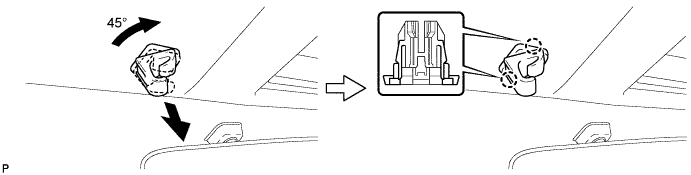
59. REMOVE VISOR HOLDER
  1. Turn the visor holder approximately 45° and pull it out as shown in the illustration.

  1. Disengage the 2 claws and remove the visor holder.

    B132066E01

    HINT:
    Use the same procedure for the RH side and the LH side.


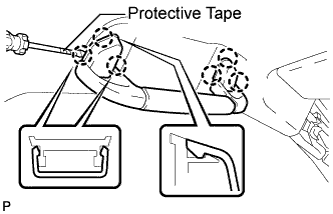
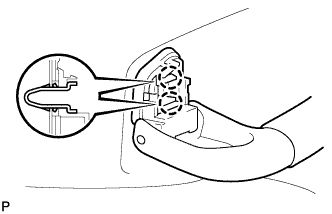
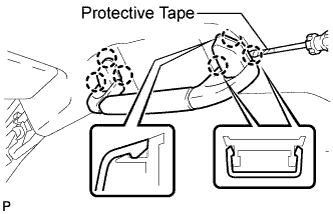
60. REMOVE FRONT ASSIST GRIP SUB-ASSEMBLY (for Driver Side)

  1. with Assist Grip:

    1. B132061E01
      Using a screwdriver, disengage the 6 claws and remove the 2 assist grip covers.

      HINT:
      Tape the screwdriver tip before use.

    2. B132062
      Disengage the 2 clips and remove the front assist grip sub-assembly.


61. REMOVE FRONT ASSIST GRIP SUB-ASSEMBLY (for Front Passenger Side)

  1. B147410E01
    Using a screwdriver, disengage the 6 claws and remove the 2 assist grip covers.

    HINT:
    Tape the screwdriver tip before use.

  1. B147411
    Disengage the 2 clips and remove the front assist grip sub-assembly.


62. REMOVE REAR ASSIST GRIP SUB-ASSEMBLY

HINT:
Use the same procedure for the rear side and the front side (Click here).


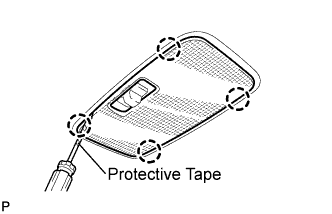
63. REMOVE NO. 1 ROOM LIGHT ASSEMBLY (w/o Sliding Roof)

  1. B132140E02
    Using a screwdriver, disengage the 4 claws and remove the lens cover.

    HINT:
    Tape the screwdriver tip before use.

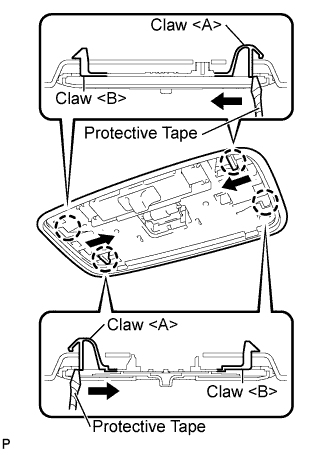
  1. B132142E01
    Using a screwdriver, disengage the 2 claws <A> as shown in the illustration.

    HINT:
    Tape the screwdriver tip before use.

  1. Disengage the 2 claws <B> and remove the No. 1 room light assembly.

  1. Disconnect the room light connector.


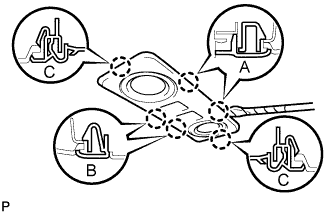
64. REMOVE SPOT LIGHT ASSEMBLY (w/ Sliding Roof)

  1. B132093E01
    Using a screwdriver, disengage the 2 claws labeled A and 2 claws labeled B from the vehicle body.

    HINT:
    Tape the screwdriver tip before use.

  1. Using a screwdriver, disengage the 2 claws labeled C and remove the spot light assembly from the headlining.

    HINT:
    Tape the screwdriver tip before use.

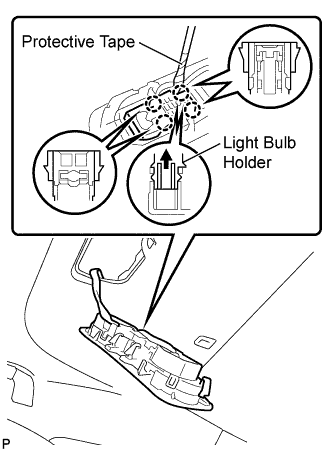
  1. B132095E01
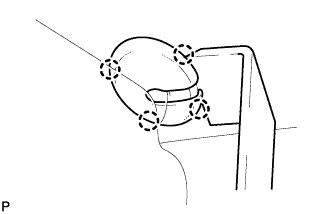
    Using a screwdriver, disengage the 4 claws.

    HINT:
    Tape the screwdriver tip before use.

  1. Pull the light bulb holder in the direction indicated by the arrow in the illustration to detach the claw. Then remove the spot light assembly from the light bulb holder.


65. REMOVE SUN ROOF OPENING TRIM MOULDING (w/ Sliding Roof)
  1. Remove the sun roof opening trim moulding.


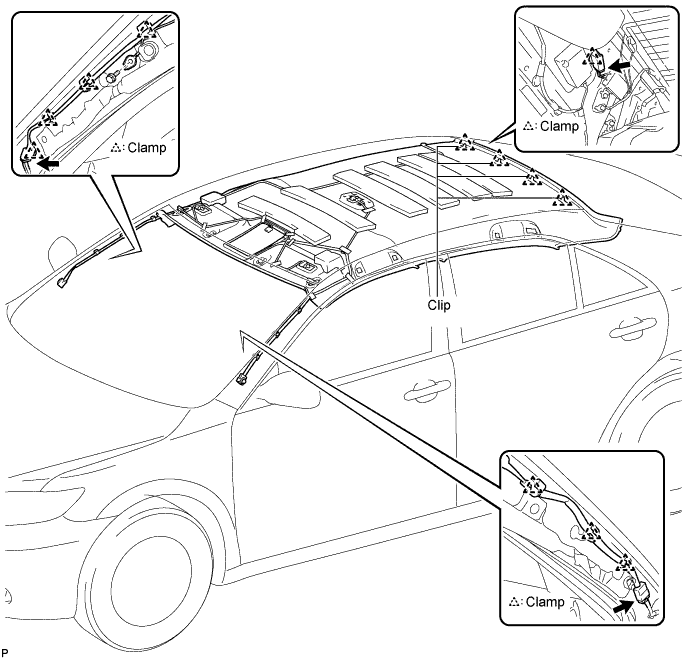
66. REMOVE ROOF HEADLINING ASSEMBLY (w/o Sliding Roof)
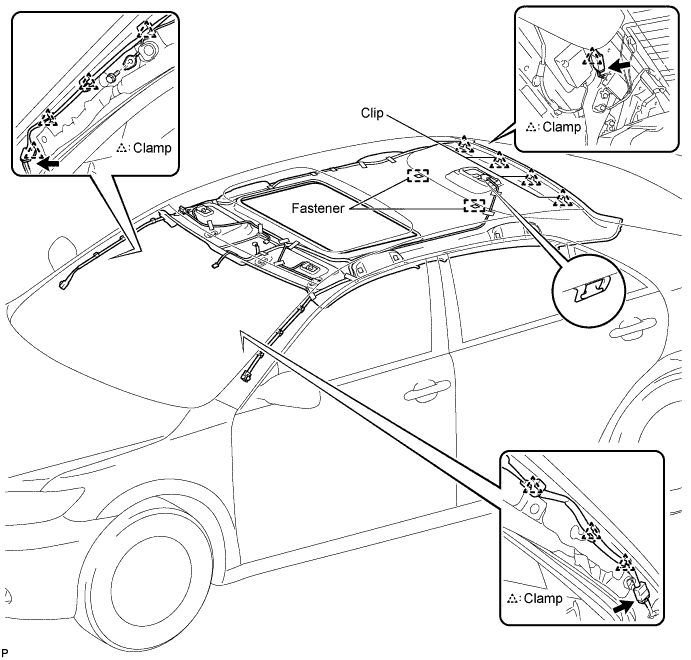
  1. Disconnect the No. 1 roof wire connector and disengage each clamp from the front pillar LH.

  1. Remove the bolt and disconnect the radio setting condenser from the front pillar RH.

  1. Disconnect the antenna cord sub-assembly connector and disengage each clamp from the front pillar RH.

  1. Disconnect the antenna cord sub-assembly connector and disengage the clamp from the rear pillar RH.

  1. Disengage the 4 clips.

    B149211E01

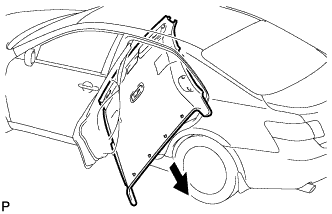
  1. B149221
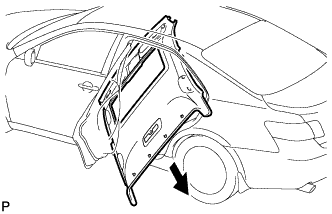
    Remove the roof headlining assembly from the vehicle through the rear left door.


67. REMOVE ROOF HEADLINING ASSEMBLY (w/ Sliding Roof)
  1. Disconnect the No. 1 roof wire connector and disengage each clamp from the front pillar LH.

  1. Remove the bolt and disconnect the radio setting condenser from the front pillar RH.

  1. Disconnect the antenna cord sub-assembly connector and disengage each clamp from the front pillar RH.

  1. Disconnect the antenna cord sub-assembly connector and disengage the clamp from the rear pillar RH.

  1. Disconnect the sliding roof drive gear connector.

  1. Disengage the hook, 4 clips, and 2 fasteners.

    B149212E01

  1. B149222
    Remove the roof headlining assembly from the vehicle through the rear left door.


68. REMOVE CURTAIN SHIELD AIRBAG ASSEMBLY
  1. Disconnect the connector.

    NOTICE:
    When handling the airbag connector, take care not to damage the airbag wire harness.

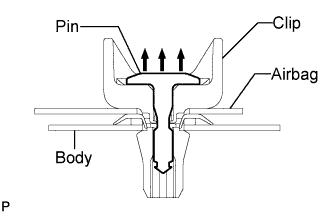
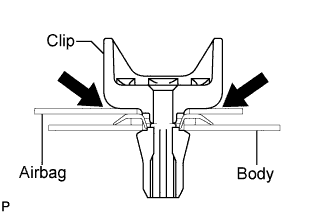
  1. Remove the 4 clips.

    1. C141263E01
      Using a clip remover, remove the pin.

    2. C141264E03
      Using needle-nose pliers, remove the clip and curtain shield airbag from the body as shown in the illustration.

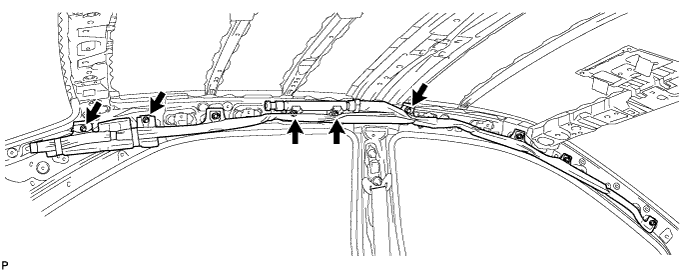
  1. Remove the 5 bolts and curtain shield airbag assembly.

    C132575

  1. Remove the 4 clips and 4 spacers from the curtain shield airbag assembly.

    NOTICE:
    If clips and spacers are removed, always replace them with new ones even though they may not appear to be damaged.

← REMOVAL (Jun 2006 – Sep 2006)REMOVAL (from Jun 2009) →