Power Source Mode does not Change to ON (IG and ACC)
Circuit diagnosis · Vehicles built from Jun 2009
DESCRIPTION
When the engine switch is pushed with the electrical key in the cabin, the main body ECU (instrument panel junction block assembly) receives signals to switch the power source mode.- HINT:
- To allow use of the intelligent tester to inspect the push-button start function when the engine switch is off, repeat opening and closing any of the doors. Opening and closing a door establishes communication between the intelligent tester and the main body ECU (instrument panel junction block assembly). (Opening and closing a door can also be simulated by operating a door courtesy light switch.)
WIRING DIAGRAM
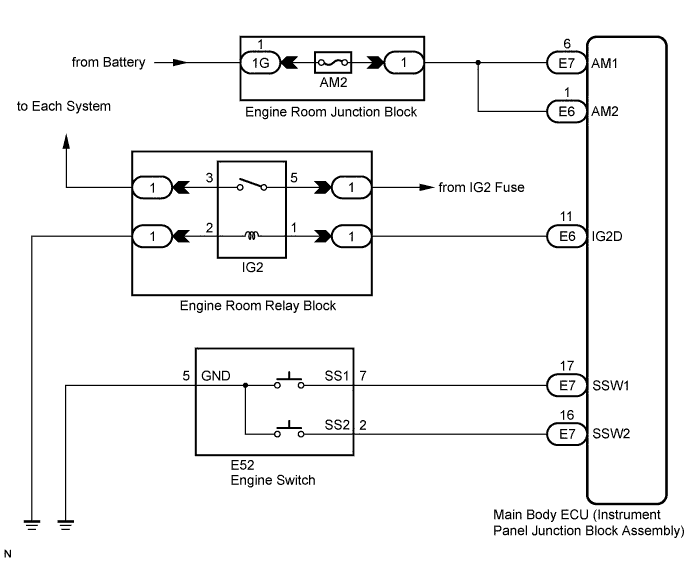

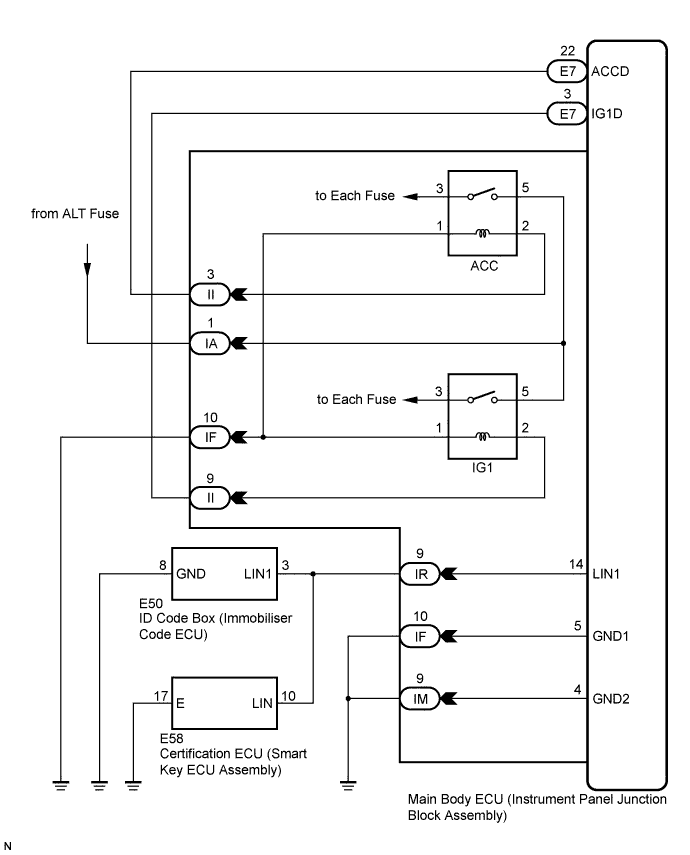
INSPECTION PROCEDURE
| 1. CHECK ENTRY FUNCTION DETECTION AREA |

Inspect entry detection area.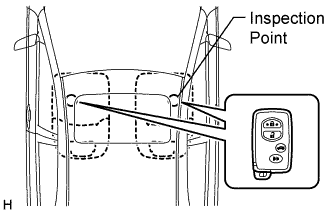
When the electrical key is in either of the 2 inspection points in the illustration, the shift lever is in the P position and the brake pedal is depressed, check that the engine switch indicator illuminates in green.
- OK:
- Engine switch illuminates in green.
- HINT:
- If the engine switch does not illuminate, perform troubleshooting according to the Problem Symptoms Table (Click here).
|
|
||||

| OK | |
 |
| 2. CHECK CONNECTORS |
Check that the connectors are securely connected and the terminals are not deformed or loose.
- OK:
- The connectors are securely connected and the terminals are not deformed or loose.
|
|
||||
| OK | |
|
| 3. CHECK HARNESS AND CONNECTOR (MAIN BODY ECU (INSTRUMENT PANEL JUNCTION BLOCK) - BATTERY) |
Disconnect the E6 and E7 connectors.
Measure the voltage according to the value(s) in the table below.
- Standard Voltage:
Tester Connection
Condition
Specified Condition
E7-6 (AM1) - Body ground
Always
11 to 14 V
E6-1 (AM2) - Body ground
Always
11 to 14 V
|
|
||||
| OK | |
|
| 4. CHECK HARNESS AND CONNECTOR (MAIN BODY ECU - BODY GROUND) |
Disconnect the IF and IM connectors.
Measure the resistance according to the value(s) in the table below.
- Standard Resistance:
Tester Connection
Condition
Specified Condition
IF-10 (GND1) - Body ground
Always
Below 1 Ω
IM-9 (GND2) - Body ground
Always
Below 1 Ω
|
|
||||
| OK | |
|
| 5. CHECK FOR DTCS |
Clear the DTCs (Click here).
- HINT:
- After all the DTCs are cleared, check if the trouble occurs again 5 seconds after the engine switch is turned on (IG).
Check for DTCs again.
- OK:
- DTC is not output.
|
|
||||
| OK | |
|
| 6. READ VALUE USING INTELLIGENT TESTER |
Turn the engine switch off.
Connect the intelligent tester to the DLC3.
Turn the engine switch on (IG).
Turn the intelligent tester on.
Enter the following menus: Body / Main Body / Data List.
Read the Data List according to the display on the intelligent tester.
- HINT:
- When using the intelligent tester with the engine switch off, turn on and off any of the door courtesy light switches repeatedly at 1.5 second intervals or less until communication between the tester and vehicle starts.
Main Body: Tester Display
Measurement Item/Range
Normal Condition
Diagnostic Note
St SW1
Start Switch 1/ON or OFF
ON: Engine switch is pushed
OFF: Engine switch is not pushed
-
St SW2
Start Switch 2/ON or OFF
ON: Engine switch is pushed
OFF: Engine switch is not pushed
-
- OK:
- ON (engine switch is pushed) and OFF (engine switch is not pushed) appear on the screen.
|
|
||||

| OK | ||
 |
||
| ||
| 7. INSPECT ENGINE SWITCH |
Remove the engine switch (Click here).
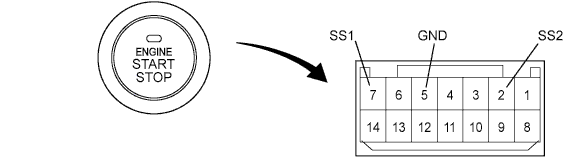
Measure the resistance of the switch.
- Standard Resistance:
Tester Connection
Switch Condition
Specified Condition
7 (SS1) - 5 (GND)
Pushed
Below 1 Ω
2 (SS2) - 5 (GND)
Pushed
Below 1 Ω
7 (SS1) - 5 (GND)
Not pushed
10 kΩ or higher
2 (SS2) - 5 (GND)
Not pushed
10 kΩ or higher
|
|
||||
| OK | |
|
| 8. CHECK HARNESS AND CONNECTOR (MAIN BODY ECU AND BODY GROUND - ENGINE SWITCH) |
Disconnect the E7 connector.
Measure the resistance according to the value(s) in the table below.
- Standard Resistance:
Tester Connection
Condition
Specified Condition
E52-7 (SS1) - E7-17 (SSW1)
Always
Below 1 Ω
E52-2 (SS2) - E7-16 (SSW2)
Always
Below 1 Ω
E52-5 (GND) - Body ground
Always
Below 1 Ω
E52-7 (SS1) or E7-17 (SSW1) - Body ground
Always
10 kΩ or higher
E52-2 (SS2) or E7-16 (SSW2) - Body ground
Always
10 kΩ or higher
|
|
||||
| OK | ||
|
||
| ||