Steering Pad Switch Circuit
Circuit diagnosis · Vehicles built from Jun 2009
DESCRIPTION
This circuit sends an operation signal from the steering pad switch assembly to the radio and display assembly.If there is an open in the circuit, the audio system cannot be operated using the steering pad switch assembly.
If there is a short in the circuit, the same condition as that when the switch is continuously depressed occurs.
Therefore, the radio and display assembly cannot be operated using the steering pad switch assembly, and also the radio and display assembly itself cannot function.
WIRING DIAGRAM
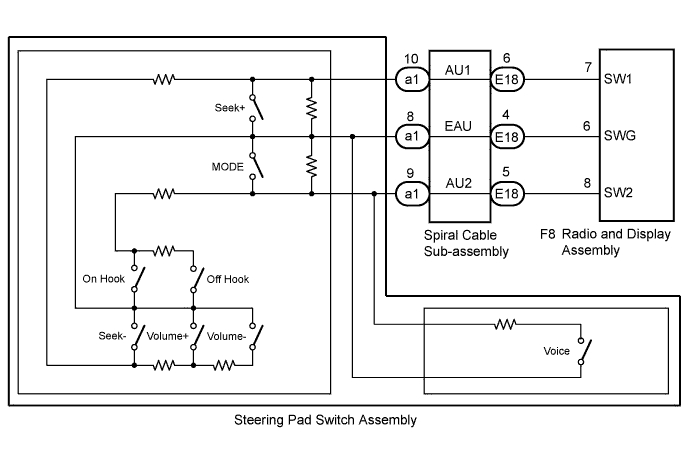

INSPECTION PROCEDURE
- NOTICE:
- The vehicle is equipped with an SRS (Supplemental Restraint System) which includes components such as airbags. Before servicing (including removal or installation of parts), be sure to read the precaution for Supplemental Restraint System (Click here).
| 1. INSPECT RADIO AND DISPLAY ASSEMBLY |

Disconnect the F8 radio and display assembly connector.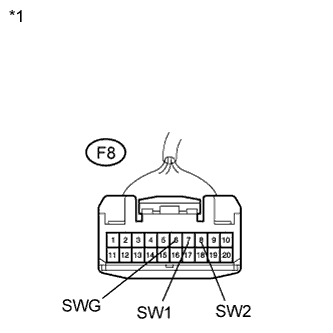
Measure the resistance according to the value(s) in the table below.
- Standard Resistance:
Tester Connection
Condition
Specified Condition
F8-7 (SW1) - F8-6 (SWG)
No switch pushed
95 to 105 kΩ
F8-7 (SW1) - F8-6 (SWG)
Seek+ switch pushed
Below 2.5 Ω
F8-7 (SW1) - F8-6 (SWG)
Seek- switch pushed
312.5 to 345.4 Ω
F8-7 (SW1) - F8-6 (SWG)
Volume+ switch pushed
950 to 1050 Ω
F8-7 (SW1) - F8-6 (SWG)
Volume- switch pushed
2954.5 to 3265.5 Ω
F8-8 (SW2) - F8-6 (SWG)
No switch pushed
95 to 105 kΩ
F8-8 (SW2) - F8-6 (SWG)
MODE switch pushed
Below 2.5 Ω
F8-8 (SW2) - F8-6 (SWG)
Voice switch pushed
2954.5 to 3265.5 Ω
F8-8 (SW2) - F8-6 (SWG)
On Hook switch pushed
312.5 to 345.4 Ω
F8-8 (SW2) - F8-6 (SWG)
Off Hook switch pushed
950 to 1050 Ω
Text in Illustration *1
Front view of wire harness connector
(to Radio and Display Assembly)
|
|
||||

| OK | ||
 |
||
| ||
| 2. INSPECT STEERING PAD SWITCH ASSEMBLY |
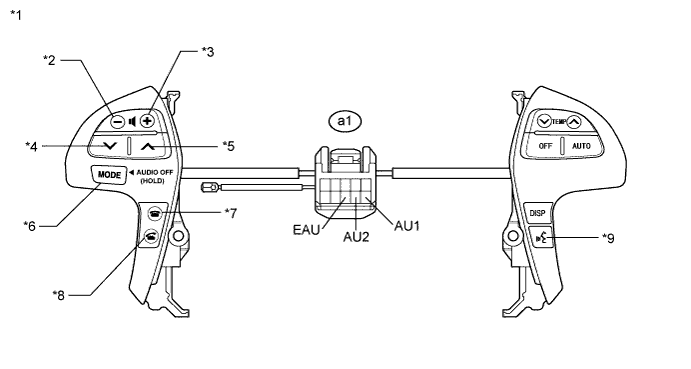
Disconnect the a1 steering pad switch assembly connector.
Measure the resistance according to the value(s) in the table below.
- Standard Resistance:
Tester Connection
Condition
Specified Condition
a1-10 (AU1) - a1-8 (EAU)
No switch pushed
95 to 105 kΩ
a1-10 (AU1) - a1-8 (EAU)
Seek+ switch pushed
Below 2.5 Ω
a1-10 (AU1) - a1-8 (EAU)
Seek- switch pushed
312.5 to 345.4 Ω
a1-10 (AU1) - a1-8 (EAU)
Volume+ switch pushed
950 to 1050 Ω
a1-10 (AU1) - a1-8 (EAU)
Volume- switch pushed
2954.5 to 3265.5 Ω
a1-9 (AU2) - a1-8 (EAU)
No switch pushed
95 to 105 kΩ
a1-9 (AU2) - a1-8 (EAU)
MODE switch pushed
Below 2.5 Ω
a1-9 (AU2) - a1-8 (EAU)
Voice switch pushed
2954.5 to 3265.5 Ω
a1-9 (AU2) - a1-8 (EAU)
On Hook switch pushed
312.5 to 345.4 Ω
a1-9 (AU2) - a1-8 (EAU)
Off Hook switch pushed
950 to 1050 Ω
Text in Illustration *1
Component without harness connected
(Steering Pad Switch Assembly)
*2
Volume-
*3
Volume+
*4
Seek-
*5
Seek+
*6
MODE
*7
On Hook
*8
Off Hook
*9
Voice
-
-
|
|
||||

| OK | |
 |
| 3. INSPECT SPIRAL CABLE SUB-ASSEMBLY |
Disconnect the E18 spiral cable sub-assembly connector.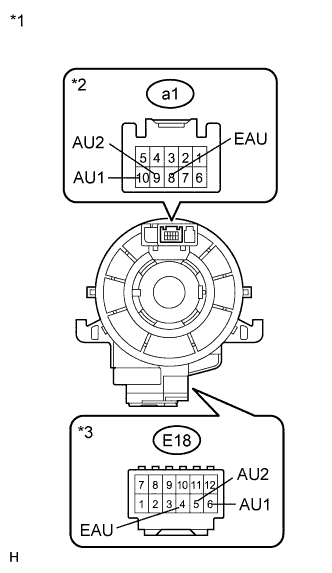
Measure the resistance according to the value(s) in the table below.
- Standard Resistance:
Tester Connection
Spiral Cable Position
Specified Condition
a1-8 (EAU) - E18-4 (EAU)
Center
Below 1 Ω
2.5 rotations to the left
2.5 rotations to the right
a1-10 (AU1) - E18-6 (AU1)
Center
Below 1 Ω
2.5 rotations to the left
2.5 rotations to the right
a1-9 (AU2) - E18-5 (AU2)
Center
Below 1 Ω
2.5 rotations to the left
2.5 rotations to the right
- NOTICE:
- The spiral cable sub-assembly is an important part of the SRS airbag system. Incorrect removal or installation of the spiral cable may prevent the airbag from deploying. Be sure to read the pages shown in the brackets below.
- HINT:
- Removal (Click here)
- Installation (Click here)
- Removal (Click here)
Text in Illustration *1
Component without harness connected
(Spiral Cable Sub-assembly)
*2
Steering Pad Switch Side
*3
Vehicle Side
|
|
||||
| OK | ||
|
||
| ||