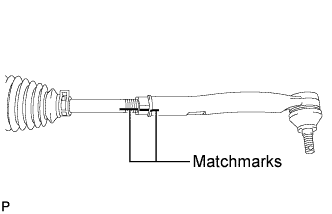
Install the lock nut and the tie rod assembly LH to the steering rack end sub-assembly until the matchmarks are aligned.
HINT:
After adjusting toe-in, torque the lock nut.
2.
REMOVE TIE ROD ASSEMBLY RH
HINT:
Perform the same procedure as for the LH side.
3.
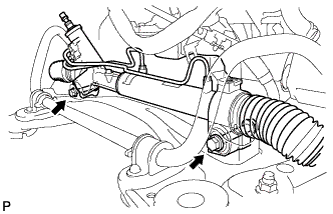
INSTALL POWER STEERING LINK ASSEMBLY
Install the power steering link assembly with the 2 bolts and 2 nuts.
Torque:
70 N*m{
714 kgf*cm
, 52 ft.*lbf
}
4.
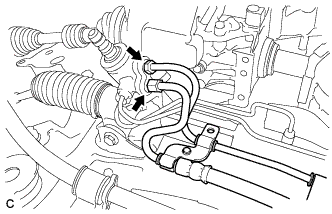
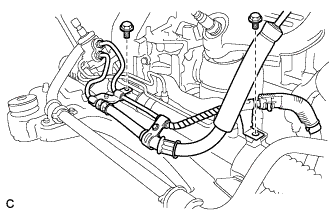
CONNECT PRESSURE FEED TUBE ASSEMBLY (for LHD)
Temporarily connect the pressure feed tube assembly to the power steering link assembly.
Install the pressure feed tube assembly clamp with the 2 bolts.
Torque:
9.8 N*m{
100 kgf*cm
, 87 in.*lbf
}
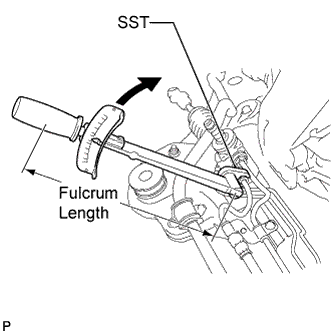
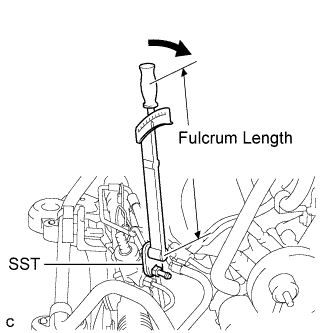
Using SST, tighten the pressure feed tube assembly (pressure feed tube side).
SST
09023-12701
Torque:
Without SST:
25 N*m{
250 kgf*cm
, 18 ft.*lbf
}
With SST:
22 N*m{
227 kgf*cm
, 16 ft.*lbf
}
NOTICE:
Use a torque wrench with a fulcrum length of 300 mm (11.81 in.).
This torque value is effective when SST is parallel to the torque wrench.
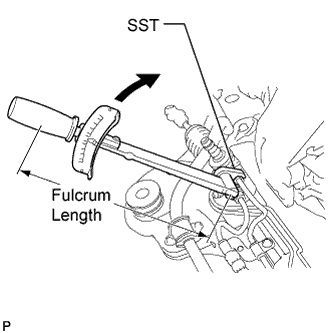
Using SST, tighten the pressure feed tube assembly (return tube side).
SST
09023-12701
Torque:
Without SST:
25 N*m{
250 kgf*cm
, 18 ft.*lbf
}
With SST:
22 N*m{
227 kgf*cm
, 16 ft.*lbf
}
NOTICE:
Use a torque wrench with a fulcrum length of 300 mm (11.81 in.).
This torque value is effective when SST is parallel to the torque wrench.
5.
CONNECT PRESSURE FEED TUBE ASSEMBLY (for RHD)
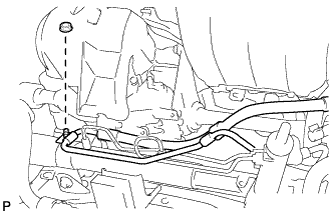
Install the pressure feed tube assembly clamp with the nut.
Torque:
9.8 N*m{
100 kgf*cm
, 87 in.*lbf
}
Using SST, connect the pressure feed tube assembly to the power steering link assembly.
SST
09023-12701
Torque:
Without SST:
25 N*m{
250 kgf*cm
, 18 ft.*lbf
}
With SST:
22 N*m{
227 kgf*cm
, 16 ft.*lbf
}
NOTICE:
Use a torque wrench with a fulcrum length of 300 mm (11.81 in.).
This torque value is effective when SST is parallel to the torque wrench.
6.
INSTALL RETURN TUBE ASSEMBLY (for RHD)
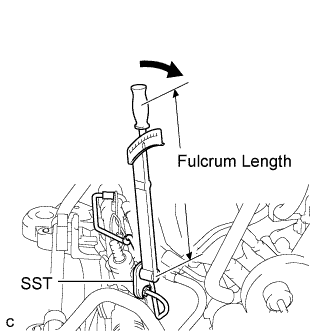
Using SST, install the return tube assembly to the power steering link assembly.
SST
09023-12701
Torque:
Without SST:
25 N*m{
250 kgf*cm
, 18 ft.*lbf
}
With SST:
22 N*m{
227 kgf*cm
, 16 ft.*lbf
}
NOTICE:
Use a torque wrench with a fulcrum length of 300 mm (11.81 in.).
This torque value is effective when SST is parallel to the torque wrench.
7.
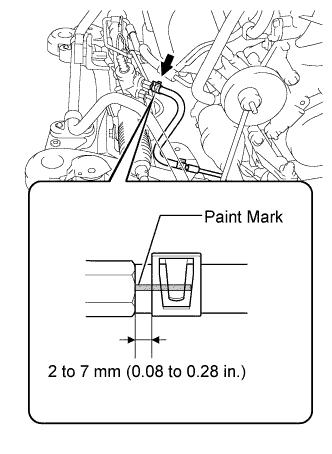
CONNECT RETURN TUBE SUB-ASSEMBLY (for RHD)
Connect the steering gear outlet return tube sub-assembly to the return tube assembly with the clip.
NOTICE:
Connect the steering gear outlet return tube with the paint mark facing upward.
Push the steering gear outlet return tube as far as it will go as shown in the illustration.
Install the clip at the position specified in the illustration.
8.
INSTALL ENGINE ASSEMBLY WITH TRANSAXLE
HINT:
Refer to the instructions for installation of the engine assembly (Click here).
9.
CONNECT TIE ROD ASSEMBLY LH
Connect the tie rod assembly LH to the steering knuckle with the nut.
Torque:
49 N*m{
500 kgf*cm
, 36 ft.*lbf
}
Install a new cotter pin.
NOTICE:
Further tighten the nut up to 60° if the holes for the cotter pin are not aligned.
10.
CONNECT TIE ROD ASSEMBLY RH
HINT:
Perform the same procedure as for the LH side.
11.
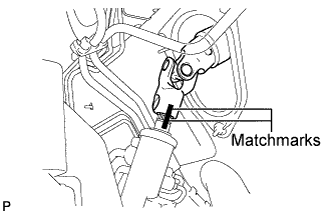
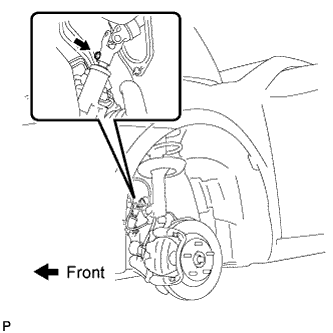
CONNECT STEERING INTERMEDIATE SHAFT ASSEMBLY
Align the matchmarks on the steering intermediate shaft and the power steering link assembly.
Install the bolt.
Torque:
35 N*m{
360 kgf*cm
, 26 ft.*lbf
}
12.
INSTALL FRONT WHEELS
Torque:
103 N*m{
1,050 kgf*cm
, 76 ft.*lbf
}
13.
CONNECT CABLE TO NEGATIVE BATTERY TERMINAL
14.
FLUSH POWER STEERING SYSTEM
NOTICE:
Do not reuse any drained power steering fluid regardless of appearance/condition.
Turn the engine OFF. Raise the front end of the vehicle off the ground until the wheels turn freely.
Remove the fluid return hose at the power steering pump reservoir inlet connector (*1).
Plug the reservoir return hose inlet connection on the power steering pump.
Place a large container under the fluid return hose in order to collect the draining fluid (*2).
Run the engine at idle while an assistant maintains the fluid level in the reservoir at "Full Cold" with new approved power steering fluid (*3).
NOTICE:
The following step may require 2 to 4 litres of power steering fluid until the draining fluid appears clear. Do not run engine without power steering fluid level at "Full Cold."
Turn the engine OFF. Turn the steering wheel fully to the left and fully to the right.
Remove the plug from the pump reservoir inlet connection and install the fluid return hose to the pump reservoir.
Maintain the fluid level at Full Cold.
Operate the engine at idle for approximately 15 minutes (*4).
Repeat steps (*1) through (*2). Check drained fluid for contamination. If foreign material is found, repeat steps (*3) through (*4) to complete a second flush. If foreign material is not found, go to step (*5).
If foreign material is still found after second flush, replace all of the hoses.
Remove the plug from the pump reservoir inlet connection and install the fluid return hose to the pump reservoir. Clean any spilled fluid (*5).
Jack up the front of the vehicle and support it with stands.
Turn the steering wheel.
With the engine stopped, turn the steering wheel slowly from lock to lock several times.
Lower the vehicle.
Start the engine.
Run the engine at idle for a few minutes.
Turn the steering wheel.
With the engine idling, turn the steering wheel left or right to the full lock position and keep it in that position for 2 to 3 seconds, then turn the steering wheel to the opposite full lock position and keep it there for 2 to 3 seconds.
Repeat this procedure several times.
Stop the engine.
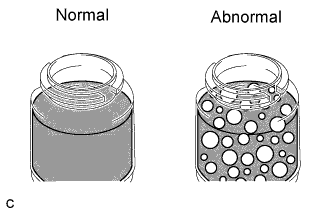
Check for foaming or emulsification.
HINT:
If the system has to be bled twice because of forming or emulsification, be sure to check for fluid leaks in the system.
With the engine stopped, check the fluid level in the fluid reservoir. If necessary, add fluid.
Fluid:
ATF DEXRON II or III, or equivalent
HINT:
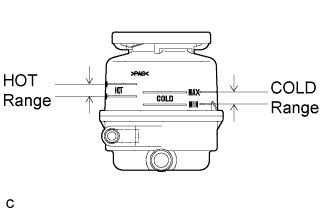
If the fluid is hot, check that the fluid level is within the HOT range on the fluid reservoir. If the fluid is cold, check that the fluid level is within the COLD range.
Start the engine and run it at idle.
Turn the steering wheel from lock to lock several times to raise fluid temperature.
Fluid temperature:
75°C (167°F) to 80°C (176°F)
Check for foaming or emulsification. If foaming or emulsification is identified, bleed the power steering system (Click here).
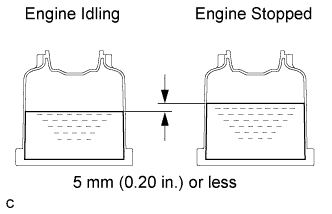
With the engine idling, measure the fluid level in the fluid reservoir.
Stop the engine.
Wait a few minutes and remeasure the fluid level in the fluid reservoir.
Maximum fluid level rise:
5 mm (0.20 in.)
If a problem is found, bleed the power steering system (Click here).