Back Sonar Sensor Circuit
Circuit diagnosis · Vehicles built from Jun 2009
DESCRIPTION
This circuit consists of the sensor power supply, sensor GND and sensor signal wires between the clearance warning ECU assembly and ultrasonic sensors. The ultrasonic sensors are digital sensors.WIRING DIAGRAM
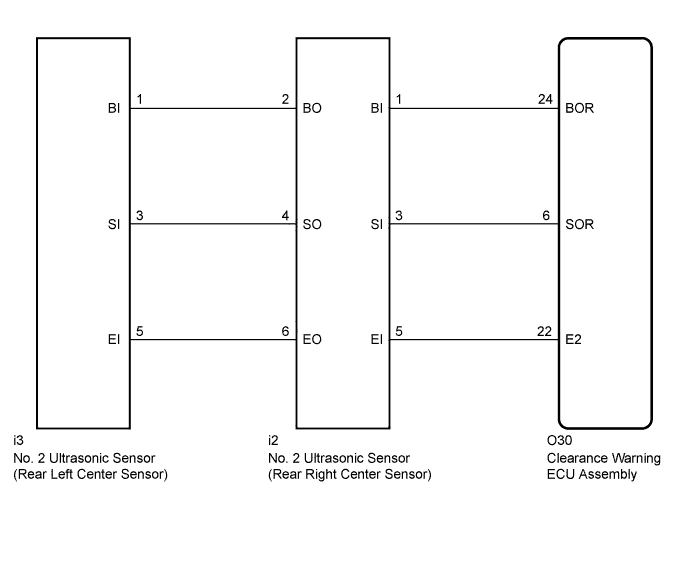

INSPECTION PROCEDURE
| 1. CHECK HARNESS AND CONNECTOR (CLEARANCE WARNING ECU - REAR RIGHT CENTER SENSOR) |

Disconnect the O30 connector from the clearance warning ECU assembly.
Disconnect the i2 connector from the No. 2 ultrasonic sensor (rear right center sensor).
Measure the resistance according to the value(s) in the table below.
- Standard Resistance:
Tester Connection
Condition
Specified Condition
O30-24 (BOR) - i2-1 (BI)
Always
Below 1 Ω
O30-6 (SOR) - i2-3 (SI)
O30-22 (E2) - i2-5 (EI)
O30-24 (BOR) - Body ground
10 kΩ or higher
O30-6 (SOR) - Body ground
O30-22 (E2) - Body ground
|
|
||||

| OK | |
 |
| 2. INSPECT CLEARANCE WARNING ECU ASSEMBLY |
Reconnect the O30 connector to the clearance warning ECU assembly.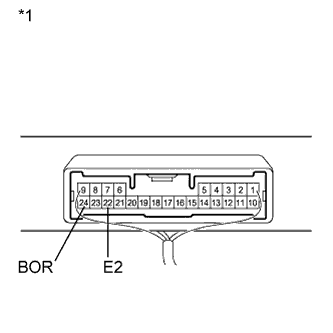
Measure the resistance according to the value(s) in the table below.
- Standard Resistance:
Tester Connection
Condition
Specified Condition
O30-22 (E2) - Body ground
Always
Below 1 Ω
Measure the voltage according to the value(s) in the table below.
- Standard Voltage:
Tester Connection
Switch Condition
Specified Condition
O30-24 (BOR) - Body ground
Ignition switch on (IG), clearance sonar main switch on
7.2 to 8.8 V
Text in Illustration *1
Component without harness connected
(Clearance Warning ECU Assembly)
|
|
||||
| OK | |
|
| 3. CHECK ULTRASONIC SENSOR (REAR RIGHT CENTER SENSOR) |
Remove the No. 2 ultrasonic sensor (rear right center sensor) (Click here).
Measure the resistance according to the value(s) in the table below.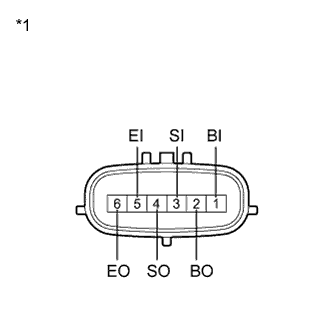
- Standard Resistance:
Tester Connection
Condition
Specified Condition
1 (BI) - 5 (EI)
Always
10 kΩ or higher
1 (BI) - 2 (BO)
Always
10 kΩ or higher
3 (SI) - 4 (SO)
Always
Below 1 Ω
5 (EI) - 6 (EO)
Always
Below 1 Ω
Text in Illustration *1
Component without harness connected
(Ultrasonic Sensor (Rear Right Center Sensor))
|
|
||||
| OK | |
|
| 4. CHECK HARNESS AND CONNECTOR (REAR RIGHT CENTER SENSOR - REAR LEFT CENTER SENSOR) |
Disconnect the i2 and i3 connectors from the ultrasonic sensors.
Measure the resistance according to the value(s) in the table below.
- Standard Resistance:
Tester Connection
Condition
Specified Condition
i2-2 (BO) - i3-1 (BI)
Always
Below 1 Ω
i2-4 (SO) - i3-3 (SI)
i2-6 (EO) - i3-5 (EI)
i2-2 (BO) - Body ground
10 kΩ or higher
i2-4 (SO) - Body ground
i2-6 (EO) - Body ground
|
|
||||
| OK | |
|
| 5. REPLACE ULTRASONIC SENSOR (REAR RIGHT CENTER SENSOR) |
Replace the No. 2 ultrasonic sensor (rear right center sensor) with a new or a known good one (Click here).
| NEXT | |
|
| 6. CHECK TOYOTA PARKING ASSIST-SENSOR SYSTEM |
Check the operation of the Toyota parking assist-sensor system (Click here).
- Result:
Result
Proceed to
Toyota parking assist-sensor system is malfunctioning
A
Toyota parking assist-sensor system is normal
B
|
|
||||
| A | |
|
| 7. REPLACE ULTRASONIC SENSOR (REAR LEFT CENTER SENSOR) |
Replace the No. 2 ultrasonic sensor (rear left center sensor) with a new or a known good one (Click here).
| NEXT | |
|
| 8. CHECK TOYOTA PARKING ASSIST-SENSOR SYSTEM |
Check the operation of the Toyota parking assist-sensor system (Click here).
- Result:
Result
Proceed to
Toyota parking assist-sensor system is malfunctioning
A
Toyota parking assist-sensor system is normal
B
|
|
||||
| A | ||
 |
||
| ||